
Cómo editar o eliminar un flujo de mejora
Vea cómo crear un flujo de mejora para contexto. Este artículo explica cómo editar o eliminar un flujo de mejora.
Nota: Actualmente hay 3 plantillas para tableros de mejora y flujos de mejora: PDCA, Kanban y 8D. Las 3 plantillas comparten las mismas opciones de edición. Los ejemplos de este artículo usan la plantilla PDCA.
Cómo acceder al editor de flujos de mejora
Así puede acceder al editor de flujos de mejora:
- Haga clic en “Mejora continua” en el panel lateral.
- Haga clic en “Configuración”.
- Haga clic en el icono de tres puntos junto al flujo de mejora que desea editar.
- Haga clic en “Editar flujo”.
Allí verá 5 pestañas del editor: las pestañas General, Flow Template, Advanced, Docx Reports y Parameters. Simplemente haga clic en una pestaña para abrirla. Cubriremos cada pestaña en las secciones siguientes.
Pestaña General
La pestaña General es la primera pestaña que aparece cuando abre el editor de flujos de mejora. Esto es lo que puede editar en esta pestaña:

- Haga clic para abrir la pestaña General.
- Aquí puede editar el nombre del flujo de mejora.
- Seleccione si la persona que envía un ticket queda suscrita automáticamente a la incidencia vinculada a ese ticket. Si está suscrita, recibirá un correo electrónico cada vez que la incidencia cambie de columna.
- Introduzca el número máximo de días concedidos para resolver una incidencia listada en este flujo de mejora (si procede).
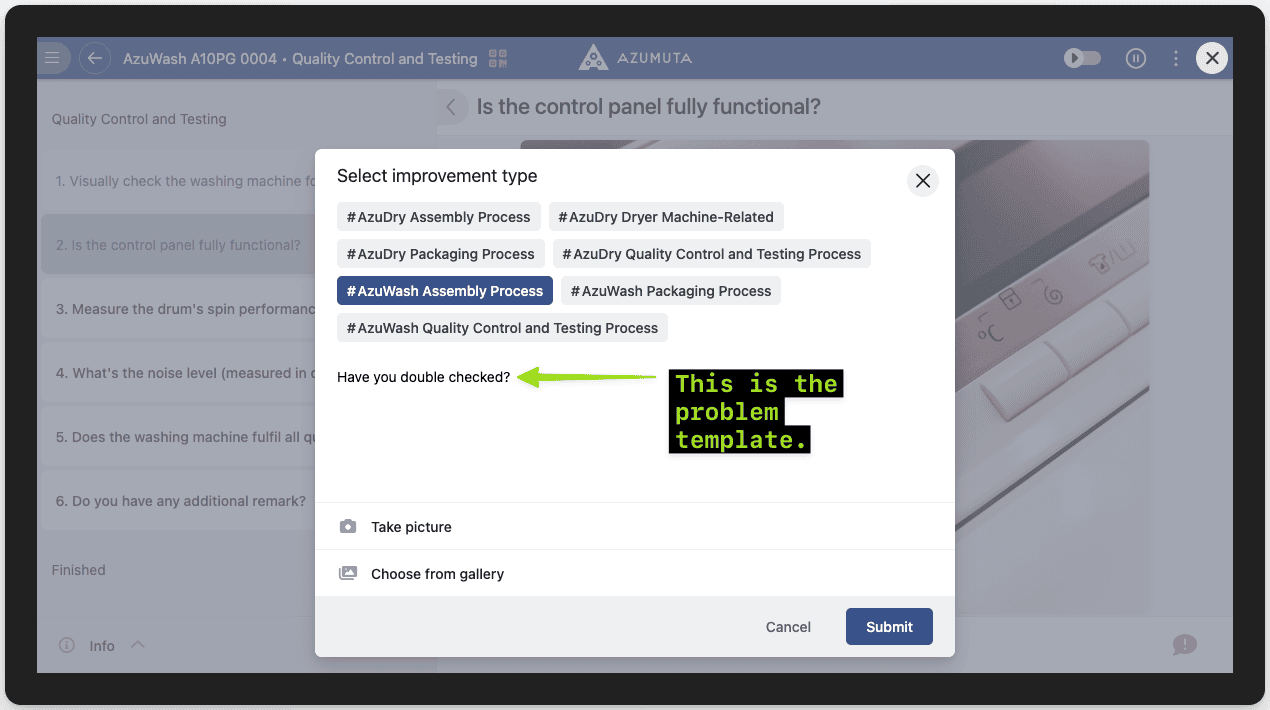
- Inserte la plantilla de problema (si procede). Una plantilla de problema es un texto que aparecerá en un ticket (como se muestra en la imagen inferior). Generalmente se usa para dar una instrucción al operario que va a enviar un ticket.
- Inserte una checklist (si procede).
- Cuando termine de editar, haga clic en “Guardar”. Si desea continuar sin guardar los cambios realizados, haga clic en “Cancelar”.

Pestaña Flow Template
De aquí proviene la palabra “flow” en “improvement flow”. Un flujo de mejora consiste en varias columnas. Una columna representa una fase de acción que debe realizarse para resolver una incidencia.

Los nombres de las columnas varían según la plantilla de flujo de mejora que use. Por ejemplo, en la plantilla PDCA hay 6 columnas, que son:
- Plan
- Hacer
- Comprobar
- Actuar
- Rechazado
- Archivado (para las incidencias que se han resuelto)
Vea cómo editar el nombre de cada columna.

Puede añadir varios ítems por columna. Explicaremos cómo añadir un ítem y cómo editarlo en las secciones siguientes.
Cómo añadir un ítem a una columna
Puede añadir distintos ítems a una columna de flujo de mejora. Así es como se añade uno:
- Haga clic en “Add Item” en la columna objetivo.
- Seleccione el ítem deseado.
- Introduzca los datos necesarios.
- Cuando termine, haga clic en “Guardar”.
Estas son las opciones de ítem disponibles para cada columna:

- Haga clic para añadir una tarea (puede escribir la descripción de la tarea directamente. Si el ítem no implica pedir una firma o rellenar una checklist, recomendamos escoger este tipo de ítem).
- Haga clic para añadir una solicitud de firma para una persona específica. (Una firma sirve para aprobar que un operario ha completado todos los ítems requeridos dentro de una columna y está listo para pasar a la siguiente. Normalmente se pide a un supervisor o responsable).
- Haga clic para añadir una solicitud de firma para un grupo de usuarios.
- Haga clic para añadir una checklist.
Cómo editar un ítem en una columna
Para editar un ítem en una columna, simplemente haga lo siguiente:
- Haga clic en el icono de tres puntos junto al ítem que desea editar.
- Realice las modificaciones deseadas.
- Cuando termine, haga clic en “Guardar”.
Las opciones de configuración difieren ligeramente según el tipo de ítem. Aquí están las opciones de configuración por tipo:
Editar una tarea

- Edite aquí la descripción de la tarea.
- Haga clic para asignar la tarea a usted mismo.
- Haga clic para asignar la tarea a una persona específica.
- Haga clic para asignar la tarea a un grupo de usuarios específico.
- Haga clic para eliminar la persona/grupo asignado (solo puede hacerse si ya hay una persona o grupo asignado).
- Seleccione si desea que la persona/grupo asignado reciba un correo automático de Azumuta cuando una incidencia llegue a esta columna.
- Seleccione si la persona/grupo que complete esta tarea quedará suscrito a la incidencia vinculada. Si alguien está suscrito a una incidencia, recibirá un correo automático cada vez que esa incidencia cambie de estado.
- Haga clic para eliminar la tarea.
- Cuando termine de editar, haga clic en “Guardar”. Si desea continuar sin guardar los cambios realizados, haga clic en “Cancelar”.
Editar una solicitud de firma a una persona/a un grupo de usuarios

- Si elige esta opción, usted es la única persona autorizada para firmar esta solicitud de firma.
- Seleccione la persona autorizada para firmar esta solicitud.
- Seleccione el grupo de usuarios autorizado para firmar esta solicitud.
- Seleccione si desea que la persona/grupo asignado reciba un correo automático de Azumuta cuando una incidencia llegue a esta columna.
- Seleccione si la persona/grupo que haya dado la firma quedará suscrito a la incidencia vinculada. Si alguien está suscrito a una incidencia, recibirá un correo automático cada vez que esa incidencia cambie de estado.
- Haga clic para eliminar la solicitud de firma.
- Cuando termine de editar, haga clic en “Guardar”. Si desea continuar sin guardar los cambios realizados, haga clic en “Cancelar”.
Editar una checklist

- Haga clic para ver la instrucción de trabajo de la checklist.
- Haga clic para asignar la checklist a usted mismo.
- Haga clic para asignar a una persona específica la cumplimentación de la checklist.
- Haga clic para asignar a un grupo de usuarios la cumplimentación de la checklist.
- Haga clic para eliminar la persona/grupo asignado (solo puede hacerse si ya hay una persona o grupo asignado).
- Seleccione si desea que la persona/grupo asignado reciba un correo automático de Azumuta cuando una incidencia llegue a esta columna.
- Seleccione si la persona/grupo que rellene la checklist quedará suscrito a la incidencia vinculada. Si alguien está suscrito a una incidencia, recibirá un correo automático cada vez que esa incidencia cambie de estado.
- Haga clic para eliminar la checklist.
- Cuando termine de editar, haga clic en “Guardar”. Si desea continuar sin guardar los cambios realizados, haga clic en “Cancelar”.
Pestaña Advanced
Vea las columnas en un flujo de mejora para contexto. Esta sección muestra cómo usar estas columnas de forma coordinada.
La pestaña Advanced consiste en 2 elementos: columnas y transiciones. En la pestaña Advanced, una columna representa una fase de acción que debe realizarse para resolver una incidencia (igual que en la pestaña Flow Template).
Los nombres de las columnas varían según la plantilla de flujo de mejora que use. Por ejemplo, en la plantilla PDCA hay 6 columnas, que son:
- Plan
- Hacer
- Comprobar
- Actuar
- Rechazado
- Archivado (para las incidencias que se han resuelto)
Mientras tanto, una transición funciona como puente entre columnas. Una transición lleva un ítem a otra columna, según un escenario preconfigurado.
La imagen inferior muestra la distinción entre una columna y una transición.

- Haga clic para abrir la pestaña Advanced.
- Esto es una columna.
- Esta es la lista de transiciones para esta columna.
Cómo añadir un ítem a una columna
Puede añadir distintos ítems a una columna de flujo de mejora. Así es como se añade uno:
- Haga clic en “Add Item” en la columna objetivo.
- Seleccione el ítem deseado.
- Introduzca los datos necesarios.
- Cuando termine, haga clic en “Guardar”.
Nota: Si añadió un ítem en la pestaña Flow Template, ese ítem también aparecerá en la misma columna en la pestaña Advanced. Y a la inversa, si añadió un ítem en la pestaña Advanced, también aparecerá en la misma columna en la pestaña Flow Template.
Estas son las opciones de ítem disponibles para cada columna:

- Haga clic para añadir una tarea (puede escribir la descripción de la tarea directamente. Si el ítem no implica pedir una firma o rellenar una checklist, recomendamos escoger este tipo de ítem).
- Haga clic para añadir una solicitud de firma para una persona específica (una firma sirve para aprobar que un operario ha completado todos los ítems requeridos dentro de una columna y está listo para pasar a la siguiente. Normalmente se pide a un supervisor o responsable).
- Haga clic para añadir una solicitud de firma a un grupo de usuarios.
- Haga clic para añadir una checklist.
Cómo editar un ítem en una columna
Editar un ítem en una columna en esta pestaña funciona igual que en la pestaña Flow Template. Consulte los enlaces siguientes para ver cómo editar un ítem en una columna según el tipo de ítem:
- Cómo editar una tarea
- Cómo editar una solicitud de firma a una persona/a un grupo de usuarios
- Cómo editar una checklist
Nota: Si editó un ítem en la pestaña Flow Template, ese ítem también se actualizará automáticamente en la pestaña Advanced. Y a la inversa, si editó un ítem en la pestaña Advanced, el mismo ítem se actualizará automáticamente en la pestaña Flow Template.
Cómo añadir una transición
- Haga clic en “Add transition” en la columna objetivo.
- Seleccione una de las opciones disponibles en el desplegable “When”.
- Seleccione una de las opciones disponibles en el desplegable “Then move to”.
- Cuando termine, haga clic en “Guardar”.
Los desplegables “When” y “Then Move to” tienen una relación de causa y efecto.
Siempre que ocurra el evento del desplegable “When”, este provocará que ocurra el evento del desplegable “Then Move to”.
Cómo editar una transición

- Para añadir una transición adicional a esta columna, haga clic en “Add transition”.
- Haga clic para cambiar el contenido del desplegable “When”.
- Haga clic para cambiar el contenido del desplegable “Then move to”.
- En Azumuta, todas las incidencias avanzarán automáticamente a la siguiente columna si no quedan ítems pendientes (ya sea porque todos los ítems de esta columna se han completado o porque no se añadieron ítems en esta columna). Si desea evitar que una incidencia avance automáticamente a la siguiente columna porque no se añadieron ítems en esta columna, entonces marque esta opción.
- Cuando termine de editar, haga clic en “Guardar”. Si desea continuar sin guardar los cambios realizados, haga clic en “Cancelar”.
Pestaña Docx Reports
Puede añadir informes Docx a un flujo de mejora. Vea las guías de informes Docx con información de tickets.
Pestaña Parameters
Puede añadir parámetros a un flujo de mejora. Estos parámetros aparecerán en todos los tickets que entren bajo el paraguas de este flujo de mejora, así como en todas las checklists vinculadas a esos tickets.
Esta funcionalidad es útil si tiene un flujo de mejora por cada artículo en su espacio de trabajo.
Cómo añadir un parámetro a un flujo de mejora
- Haga clic en la pestaña “Parameters”.
- Haga clic en “Add field”.
- Escriba la "Key" y el "Value" del parámetro.
- Cuando termine, haga clic en “Guardar”.
Cómo editar un parámetro en un flujo de mejora
- Haga clic en la pestaña “Parameters”.
- Realice las ediciones deseadas. Puede hacerlo en la "Key" y/o en el "Value" del parámetro.
- Cuando termine, haga clic en “Guardar”.
Cómo eliminar un parámetro en un flujo de mejora
- Haga clic en la pestaña “Parameters”.
- Haga clic en el parámetro que desea eliminar.
- Haga clic en el icono de la papelera.
- Cuando termine, haga clic en “Guardar”.
Cómo eliminar un flujo de mejora
- Haga clic en “Mejora continua” en el panel lateral.
- Haga clic en “Configuración”.
- Haga clic en el icono de tres puntos junto al flujo de mejora que desea eliminar.
- Haga clic en “Eliminar flujo”.
- Haga clic en “Eliminar”.