Azumuta Knowledge Base

Get started quickly or discover Azumuta in detail.

Quick Start

  • What Are the Quick Start Guides?
  • Quick Start: Azumuta Basics
  • Quick Start: The Freely Consultable Work Instructions Module
  • Quick Start: The Quality Management Module
  • Quick Start: The Audits & Digital Checklists Module
  • Quick Start: The Skill Matrix & Trainings Module
  • Quick Start: The Dashboards Add-on
  • Quick Start: The Continuous Improvement Add-on

How to Use Azumuta

  • Introduction to Azumuta
  • Welcome to Azumuta
    • Introduction to Azumuta
    • Navigating the Homepage (Admin View/Azumuta on Web)
    • Navigating the Sidebar (Admin View/Azumuta on Web)
    • The Navigation Breadcrumb
    • The Search Bar
    • How to Edit Your Azumuta Profile
    • Glossary
  • Work Instructions
    • What Is a Work Instruction?
    • What Is a Freely Consultable Work Instruction?
    • How to Create a Work Instruction
      • How to Create a Work Instruction
      • How to Add an Instruction Block to a Work Instruction
      • How to Add an Instruction Step to a Work Instruction
    • How to Edit a Work Instruction
      • How to Edit an Instruction Block
      • How to Edit an Instruction Step
      • How to Edit or Delete a Work Instruction or a Folder
      • How to Preview a Work Instruction
      • How to Improve a Work Instruction With Azumuta Intelligence
    • How to Use the Instruction Step Editor
      • Navigating Through the Work Instruction Step Editor
      • General
      • How to Add a Visual Page to a Work Instruction Step
      • How to Add an Image to a Work Instruction
      • How Does the Image Library Work?
      • Visuals in a Work Instruction
      • Parts
      • Equipments & Symbols
      • Videos
      • 3D Files
      • Link to Another Work Instruction or Instruction Step
      • SharePoint PDF
      • Time Study
    • Product Checks
      • What Is a Product Check?
      • Adding a Product Check to a Work Instruction
      • Basic Product Checks
      • Advanced Product Checks
      • Mandatory Product Checks and Fast Forward Mode
      • Double-Checks for an Instruction Step
      • Rules: Basic
      • Rules: Advanced
      • Peripherals
    • Variants
      • What Is a Variant?
      • How to Add a Variant and Use It in a Work Instruction
      • How to Edit a Variant
    • How to Create the Official Version of a Work Instruction
      • How to Create an Official Version of a Work Instruction
      • Single Person Approval
      • Multi Person Approval: Creating an Approval Board and an Approval Flow
      • The Approval Board Layout
      • Multi Person Approval: How to Edit or Delete an Approval Board
      • Multi Person Approval: How to Edit or Delete an Approval Flow
      • How to Enable Multi-Person Approval
      • How to Submit, Accept, and Decline an Approval Request
      • Triggers for Approval Boards and Approval Requests
    • How to See a Work Instruction's Revision History
      • Revision History
    • How to Add an Attachment to a Work Instruction
      • How to Add an Attachment to a Work Instruction
    • How to Print a Work Instruction or Save it as a PDF File
      • How to Print a Work Instruction or Save It as a PDF File
      • How to Print an Instruction Step or Save It as a PDF File
    • How to Share a Work Instruction
      • Sharing a Work Instruction/Folder/Article Category/Article (Public Sharing & Private Sharing)
    • Azumuta App: Work Instructions
      • Creating a Work Instruction via the Azumuta App
      • Editing a Work Instruction via the Azumuta App
      • Viewing a Work Instruction as an Operator
      • Work Instructions Layout from the Operator’s Perspective
      • How to Open an Attachment on the App
    • How to Export and Import a Work Instruction
      • What Is Exporting and Importing a Work Instruction?
      • How to Export and Import a Work Instruction
      • Converting a Microsoft Office Document into an Azumuta Work Instruction
      • Converting a Video or an Audio File Into an Azumuta Work Instruction
  • Quality Management
    • What Is the Quality Management Module?
    • How to Create a Work Instruction on the Quality Management Module
      • How to Create a Work Instruction on the Quality Management Module
      • How to Populate a Work Instruction on the Quality Management Module
      • How to Edit a Work Instruction on the Quality Management Module
      • Recordings in the Quality Management Module
    • Articles and Article Categories
      • What Is an Article Category? What Is an Article? And What’s the Difference?
      • How to Create and Edit an Article Category (via Azumuta on Web)
      • How to Create and Edit an Article Category (via the App)
      • How to Create and Edit an Article
      • How to Share an Article or An Article Category Publicly
    • How to Create a Product Order
      • What Is a Product Order?
      • What Are the Available Methods on Creating a Product Order?
      • How To Create a Product Order Manually
      • How to Create a Product Order Automatically Based on ERP Configuration
      • How to Create a Batch Order
      • How to View Created Product Orders
    • How to Activate a Product Order
      • How to Activate a Product Order
    • How to Edit a Product Order
      • How to Edit a Product Order (Basic)
      • How to Edit a Product Order (Advanced)
    • How to Execute a Product Order
      • How to See Product Orders from the App
      • How to Execute a Product Order
    • How to Filter a Product Order
      • Filtering, Sorting, and Searching for Product Orders and Batch Orders
    • Product Order Linking
      • Product Order Linking
    • Parameters
      • What Is a Parameter?
      • How to Link Parameters to an Article
      • How to Create a Product Order Based on an Article That Has Pre-Configured Parameters
      • How to Link Parameters to a Manually Created Product Order Based on Article Category
      • How to Link Parameters to a Product Order Automatically Created In Azumuta Based on ERP Configuration
      • How to Check Which Parameters Are Linked to a Product Order?
      • How to Use Parameters on an Image in a Work Instruction
      • How to Use Parameters in a Work Instruction Step
      • How to Use a Parameter in a Product Check
      • Performing Calculations With Parameters
    • How To Monitor A Product Order
      • How to Download the Microsoft Excel Report of a Specific Product Order or Multiple Product Orders
      • How To Monitor The Status Of A Product Order
      • How to View the Work Instruction Report for a Product Order in Azumuta
      • Triggers for Product Orders and Article Categories
    • Docx Reporting for Product Orders
      • Introduction to Docx Reporting for Product Orders
      • How to Add a Docx Report to an Article Category
      • How to Download a Docx Report from a Product Order
      • How to Update a Docx Report on an Article Category
      • How to Edit or Delete a Docx Report on an Article Category
      • Basic Tags on a Docx Report
      • Answer Tags (Basic)
      • Answer Tags (Advanced)
      • Variant Tags
      • Displaying Images on a Docx Report
      • Ticket Tag
      • Parameter Tags
      • Conditional Parameter Tags
      • Recap Tags
    • Andon
      • What is Andon in Azumuta?
      • Getting Started With Andon
        • Getting Started With Andon
        • Creating the Ideal Andon System Structure
        • Creating an Andon Board
        • Creating an Andon Flow
        • Activating an Andon on a Device
      • Using Andon
        • How to Use an Andon System
        • Displaying Andon on a Dashboard
      • Editing or Deleting an Andon
        • Editing or Deleting an Andon Board
        • Editing or Deleting an Andon Flow
  • Audits & Digital Checklists
    • What Is the Audits & Digital Checklists Module?
    • How to Create an Audit
      • How to Create an Audit
      • How to Populate an Audit
      • How to Edit an Audit
      • Recordings in the Audits & Digital Checklists Module
    • How to Use the Planning Tool for Audits
      • Introduction to the Planning Tool for Audits
      • Planning Tabs for Audits
      • The Planning Tab’s Sidebar Settings (for Audits)
      • Events in a Planning Tab (for Audits)
      • How to Adjust the Time Zoom and Navigate to a Specific Date in the Planning Calendar (for Audits)
    • How to Plan an Audit
      • How to Plan an Audit via the Planning Calendar
      • How to Plan an Audit Based on Automatic Triggers
    • How to Execute an Audit
      • How to Execute an Audit as an Operator
      • How to Execute an Audit as an Admin
    • How to Edit a Scheduled Audit
      • How to Edit and Delete a Scheduled Audit
    • How to View an Audit Report
      • How to View and Download an Audit Report
    • Docx Reporting for Audits
      • Introduction to Docx Reporting for Audits
      • Tags to Use on a Docx Report (for Audits)
      • How to Add a Docx Report to an Audit
      • How to Download a Docx Report for an Audit Event
      • How to Update a Docx Report on an Audit
      • How to Edit or Delete a Docx Report (for Audits)
  • Skill Matrix & Trainings
    • What Is the Skill Matrix & Trainings Module?
    • How to Create a Work Instruction on the Skill Matrix & Trainings Module
      • How to Create a Work Instruction on the Skill Matrix & Trainings Module
      • How to Populate a Work Instruction on the Skill Matrix & Trainings Module
      • How to Edit a Work Instruction on the Skill Matrix & Training Module
      • Recordings in the Skill Matrix & Trainings Module
    • Competence Management
      • Skill Matrix: The Basics
      • How to Input the Competency Level of an Employee
      • How to View an Employee’s Personal Profile Page
      • Mandatory Training Indicator on a Work Instruction
    • How to Use the Planning Tool for Training Activities
      • Introduction to the Planning Tool for Training Activities
      • Planning Tabs for Training Activities
      • The Planning Tab’s Sidebar Settings (for Training Activities)
      • Events in a Planning Tab (for Training Activities)
      • How to Adjust the Time Zoom and Navigate to a Specific Date in the Planning Calendar (for Training Activities)
    • How to Plan, Execute, Edit, and Delete a Training
      • How to Plan a Training as an Admin
      • How to Plan a Training via the App as an Operator
      • How to Execute a Planned Training
      • How to Edit and Delete a Scheduled Training
    • How to View a Training Report
      • How to View a Training Report
  • Continuous Improvement
    • What Is the Continuous Improvement Add-on?
    • What Is a Ticket and an Issue?
    • How to Create an Improvement Board and an Improvement Flow
    • The Improvement Board Layout
    • How to Edit or Delete an Improvement Board
    • How to Edit or Delete an Improvement Flow
    • How to Add a Checklist to a Ticket
    • How to Submit a Ticket as an Operator
    • How to See the List of Issues and Open an Issue in the App
    • How to Follow up on a Submitted Ticket
    • How to Do Docx Reporting with Ticket Information
      • Introduction to Docx Reporting for Tickets
      • Tags to Use on a Docx Report (for Tickets)
      • How to Add a Docx Report to an Improvement Flow
      • How to Download a Docx Report from a Ticket
      • How to Update a Docx Report (for Tickets)
      • How to Rename or Delete a Docx Report (for Tickets)
  • Dashboards
    • What Is a Widget and a Dashboard?
    • How to Add a Widget and a Dashboard
    • Continuous Improvement Widgets
      • Amount of Issues per Status Over Time (Bar Chart)
      • Amount of Issues per Improvement Flow (Pie Chart)
      • Amount of Issues per Improvement Flow (Bar Chart)
      • Lost Hours Tracking Based on the Issue’s Improvement Flow (Pareto Chart)
      • Lost Hours Tracking Based on Checklist Answer (Pareto Chart)
      • Amount of Issue Checklists per Flow (Pareto Chart)
      • Amount of Issue Checklists per Answer (Pareto Chart)
    • Audit Widgets
      • Audit Report Widget
      • Answers on Number Checks Over Time (Line Chart) – for Audits
      • Audit Scores per Zone (Bar Chart)
      • Audit Scores Over Time per Zone (Line Chart)
      • Audit Scores Over Time per Zone (Heatmap)
      • Amount of Audits Over Time (Timeline)
      • Chosen Audit Answers
      • Amount of Finished Audits per User
    • Product Order Widgets
      • Product Order Report Widget
      • Answers on Number Checks Over Time (Line Chart) for Product Orders
      • Product Order Status Widget
      • The Amount of Product Orders per Status Table Widget (Grouped Based on Articles)
      • The Amount of Product Orders per Status Table Widget (Grouped Based on Batches)
      • Product Order Kanban Board Widget
      • Control Chart
      • Control Board (Individual Zones)
      • Control Board (Grouped Zones)
    • General Widgets
      • Notes Widget
    • How to Configure a Widget
      • Adjusting a Widget’s Timespan
      • Editing a Widget
    • How to Configure a Dashboard
      • How to Configure a Dashboard
  • Login
    • How to Login to Azumuta on Web
      • How to Login to Azumuta on Web as an Admin
    • How to Login to the Azumuta App
      • How to Login to the Azumuta App
      • How to Login to the Azumuta App With an Identifier
      • How to Login to the Browser Version of the App
      • How to Login to the Browser Version of the Azumuta App Using an Identifier
    • How to Reset Your Password
      • How to Reset Your Password
  • Azumuta App/Operator View
    • Introduction to the Azumuta App
    • How to Install the Azumuta App
    • The Azumuta App Homepage
    • How to Pin a Module/Folder/Article Category/Zone to the Homepage and the Sidebar on the App
    • Translating a Work Instruction as an Operator
    • The App's Sidebar
      • Using the Sidebar on the App
      • How to Switch Between Different User Accounts on the App
      • How to Sign Out from the App
  • Management
    • Variants
      • How to See the List of Variants on Your Workspace
      • How to Edit, Unlink, and Delete a Variant
    • Resources
      • What Is a Resource?
      • How to See the List of Parts in Your Workspace
      • How to Add, Edit, and Delete a Part
      • How to See the List of Equipment on Your Workspace
      • How to Add, Edit, and Delete an Equipment
      • How to See the List of Symbols in Your Workspace
      • How to Add, Edit, and Delete a Symbol
    • Users
      • How to Add a User Account to Azumuta
      • How to Manage User Accounts on a Workspace
      • How to Manage User Groups
      • User Rights
        • What Is a User Right?
        • How to Hide and Unhide a Module/Add-On/Functionality from Your Workspace
        • User Rights: The Management Tab
        • User Rights: The Explore Tab
        • User Rights: The Work Instructions Tab
        • User Rights: The Quality Management Tab
        • User Rights: The Audits & Digital Checklists Tab
        • User Rights: Skill Matrix & Trainings
        • User Rights: The Continuous Improvement Tab
    • Devices
      • How to See the List of Devices That Are Logged in on Your Workspace
      • How to Add, Edit, and Delete a Device
      • How to Set a Device to Automatically Open the First Pinned Item
      • Device Settings: The Basics
      • Device Settings: Work Instructions-Related
      • Device Settings: Product Order-Related
      • Device Settings: Peripheral-Related
  • Azumuta Connectivity
    • Introduction
    • Peripherals
      • What Is a Peripheral Device?
      • How to Add a Peripheral Device to Your Azumuta Workspace
      • How to Use a Peripheral Device
      • How to Configure a Peripheral Group or a Peripheral Device
      • Peripheral Presets
      • Digital Torque Wrench
        • Why Should You Integrate Your Digital Torque Wrenches to Azumuta?
        • How to Integrate a Digital Torque Wrench to Your Azumuta Workspace
        • Using a Digital Torque Wrench (Torque Check)
          • What Is a Torque Check?
          • How to Add a Torque Check to an Instruction Step
          • How to Perform a Torque Check
          • Peripheral Presets for a Digital Torque Wrench
      • DYMO Label Printer
        • Why Should You Integrate Your DYMO Label Printers to Azumuta?
        • How to Integrate a DYMO Label Printer to Azumuta
        • How to Use a DYMO Label Printer With Azumuta
        • Peripheral Presets for a DYMO Label Printer
    • Integrating With an ERP
      • ERP Integration
      • Azumuta’s REST API
      • Using Your Data in the REST API
      • Simple Entry Integration
    • Triggers
      • What Is a Trigger?
      • How to Edit an Delete a Trigger
      • Triggers for Article Categories and Product Orders
      • Triggers for Continuous Improvement Issues and Approval Requests
      • Triggers for Improvement Boards and Approval Boards
      • How to See the List of Triggers in Your Workspace and Each Trigger’s Usage History
  • Azumuta Intelligence
    • What Is Azumuta Intelligence?

What's New?

  • What Are the “What’s New” Guides?
  • 2025
    • 2025 Updates Recap
    • May 2025 [Release v0.509.0 - v0.512.0]
      • Converting a Video or an Audio File into an Azumuta Work Instruction
      • Product Order Search Based on Parameter Values
      • Multi-Answer Number Check
    • April 2025 [Release v0.503.0 - v0.508.0]
      • Image Padding on Docx Reports
      • New API Docs for Batch Orders
      • New Filter to Distinguish Product Orders and Batch Orders
      • Enhancements to the Public Sharing Functionality
      • Importing Work Instructions from Microsoft Office
      • Card View for Items
      • Official Microsoft Word, Excel, and PowerPoint Icons
      • Higher Precision Timeslots for Training Events
      • Enhanced UI for Linked Work Instructions and Instruction Steps
    • March 2025 [Release v0.500.0 - v0.502.0]
      • Instant Work Instruction Translation
    • February 2025 [Release v0.493.0 - v0.499.0]
      • Using REST API Endpoint to Upload & Remove Attachment on Issues
      • Updated Video Editor
      • Parameters Can Now Be Included on Microsoft Excel Product Order Reports
      • Plan Training Activities Directly from a Skill Matrix
      • The Approval Workflows Are More Accessible Now
      • Unlimited Product Orders Selection
    • January 2025 [Release v0.491.0 - v0. 492.0]
      • Work Instruction UI Enhancement: Expandable Tag Lists
      • Keyboard Shortcuts in Editing Work Instructions
      • In-Line Text Editing in Work Instructions
      • Webhook on Peripheral Integrations
      • Regular Expressions (RegEx) on Rules
  • 2024
    • 2024 Updates Recap
    • December 2024 [Release v0.490.0]
      • Confirmation Pop-up Menu to Prevent Unwanted Edits in Variant Configurations
    • November 2024 [Release v0.485.0 - v0.489.0]
      • Improved UI for Top-Level Items
      • Filtering Product Orders Based on Their Parameters
      • Enhanced Docx Reporting Capabilities for Torque Checks and Parts Checks
      • Choosing a Peripheral Group to be Used by Quality Controllers in Double-Checks
      • New UI for Article and Article Category Search
    • October 2024 [Release v0.481.0 - v0.487.0]
      • Quick Access Options on the Items in the App’s Search Bar
      • Print Multiple Labels in One Go Using Dymo Printers
      • Upload Date Filter on the Image Library
      • Duplicate Instruction Steps
      • Accidental Deletion Deterrent
      • New Toggle to Prevent the Automatic Transition of Issues Between Columns in Improvement Boards
    • September 2024 [Release v0.480.0]
      • Simple Entry Integrations
      • Automatically Proceed to the Next Instruction Step After Finishing the Parts Check
      • Filtering Product Orders Based on Execution Date
    • August 2024
      • Attachment on Parts
      • Timer for Instruction Steps
      • 3 New Audit Widgets
      • The “Show Archived” Option Has Been Moved
    • July 2024
      • Permissions Tab in Improvement Boards and Approval Boards
      • Variants Are Now Displayed on the Work Instruction Approval Menu
    • June 2024
      • Issues Will Now Automatically Move to the Next Column When There Are No Remaining Outstanding Actions
      • Comparison Tool in Work Instruction Approval Requests
      • Reassigning Signature Requests
      • Global Triggers for Article Categories and Issues
    • April 2024
      • Configurable JSON Body When Using Webhooks
      • Trigger Usage History
      • Tooltip Shortcut for the 3D File Viewer
      • New Integration Possibility: BarTender
      • Parts Check
    • March 2024
      • Symbol-Based Workflow Automation
      • Company Logo and Corporate Color Scheme on PDF Templates
    • February 2024
      • The Torque Check Now Has a Torque Angle Gauge
      • 2 New Endpoints for Our REST API Have Been Added
      • 2 New Triggers Were Added
  • 2023
    • 2023 Updates Recap
    • December 2023
      • Preview Specific Instruction Steps in PDF Format
      • Filtering Work Instructions Based on Their Status in the Search Bar
      • Standardized Color Palette
    • November 2023
      • Microsoft Excel Report for Batch Orders
      • New Interface for Part Selection
  • Azumuta
  • Knowledge Base
  • How to Use Azumuta
  • Quality Management
  • Andon
  • Using Andon
  • Displaying Andon on a Dashboard
View Categories

Displaying Andon on a Dashboard

Another advantage of using andon in Azumuta is that you can have a helicopter view of your plant’s production status. By using our dashboards functionality, you can see whether there are any active andon call – and on from specific part of the plant was it called from. That way, you can take the necessary corrective actions as quickly and precisely as possible.

In this guide webpage, we will show you how to display andon in a dashboard. In general, this entire process takes 5 phases:

  • Phase 1: Creating the Structure
  • Phase 2: Creating the Dashboard
  • Phase 3: Configuring the Dashboard
  • Phase 4: Creating Product Orders
  • Phase 5: Displaying Andon on a Widget


We will provide a detailed explanation of each phase in the guide sections below

Phase 1: Creating the Structure #

Before you can display andon on a dashboard, you will need to first create the ideal andon system structure in your workspace. Get started with Andon.


Phase 2: Creating the Dashboard #

After you’ve created the structure in phase 1, the next phase is to create a dashboard. Click here to see how to create a dashboard.


Phase 3: Making the Dashboard Automatically Refresh #

After the dashboard has been created, you will need to configure it so that the dashboard automatically refreshes. To do it, please follow the steps below:

  1. Navigate to the dashboard that you’ve created on phase 2.
  2. Click on the three-dot icon next to the dashboard’s name.
  3. Click on “Edit dashboard”.
  4. Under the “Auto refresh interval in seconds” field, fill in the interval time (in seconds) between each automatic refresh. The interval time should be at least 5 seconds long.
  5. When you’re done, click on “Save”.


Phase 4: Creating a Product Order and Assigning a Work Instruction from That Product Order to a Zone #

Afterward, you will need to create a product order. Click here to learn more about product orders, and the possible methods to create them.

A product order contains one or several work instructions. After a product order has been made, you will need to assign one or several work instructions from that product order to the zone(s) that you’ve made in phase 1. Only assign the work instruction(s) that you would like to be displayed on the dashboard.

Here’s how to assign a work instruction to a zone:

  1. Navigate to the product order that contains the work instruction that you would like to assign to a zone.
  2. Click on the three-dot icon next to the work instruction that you would like to assign to a zone.
  3. Click on “Assign to zones”.
  4. Select the zone(s) that you would like to assign this work instruction to. You can assign a work instruction to one or multiple zones.


Note: We recommend that all instruction steps within the work instruction have a time study. That way, your widgets will show punctuality & productivity related data. You can read more about it on phase 5.


Phase 5:  Displaying Andon on a Dashboard Widget #

The fifth phase involves displaying andon on a widget.

In the guide sections below, we will explain how to create & use the control board (individual zones) widget for displaying Andon.

The Control Board (Individual Zones) Widget #

If you’re not already familiar with this widget, you can find detailed information on the control board (individual zones) widget in this guide.

Creating the Widget #

  1. Go to the dashboard that you’ve made in phase 2.
  2. Click on the yellow plus button on the bottom right of the screen.
  3. Navigate to “Control board (individual zones)” under the “Product Orders” widget category, and click on “Create”.
  4. Select the zone(s) that you would like to display in this widget. The zones here should refer to the structure that you’ve made in phase 1.
  5. For the  “Default tolerance percentage” field, enter the time tolerance (as a percentage) for the given time study. For example, if the time study is 60 seconds and the tolerance percentage is set to 10%, that means that the time tolerance is 6 seconds. This means that the total allowed time in this widget for that particular work instruction is 66 seconds (60 seconds + 6 seconds). The widget’s bar will stay green for 66 seconds and turn orange as a warning once this time tolerance has been exceeded.
  6. For the “Board” field, select the andon board that will be linked to this widget.
  7. For the “Highlight zone in red for these columns” field, we recommend that you select only the first column that appears in this option. That way, whenever an andon issue is reported, the zone where the andon is reported from will be highlighted in red. That way, you can immediately tell from which zone is the andon called. Meanwhile, the second column only concenns andon issues that are deemed as solved. Check out the “Using the Widget” guide section to see how it works.
  8. For the “Play sound for these columns” field, select which andon column(s) will trigger a specific sound – whenever an andon issue reaches this andon column. We recommend you to select only the first column that appears in this option, so that you’ll be notified only when a new andon issue is reported .The second column only concenns andon issues that are deemed as solved.
  9. For the “Tag of audio attachment of each zone” field, select the audio file tag that will be played on this widget.
  10. Click on “Add”.
  11. Drag the widget to make it bigger.
  12. Select the widget’s timescope.
  13. Click on “Save”.
  14. Click on “Yes”.


Using the Widget #

This widget works by showing the following information:

Azumuta Andon Dashboard showing individual station data including plan, actual, progress, Andon status, product order, and work instruction details for multiple AzuWash assembly lines.

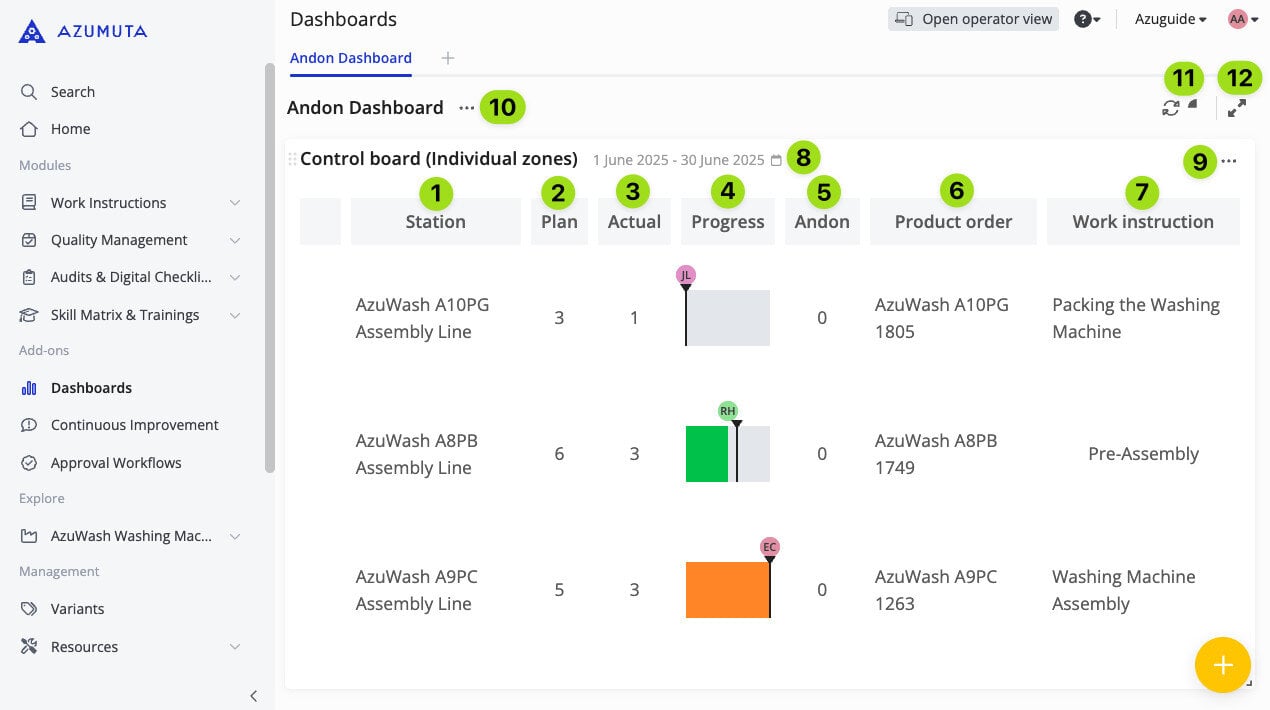
  1. This column shows the list of workstations (also known as zones) that are displayed on this widget.
  2. This column shows the number of product orders that have been assigned to each zone.
  3. This column shows the number of finished product orders in each zone.
  4. The Progress column shows the live progress of the work instruction on each zone currently being worked on by your operators. The black line on each chart represents the time study for each work instruction. If a work instruction’s progress is behind schedule (and the additional tolerance that you’ve set when creating the widget), then that work instruction’s progress bar will turn orange.
  5. This column shows the number of times an andon has been called on each zone.
  6. This column shows the name/number of the product order that is currently being worked on in each zone.
  7. This column shows the name of the work instruction that is currently being worked on in each zone.
  8. Click here to change the widget’s timescope.
  9. Click here to access the widget’s settings.
  10. Click here to access the dashboard’s settings.
  11. Click here to manually refresh the dashboard.
  12. Click here to make the dashboard go full screen.


Moreover, whenever an andon is called, the zone where the andon call originated will be highlighted in red. That way, you can immediately tell where attention is needed and respond promptly to the andon call. Additionally, a sound of your choice (if you added one when creating the widget) will also play.

Have a look at the video below to see how the widget appears when an andon is being called (we choose to use the sound of an alarm for this widget).


Do you have further questions? Click here and send us a message!

How can we help?

Updated on 25 July 2025
How to Use an Andon System
Table of Contents
  • Phase 1: Creating the Structure
  • Phase 2: Creating the Dashboard
  • Phase 3: Making the Dashboard Automatically Refresh
  • Phase 4: Creating a Product Order and Assigning a Work Instruction from That Product Order to a Zone
  • Phase 5:  Displaying Andon on a Dashboard Widget
    • The Control Board (Individual Zones) Widget
      • Creating the Widget
      • Using the Widget