
Double-Checks for an Instruction Step
What Is a Double-Check?
As the name suggests, a double-check is an Azumuta feature that allows you to verify the answer to a product check within an instruction step. After a product check has been answered by an operator, a user from a selected user group (usually a quality controller) will be assigned to verify that operator’s answer.
This feature is designed to reduce possible errors by requiring a secondary confirmation to a product check. You should use this feature for instruction steps that require uncompromising precision.
Note: At the moment, this feature is not yet enabled for all Azumuta customers. If you would like to use this feature immediately, please contact us through our support@azumuta.com email.
How to Add a Double-Check to an Instruction Step?
Adding a double-check to a product check requires 2 phases:
Phase 1: Setting up the Double-Check on the Instruction Step
The first thing that you will need to do is to set up the double-check on a product check. Here’s how:
- Navigate to the targeted instruction step. The instruction step must contain a product check.
- Click on the “Checks” tab.
- Scroll down until you see “Double-check options”. Click on it to expand it.
- Set up the double-check. We provided further explanations on the configuration options under the video.
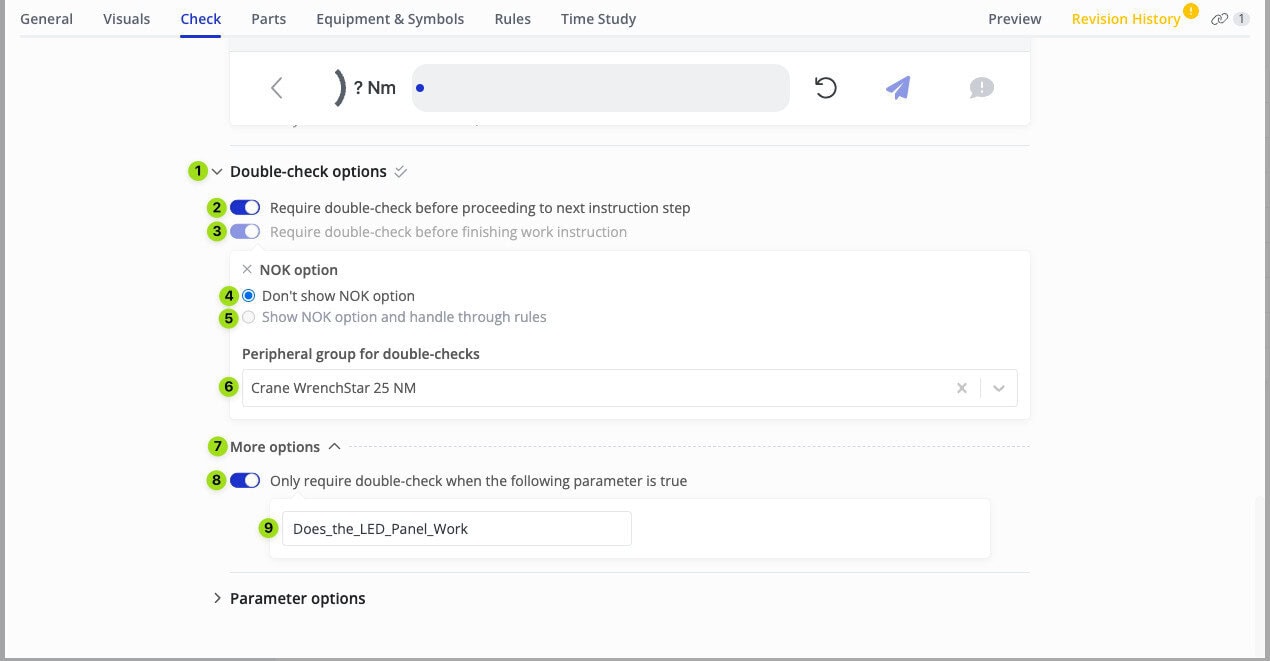
- Click to expand the “Double-check options”.
- If you activate this toggle, then the operator can only proceed to the next instruction step if the person from the authorized user group (usually a quality controller) has finished the double-check. Moreover, if you activate this toggle, then the toggle on No.3 will always be activated as well.
- If you activate this toggle, then the operator can only finish the work instruction if the person from the authorized user group has completed the double-check.
- This item is still under development. We will update the guide once it has been completed.
- This item is still under development. We will update the guide once it has been completed.
- Select the peripheral group that must be used in the double-check process. The person from the authorized user group can only use a peripheral device that is included in this peripheral group.
- Click to expand “More options”.
- If you activate this toggle, then the double-check will only be required if this instruction step is linked to a product order that contains the parameter listed on No.9. See the parameters guides to learn more about parameters.
- Related to No.8, write the parameter’s key on this field.
Phase 2: Enabling Double-Check on the Selected Device
After you’ve finished the first phase, then you should proceed to phase 2, which consists of the following steps:
- Click on “Devices”.
- Click on the three-dot icon next to the device where you would like to enable the double-check on.
- Click on “Edit device”.
- Click on the “Work instructions” tab.
- Under “Allow double-checks by”, select the user group that will be assigned to perform the double-check. Anyone from this user group will have the ability to perform any double-check on this device.
- Click on the “Security” tab.
- Make sure that the “Allow authority checks using login identifier” box is ticked.
- Click on “Save”.
How to Give an Identifier Code to a User
Make sure that the user(s) that’s assigned to perform the double-check already has an identifier code. Here’s how to give an identifier code to a user:
- Click on “Users”.
- Click on the three-dot icon next to the user that you would like to give an identifier code to.
- Click on “Edit user”.
- On the “Login identifier” field, type in the identifier code for that user.
- Click on “Save”.
You can also give yourself an identifier code using this method.
How Does the Double-Check Work?
After you’ve completed the 2 phases above, the double-check can now be used on that particular instructions step. But how does it actually work?
Well, an operator should first answer the product check that contains a double-check. Afterward, here’s what will happen in the double-checking process:
- One of the users from the authorized user group (usually a quality controller) that has been selected on this phase must navigate to that instruction step. When following the steps in this guide section, that user must use the operator view, ideally using the Azumuta App on a tablet.
- The user from the authorized user group should click on “Needs double-check”.
- The user from the authorized user group should type in their identifier code and click on ”Authorize”. See how to give an identifier code to a user.
- If the user from the authorized user group agrees with the answer that was provided by the operator, then that user should simply click on the green checklist button.
- If the user from the authorized user group would like to (temporarily) skip this double-check and move on to another double-check, then that user should click on “Skip”.
- If the user from the authorized user group disagrees with the answer provided by the operator, then that user can edit the operator’s answer directly in the product check field (in the video below, we used the Single Line Check as an example). Afterward, that user should click on the green checklist button. This new answer will be shown on the product order report (instead of the operator’s original answer). This is the scenario that we took in the video below.
How to Edit or Delete a Double-Check in an Instruction Step
To edit or delete a double-check on an instruction step, here’s what you will need to do:
- Navigate to the instruction step that contains a double-check.
- Click on the “Checks” tab.
- Scroll down until you see “Double-check options”. Click on it to expand it.
- Do the desired edits. If you would like to delete the double-check, simply deactivate all of the toggles that fall under the “Double-check options”.