
How to Create an Improvement Board and an Improvement Flow
How to Create an Improvement Board
- Go to “Continous Improvement” on the sidebar.
- Click on “Settings”.
- Click the plus button next to “Intro”.
- For the template, choose one of the available templates under “Continous Improvement” (and not “Work Instruction Approval”).
- Fill in the improvement board’s name.
- If you want the issues that fall under this improvement board to have a predetermined prefix, then type the predetermined prefix here. Please be aware that there’s a 5-character limit for the prefix. For example: “TCKT”
- Choose whether to show the improvement flows of this improvement board on work instruction overviews (we recommend keeping this option ticked).
- Choose whether to show the improvement flows of this improvement board when an operator is submitting a ticket (we recommend keeping this option ticked).
- Select which user group(s) get to see this improvement board and its contents. If you don’t select any group, it will be visible to everyone in your factory.
- When you’re done, click on “Add”.
- After you’ve created the improvement board, you will need to configure it. See the improvement board configuration guides.
How to Edit an Improvement Board’s Visibility
When you were creating an improvement board, you had the option to configure its visibility. However, after an improvement board has been created, you can still edit its visibility. Here’s how:
- Go to “Continous Improvement” in the sidebar.
- Click on “Settings”.
- Click on the three-dot icon next to the targeted improvement board.
- Click on “Edit board”.
- Click on the dropdown menu under “Visible for groups”.
- Do the desired edit.
- When you’re done, click on “Save”.
Note: An improvement board's visibility settings are also applied to all improvement flows that fall under its umbrella.
How to Create an Improvement Flow
Of course, you’ll need to set up your issue resolution mechanism. Which actions should be taken in order to resolve an issue? Which employees are responsible for checking and approving these actions? All of these are done within an improvement flow.
When creating an improvement board, an improvement flow (with the same name) is also automatically created within this improvement board.
However, you can also create improvement flows manually. Here’s how to create one:
- Go to “Continous Improvement” in the side panel.
- Click on “Settings”.
- Click on the three-dot icon next to the targeted improvement board.
- Click on “Add flow”.
- Enter the improvement flow data (only the name field is mandatory). You can fill in the other fields later.
- When you’re done, click on “Add”.
- After you’ve created the improvement flow, you will need to configure it. See the improvement flow configuration guides.
Improvement Board vs Improvement Flow: What’s the Difference?
An improvement board is the main platform for issue reporting. It is a centralized dashboard that tracks and displays all issues that have been reported, including each issue’s key details (e.g., issue status, a description of the issue, the name of the user that reported the issue, etc.). On the other hand, an improvement flow is the mechanism used to process and solve an issue.
An improvement board consists of one or several improvement flows. An improvement board is generally associated with a product or an assembly line. Meanwhile, an improvement flow is often associated with a certain production phase, a production machine, or an issue topic (e.g., workplace safety, product quality, etc.).
Here’s how to see an overview of all improvement boards and improvement flows in your workspace:
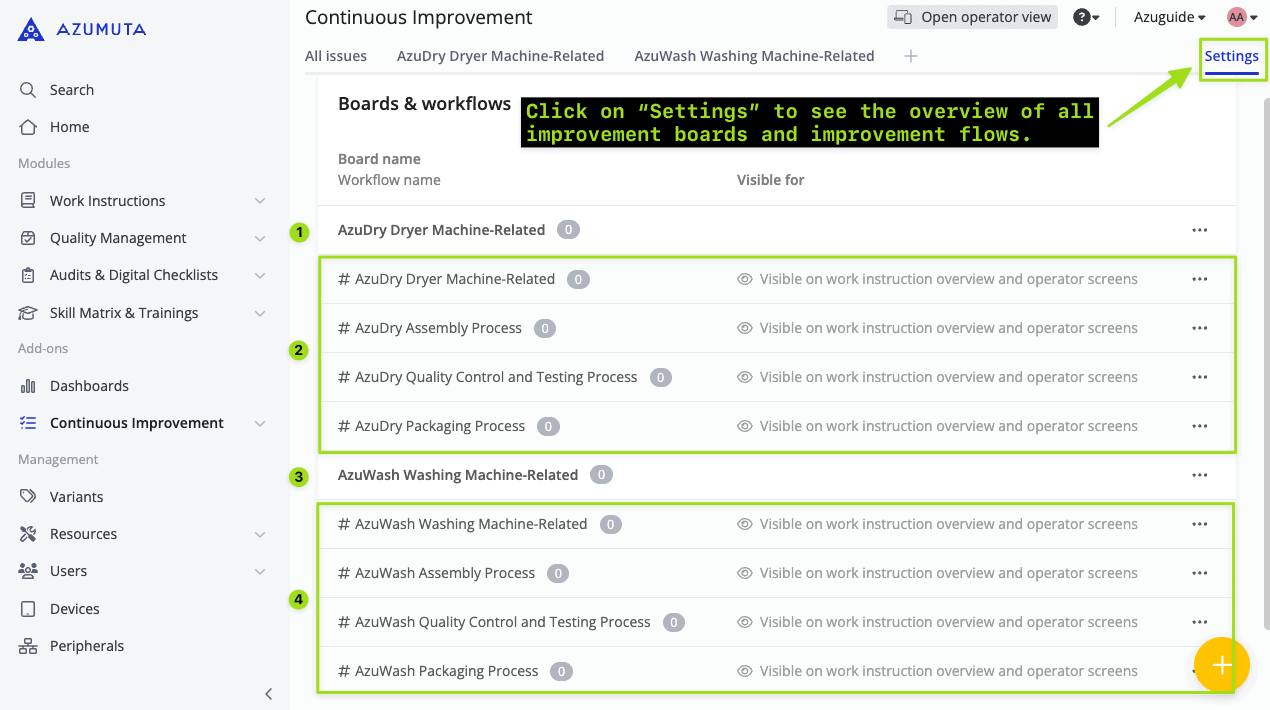
- This is the “AzuDry Dryer Machine-Related” improvement board.
- These are the improvement flows that fall under the “AzuDry Dryer Machine-Related” improvement board. Each improvement flow is marked by a hashtag.
- This is the “AzuWash Washing Machine Related” improvement board.
- These are the improvement flows that fall under the “AzuWash Washing Machine-Related” improvement board. Each improvement flow is marked by a hashtag.