
Triggers for Article Categories and Product Orders
In Azumuta, triggers serve a wide variety of functions. On this webpage, we’ll focus specifically on using triggers for article categories and product orders.
We’ll guide you through the process of creating a trigger and show you how to use it effectively.
How to Create a Trigger for an Article Category
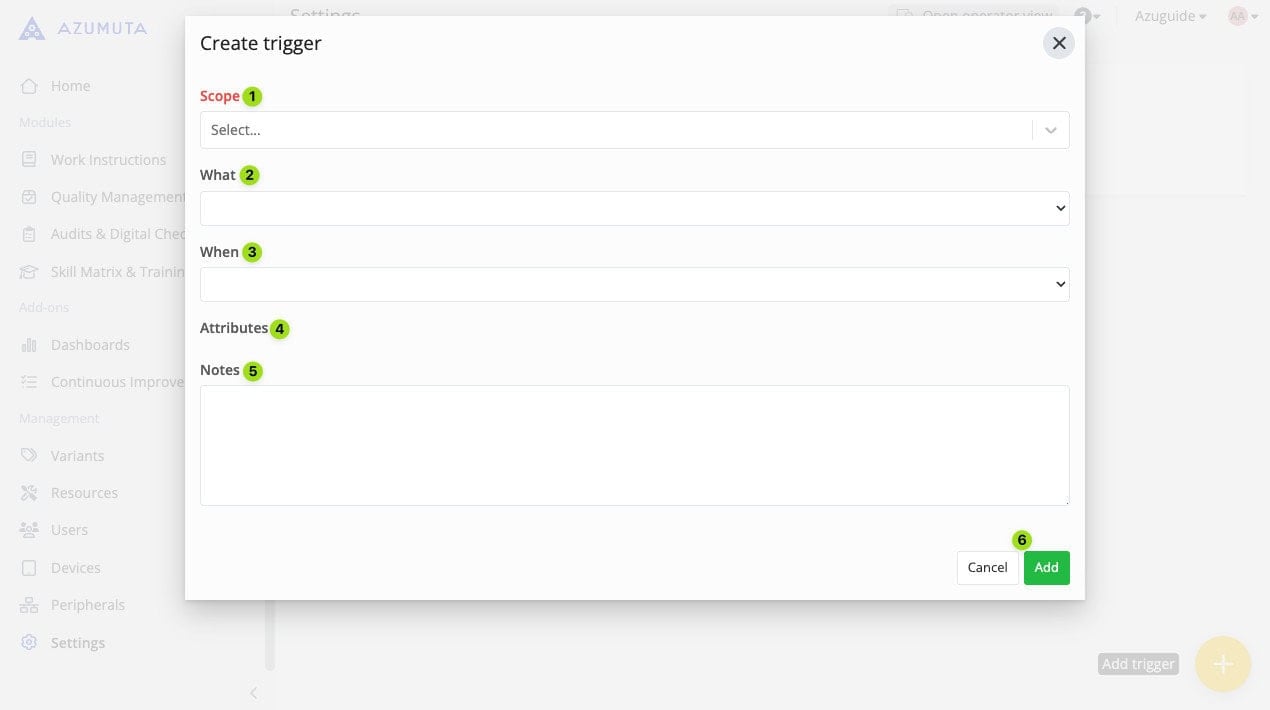
- Click on “Settings” under “Management”.
- Click on “Triggers” under “Integrations”.
- Click on the yellow plus button.
- Fill out the available fields. We will provide an explanation for each field below the video.
- When you’re done, click on “Add”.
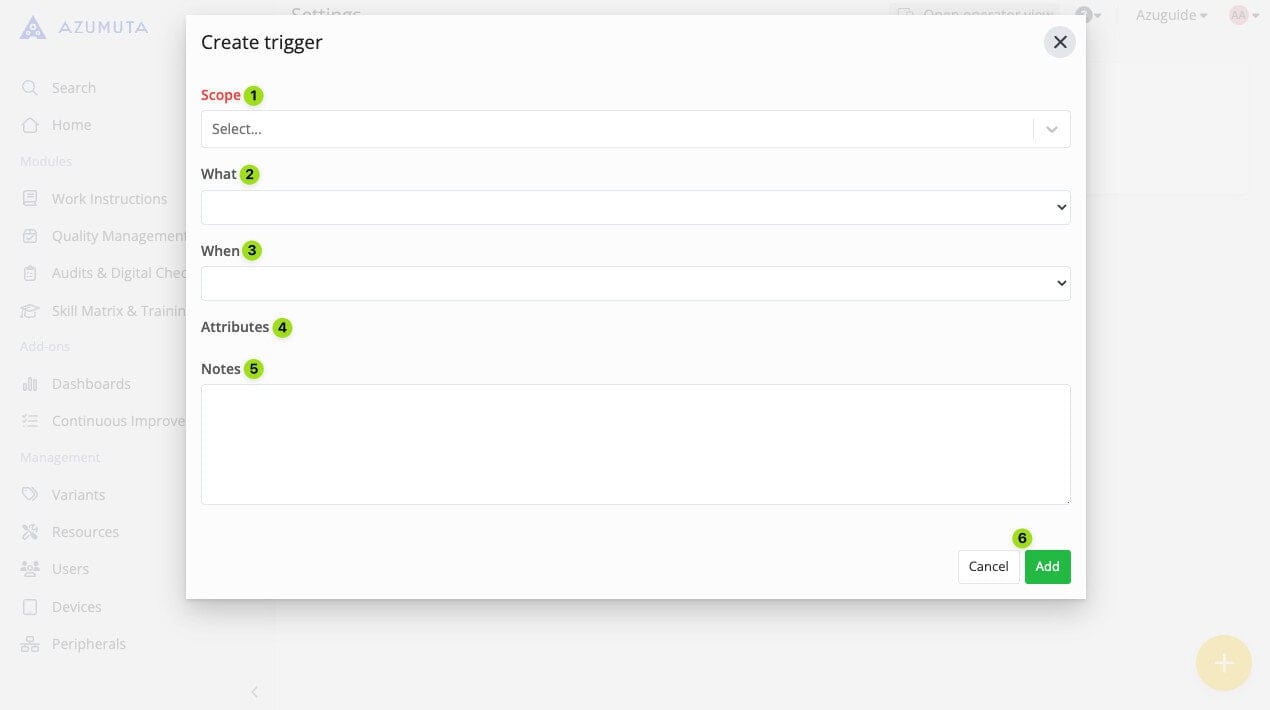
- On the “Scope” dropdown menu, select the trigger use case. Since we’re going to create a trigger for an article category, you should select the article category to which you would like to add a trigger.
- On the “What” dropdown menu, select the trigger type that you will use.
- On the “When” dropdown menu, select the occurrence that will activate this trigger.
- The “Attributes” dropdown menu will display additional configuration options for this trigger. They will only appear once you’ve filled in the “What” and “When” dropdown menus.
- If needed, you can write additional notes for this trigger.
- When you’re done, click on “Add”. However, if you would like to cancel it, click on “Cancel”.
The Trigger Types That You Can Use for an Article Category
Currently, there are 5 trigger types that you can use for an article category:
- Sending an email
- Sending a notification to Slack*
- Calling a webhook
- Scheduling an audit on the planning tool
- Exporting a docx report
*We can also configure our triggers to be compatible with other communication tools. If you’re interested, please contact us through our support@azumuta.com email,
Here’s an explanation for each trigger type:
Sending an Email
In this trigger type, whenever the occurrence determined on the **“When”**dropdown menu occurs, our platform will automatically send an email to a pre-determined person. Please have a look at the image below to learn more about this trigger type:
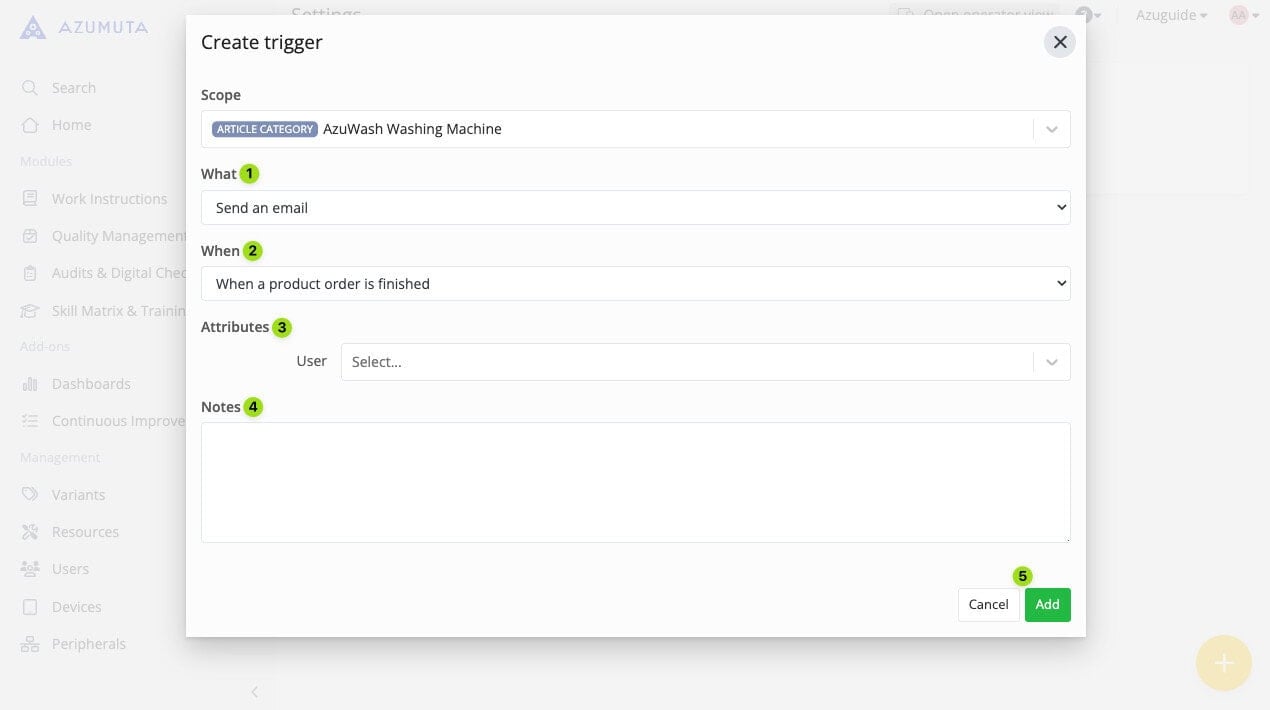
- On the “What” dropdown menu, select “Send an email”.
- On the “When” dropdown menu, select the occurrence that will activate this trigger.
- On the “Attributes” dropdown menu, select the person that will receive emails from this trigger.
- If needed, you can write additional notes for this trigger.
- When you’re done, click on “Add”. However, if you would like to cancel it, click on “Cancel”.
Sending a Notification to Slack
In this trigger type, whenever the occurrence determined on the “When” dropdown menu occurs, our platform will automatically send a notification to Slack.
If you need help integrating Slack, please contact us via support@azumuta.com – we’d be happy to help.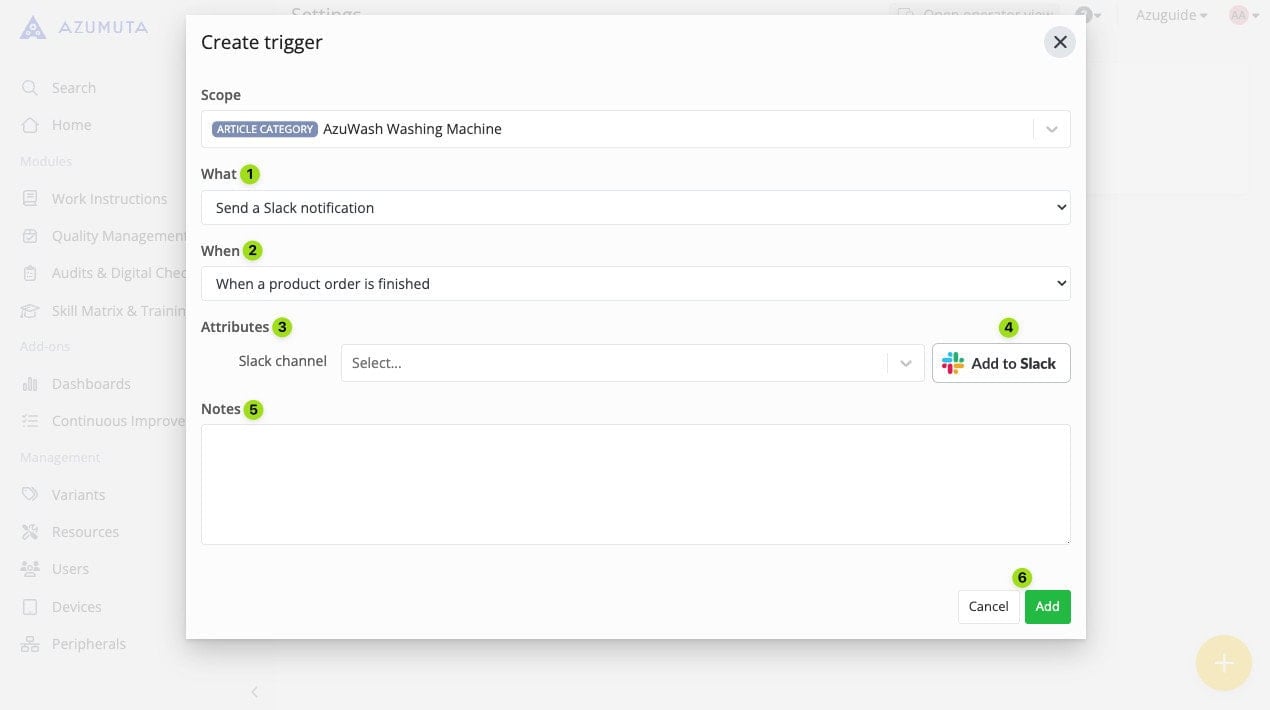
- On the “What” dropdown menu, select “Send a Slack notification”.
- On the “When” dropdown menu, select the occurrence that will activate this trigger.
- On the “Attributes” dropdown menu, select the Slack channel/Slack contact that will receive notifications from this trigger. You can do this once you’ve integrated Slack into your Azumuta platform. If you haven’t done so, please have a look at No.4.
- Click to integrate Slack into your Azumuta platform. Please contact us through support@azumuta.com if you need any help with the integration process.
- If needed, you can write additional notes for this trigger.
- When you’re done, click on “Add”. However, if you would like to cancel it, click on “Cancel”.
Note: Besides sending notifications to Slack, we can also configure the platform to send notifications to any other communication tool that your organization uses. Please contact us at support@azumuta.com to learn more.
Calling a Webhook
In this trigger type, whenever the occurrence determined on the “When” dropdown menu occurs, our platform will automatically call a webhook.
A webhook is a tool that’s used to send and receive data across multiple platforms. If you would like to learn more about webhooks and how you can use them, please contact us via support@azumuta.com – we’d be happy to assist you.
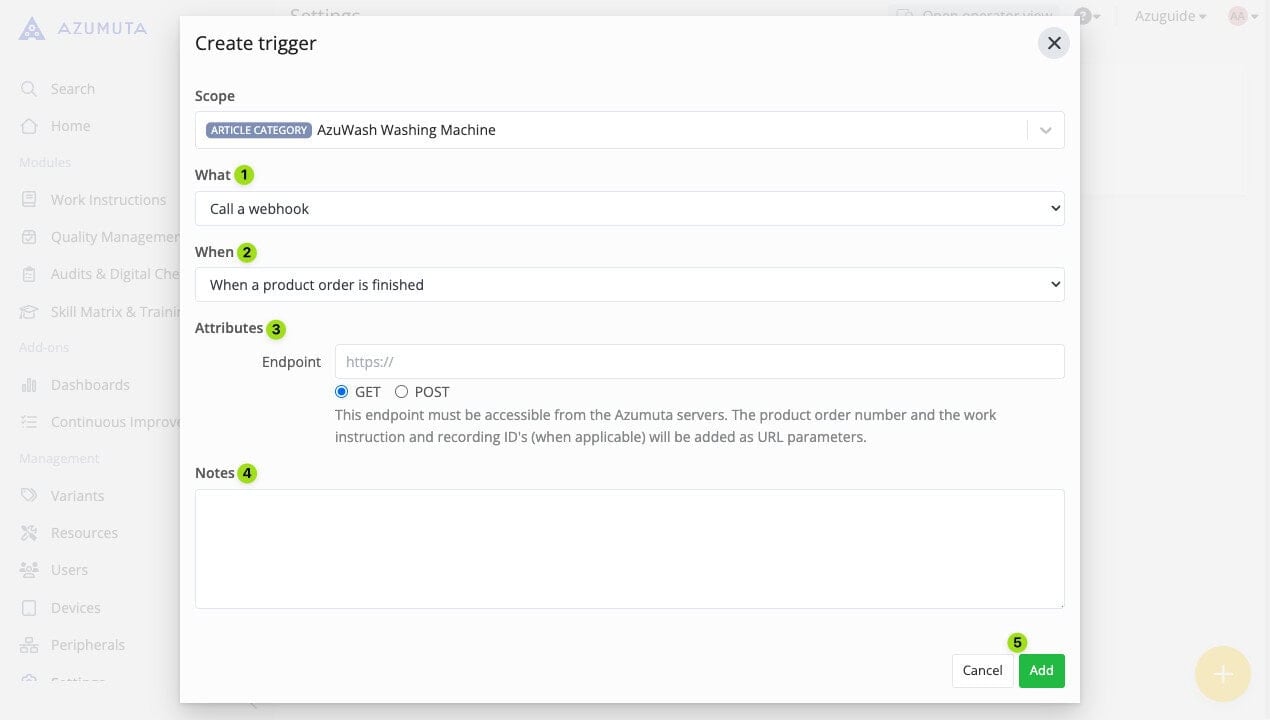
- On the “What” dropdown menu, select “Call a webhook”.
- On the “When” dropdown menu, select the occurrence that will activate this trigger.
- The “Attributes” dropdown menu contains the configuration options for this trigger. To learn more about webhooks and how to use them, please contact us through the support@azumuta.com email.
- If needed, you can write additional notes for this trigger.
- When you’re done, click on “Add”. However, if you would like to cancel it, click on “Cancel”.
Scheduling an Audit on the Planning Tool
In this trigger type, whenever the occurrence determined on the “When” dropdown menu occurs, our platform will automatically schedule an audit event on the planning tool. Therefore, you no longer need to do it manually.

- On the “What” dropdown menu, select “Plan an audit”.
- On the “When” dropdown menu, select the occurrence that will activate this trigger.
- On the “Attributes” dropdown menu, select the audit/work instruction that will be used on the audit event.
- Select whether the selected audit/work instruction will appear under its audit folder/work instruction folder on the planning tool.
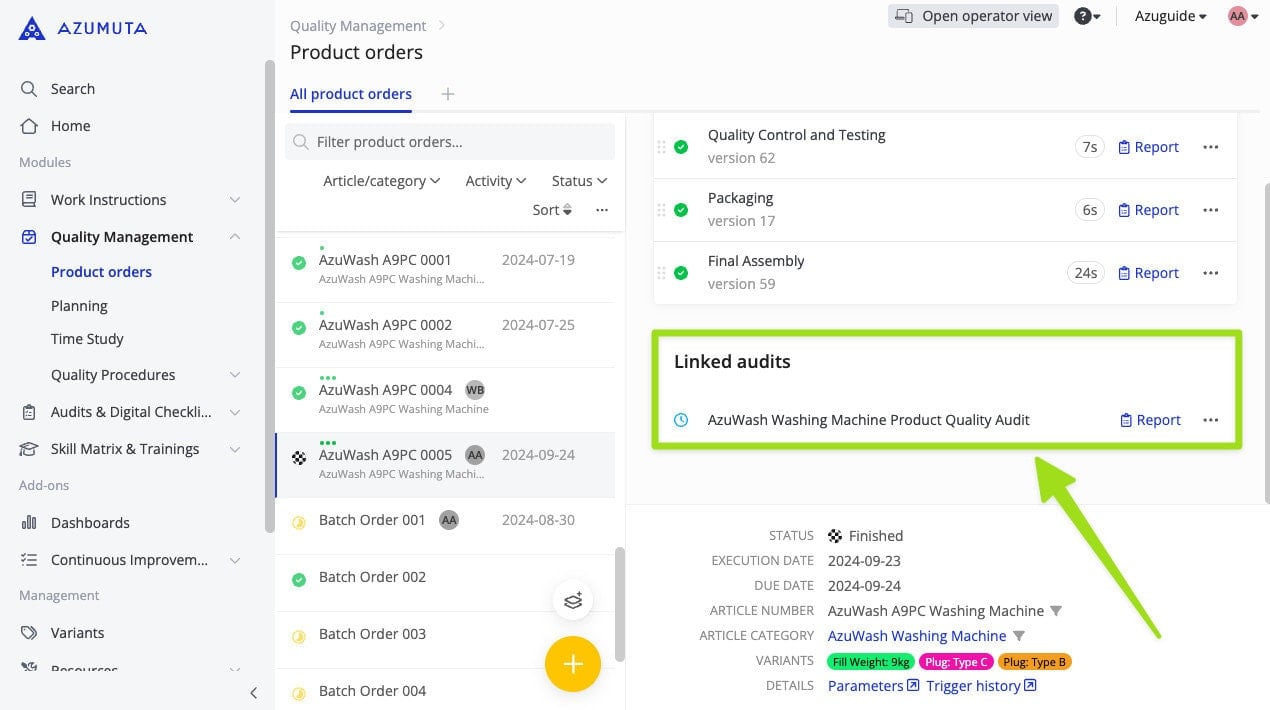
- Select whether the audit event will be linked to the product order. If so, the audit event will appear on the product order, as shown in the image below:
- If needed, you can write additional notes for this trigger.
- When you’re done, click on “Add”. However, if you would like to cancel it, click on “Cancel”.
Exporting a Docx Report
In this trigger type, whenever the occurrence determined on the “When” dropdown menu occurs, our platform will automatically send a docx report file to a pre-determined location. Most often, our customers use this trigger to send their docx report files to a platform that they use to store and share data (e.g., Microsoft SharePoint, Google Drive, SFTP, etc.).
Before you can use this trigger, please make sure that you’ve already integrated your preferred data storage & sharing platform into your Azumuta platform. Please contact us through support@azumuta.com to learn more.
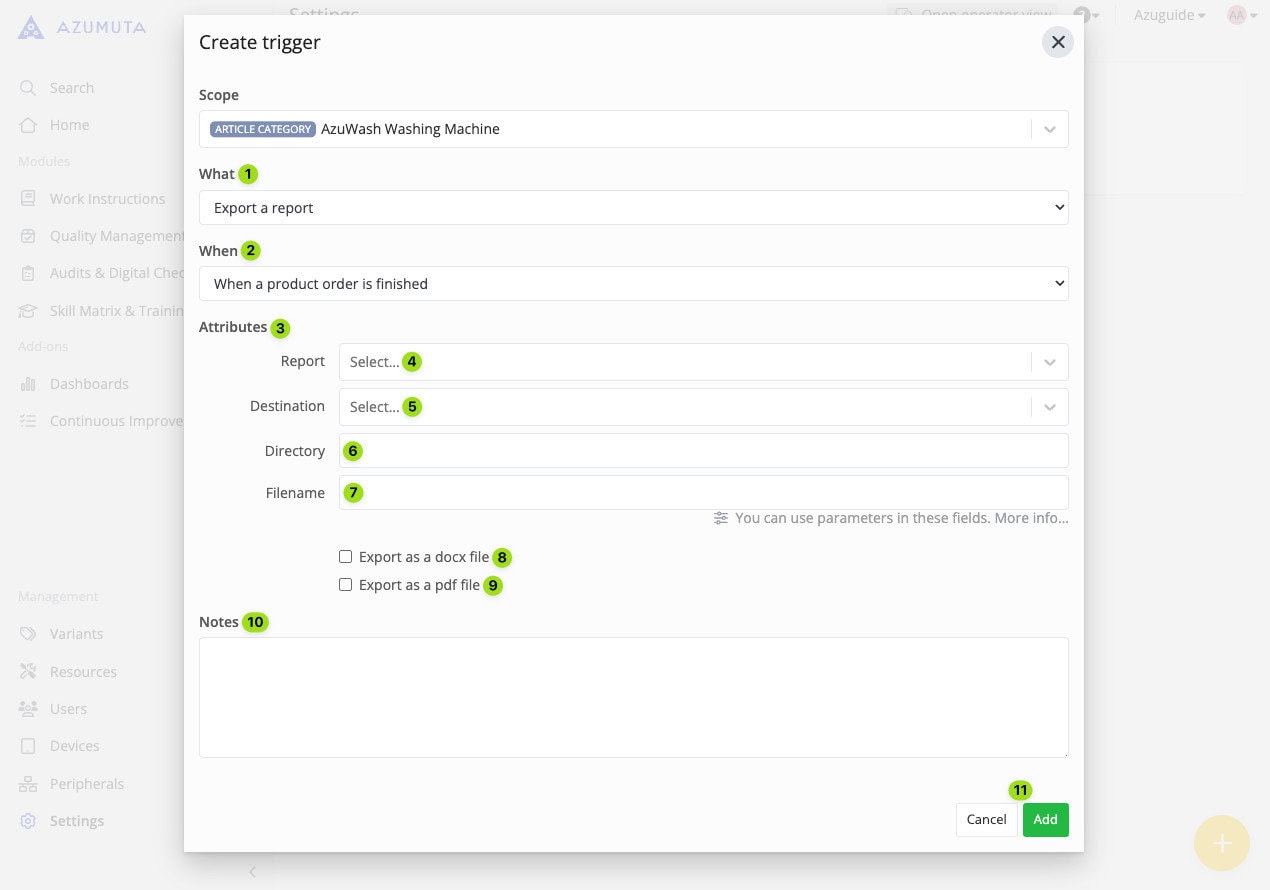
- On the “What” dropdown menu, select “Export a report”.
- On the “When” dropdown menu, select the occurrence that will activate this trigger.
- The “Attributes” dropdown menu contains various configuration options for this trigger.
- Select the docx report that you would like to be sent by this trigger. Please make sure that you have already uploaded the desired docx report to the selected article category.
- Select to which destination this trigger should send the docx report to. Before you can select any destination, please make sure that you’ve already integrated a data storage & sharing platform into your Azumuta platform. Please contact us via support@azumuta.com to learn more.
- Select which folder the docx report should be sent to.
- Type in the filename of the docx report. This is the docx report’s filename that will be displayed on the destination.
- If you would like the docx report to be exported as a .docx file, then tick this option.
- If you would like the docx report to be exported as a PDF file, then tick this option.
- If needed, you can write additional notes for this trigger.
- When you’re done, click on “Add”. However, if you would like to cancel it, click on “Cancel”.
How to Create a Trigger for Product Orders
Besides creating a trigger for an article category, you can also create a trigger for product orders in your workspace.
However, unlike creating a trigger for an article category, you can’t create a trigger for a specific product order. Each trigger will apply to all product orders that exist in your workspace.
Here’s how to create a trigger for product orders in your workspace:
- Click on “Settings” under “Management”.
- Click on “Triggers” under “Integrations”.
- Click on the yellow plus button.
- Fill out the available fields. We will provide an explanation for each field below the video.
- When you’re done, click on “Add”.
- On the “Scope” dropdown menu, select the trigger use case. Since we’re going to create a trigger for product orders, you should select “All product orders”.
- On the “What” dropdown menu, select the trigger type that you will use.
- On the “When” dropdown menu, select the occurrence that will activate this trigger.
- The “Attributes” dropdown menu will display additional configuration options for this trigger. They will only appear once you’ve filled in the “What” and “When” dropdown menus.
- If needed, you can write additional notes for this trigger.
- When you’re done, click on “Add”. However, if you would like to cancel it, click on “Cancel”.
The Trigger Types That You Can Use for Product Orders
Product orders have the same trigger types as article categories. Please click on the links below to learn how each trigger type works.
- Sending an email
- Sending a notification to Slack*
- Calling a webhook
- Scheduling an audit on the planning tool
- Exporting a docx report
*We can also configure our triggers to be compatible with other communication tools. If you’re interested, please contact us through our support@azumuta.com email,