
How to Integrate a DYMO Label Printer to Azumuta
Integrating a DYMO label printer into your Azumuta workspace is a simple process. Before we introduce you to the steps of doing so, please ensure that you already have the following items:
- The DYMO label printer that you wish to integrate.
- A computer (can be a desktop computer/laptop computer) or a Windows tablet that is logged in to your Azumuta workspace. At the moment, you can’t use a non-Windows tablet or a smartphone with a DYMO label printer yet.
If you have the items listed above, then you can start the process of integrating your DYMO label printer into your Azumuta workspace, which consists of 4 phases.
DYMO produces a wide variety of label printers. Within our guides, we will use the DYMO LabelWriter 550 Label Printer in our examples.
Phase 1: Download and Install DYMO Connect to Your Computer
The first phase is to download the DYMO Connect software & drivers to your computer. You will use this tool to connect your computer to the DYMO label printer and to design your labels.
- Go to DYMO’s website (https://www.dymo.com)
- Click on “Resources & Guides”.
- Click on “Driver & Software Downloads”.
- Click on “The Latest Software & Drivers for all LabelWriters® and LabelManager®”.
- Download either the Mac or Windows version of DYMO Connect to your computer.
- After the download process is complete, install it on your computer.
Phase 2: Design Your Labels on DYMO Connect
The second phase is to design your labels on DYMO Connect. To do so, simply open the DYMO Connect app that you downloaded in phase 1 and design the labels that your operators will print.
Download the DYMO Connect user guide from DYMO's support page.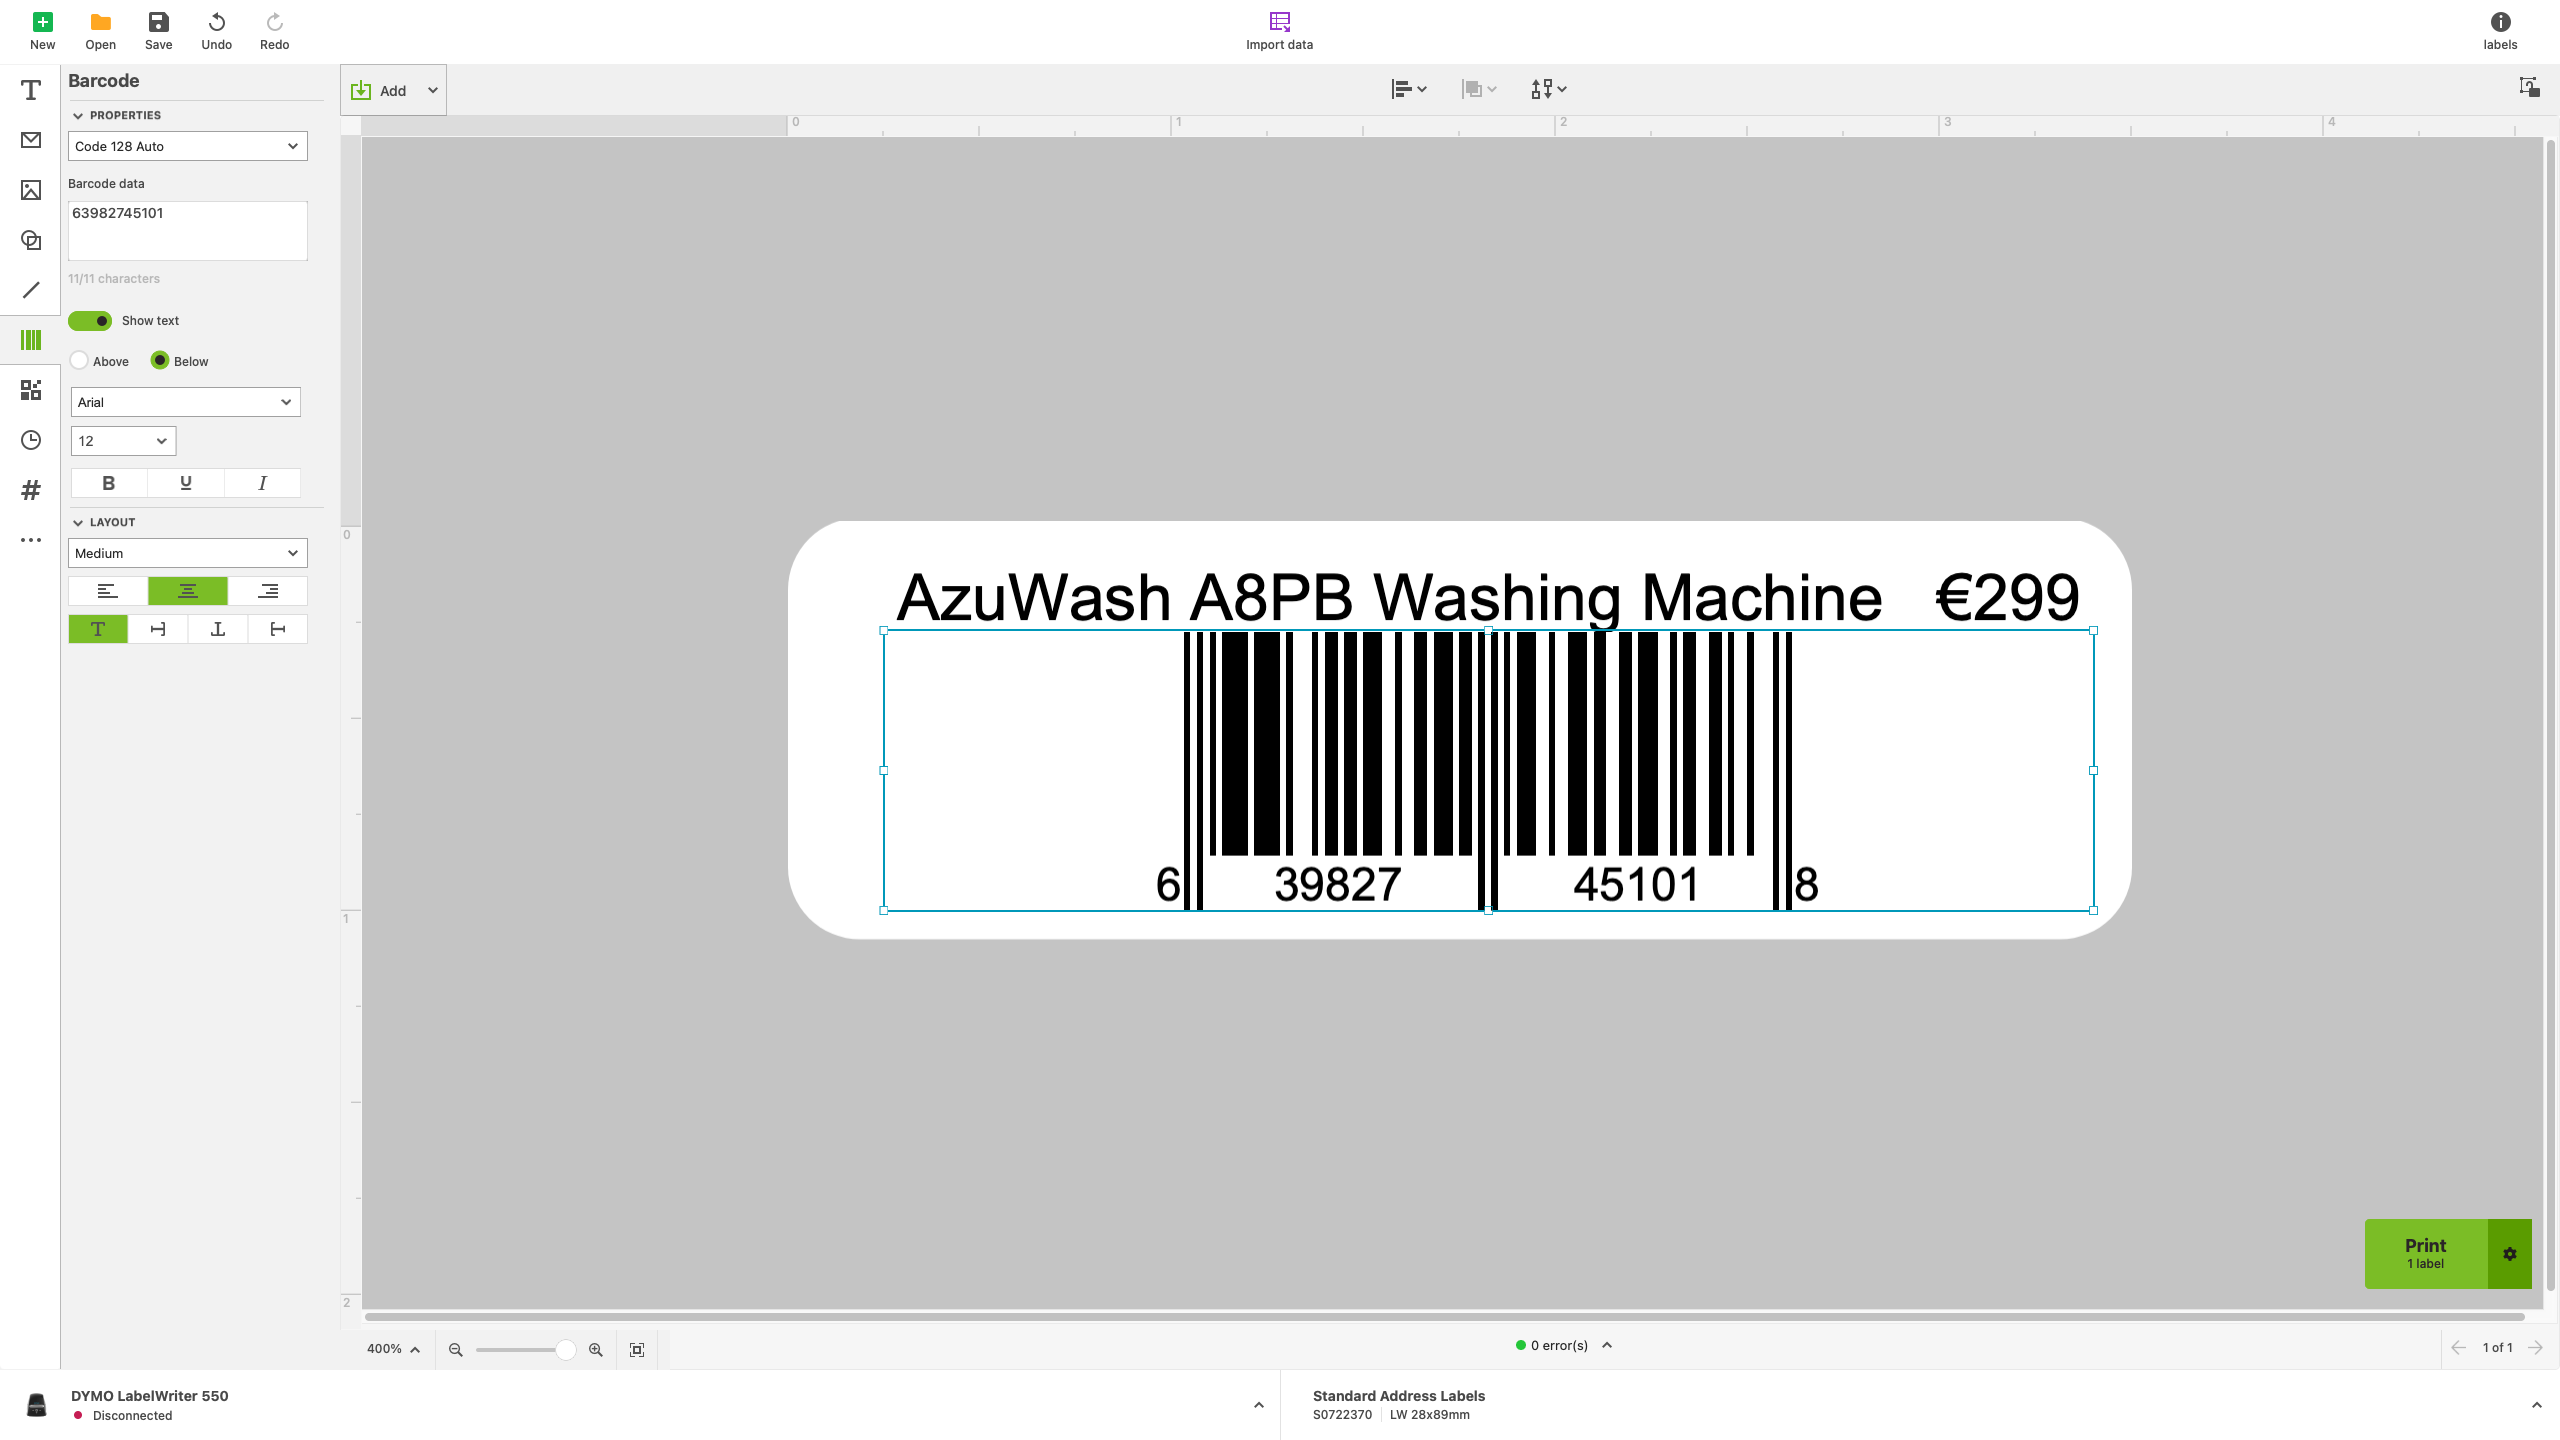
Using Parameters in Label Printing
Besides designing a label conventionally, you can also include our parameters functionality when designing a label. By writing a parameter key in a label template, the labels printed based on this template will automatically display the parameter value of their articles.
Thanks to this feature, you no longer need to manually write parameter values within a label. It will save you time and minimize the possibility of data input errors, as everything will be automated.
Please note that this feature only works if you print a label from an instruction step within a work instruction that is part of a product order that was made based on an article.
To input a parameter key to a label, please follow the following formula:
- ${parameter key}
For example, we would like to incorporate the parameter key Paint_Type. Therefore, we will write the following on the label:
- ${Paint_Type}
Example
For example, we would like to print a product identification label. We will use the following parameter keys:
- Color
- Paint_Type
- Body_Material
Please consult the images below to see how it works: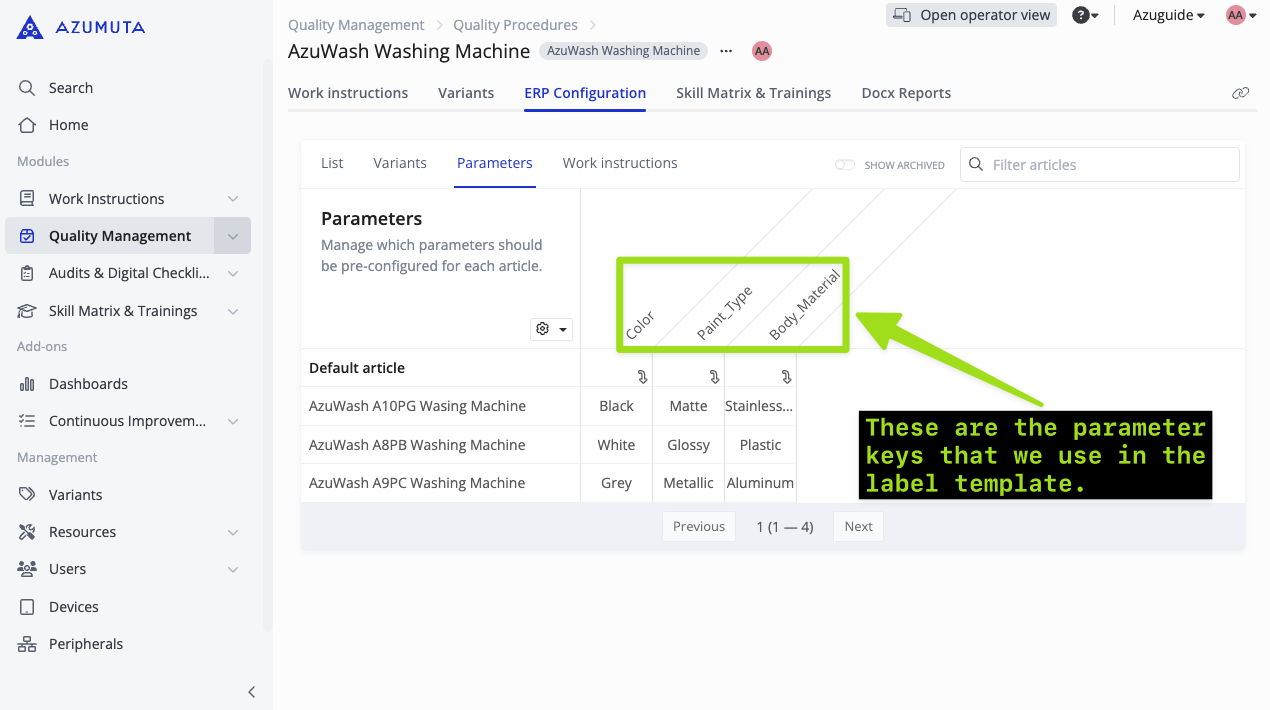
Thus, this is how we wrote the 3 parameter keys on the label template: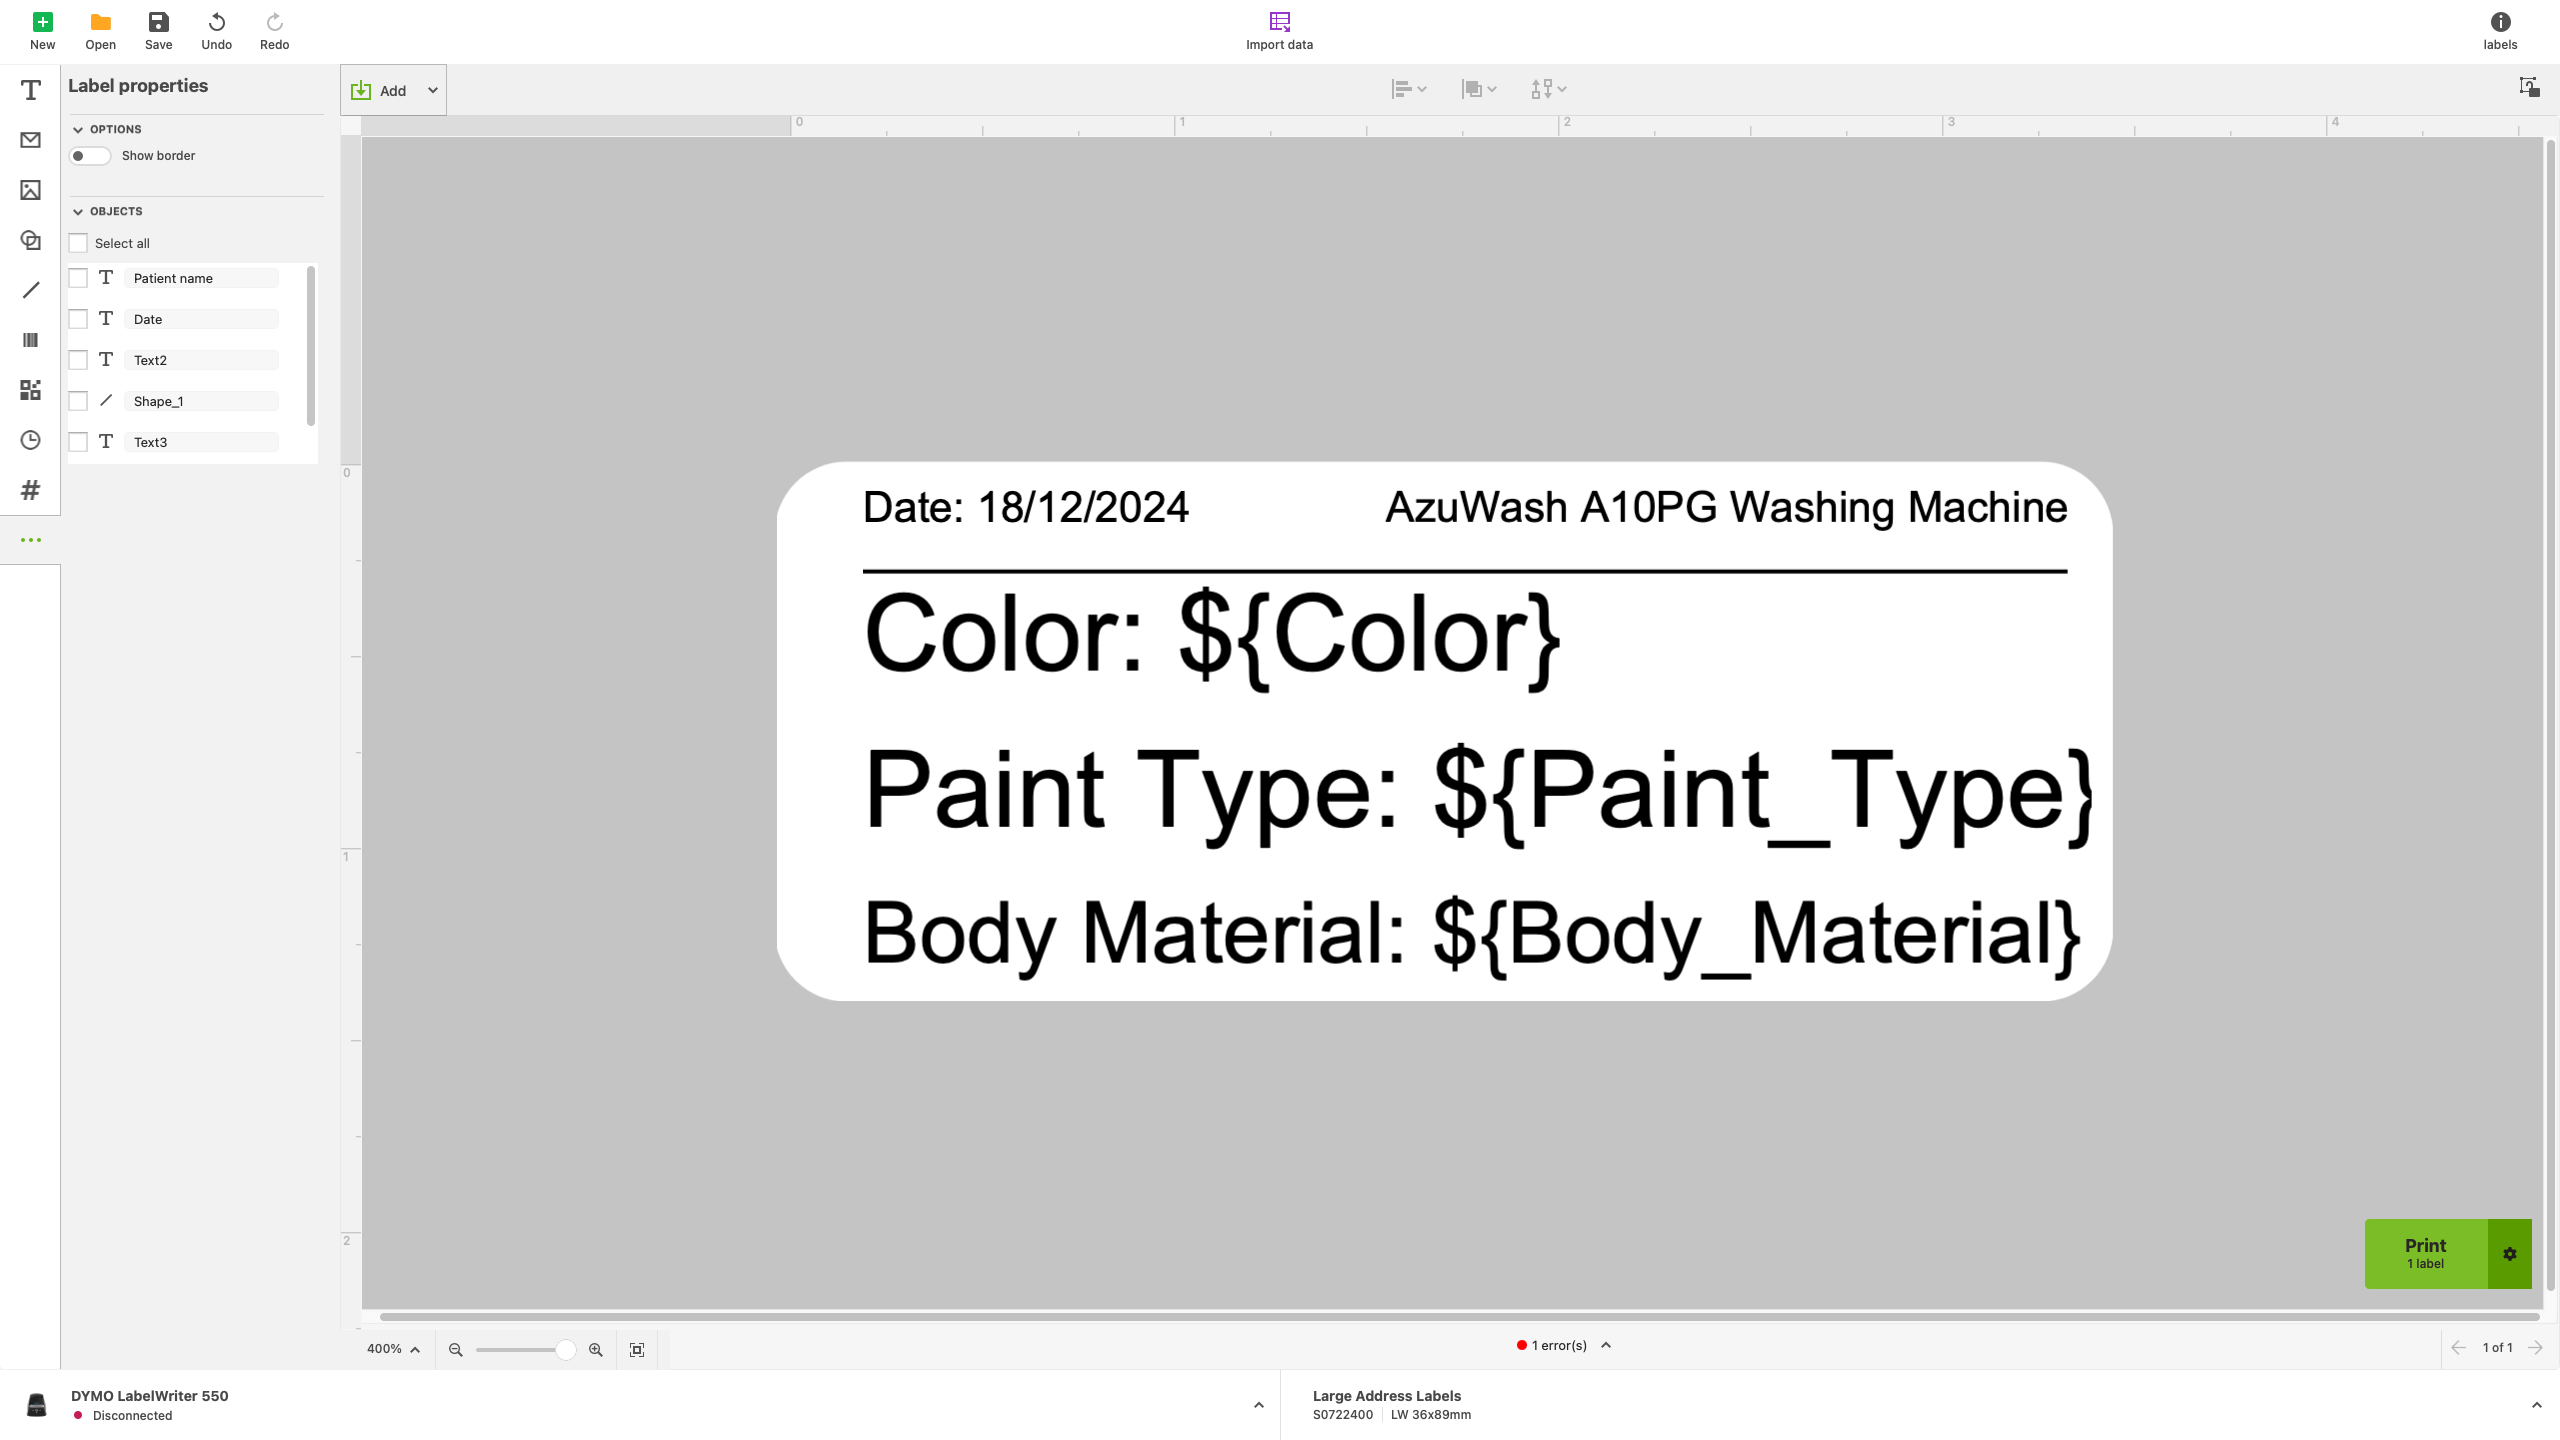
And this is the label after we’ve printed it: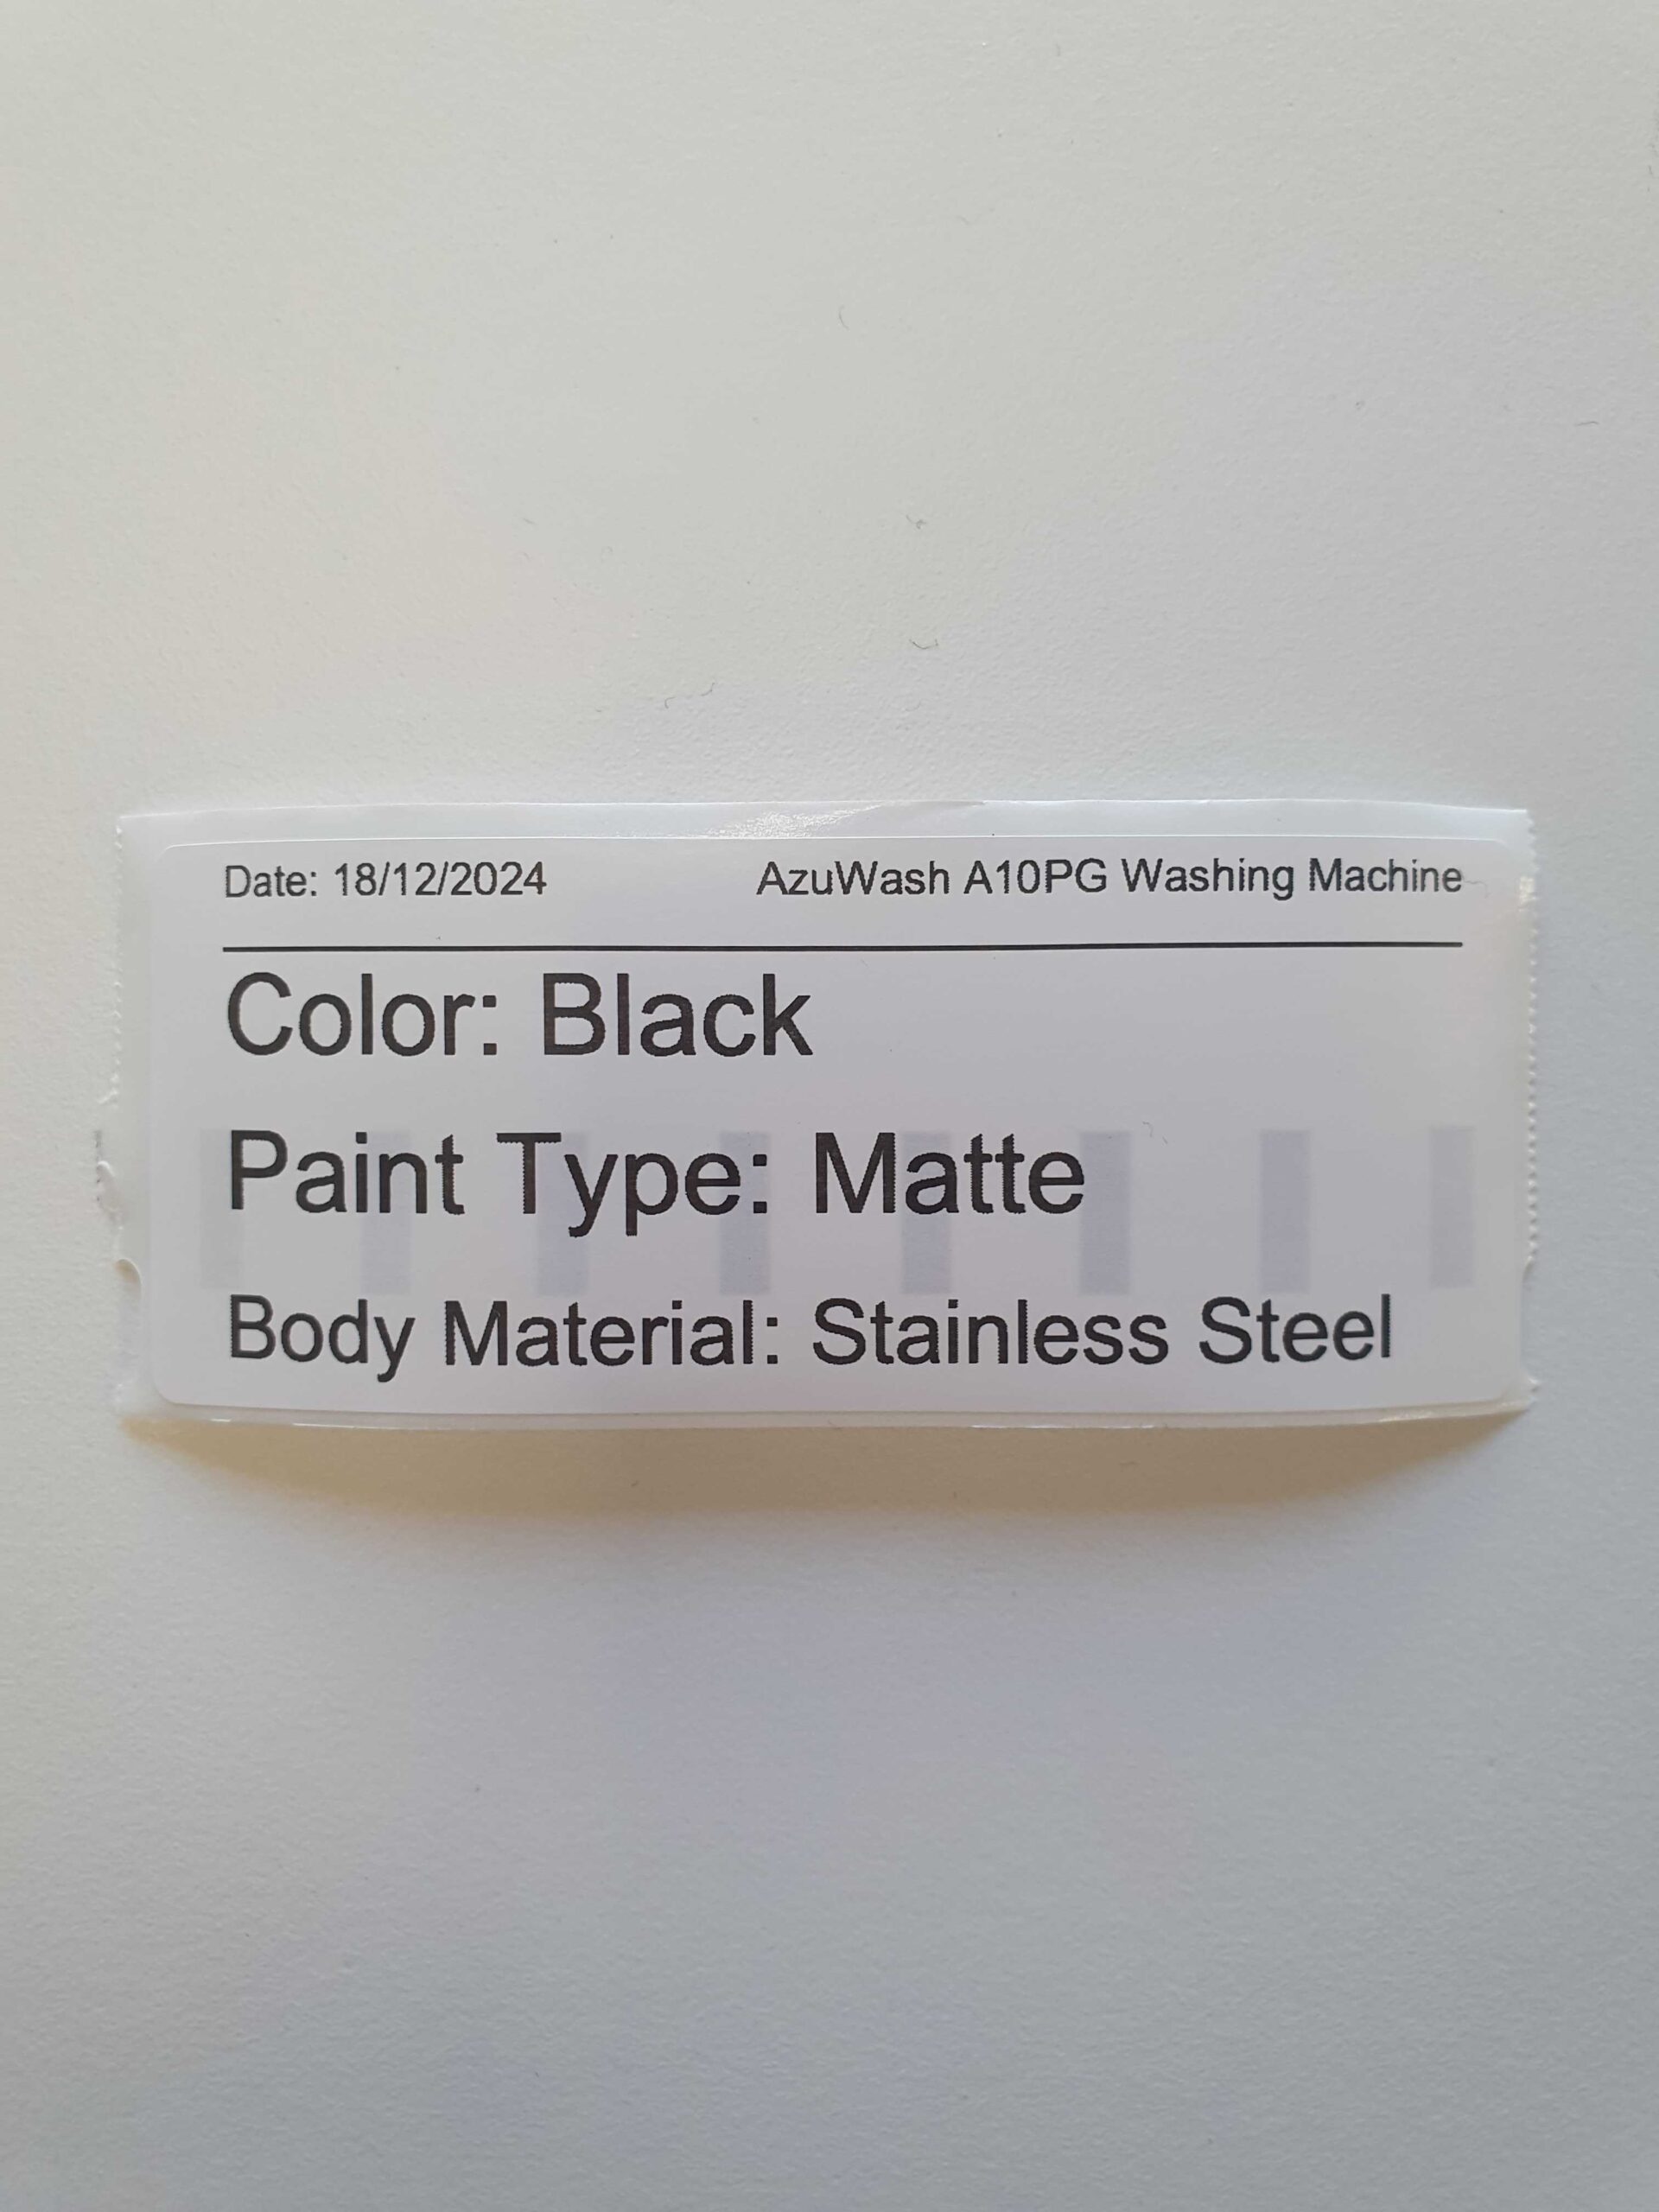
Phase 3: Adding Your DYMO Label Printer to Your Azumuta Workspace
After you’ve finished the 2 previous phases, it’s time to proceed to the third phase: adding your DYMO label printer to your Azumuta workspace. Here’s how to do it:
- Turn on your DYMO label printer. Please ensure that it remains on throughout this phase.
- Connect your DYMO label printer to your computer (either using a USB cable or a wireless network). Please ensure that it remains connected throughout this phase.
- Open your Azumuta workspace on your computer
- Click on “Peripherals” under “Management”.
- Click on the yellow plus button.
- Type in the new peripheral device’s name.
- Select one of the existing peripheral groups or create a new peripheral group.
- For the Check type, select “Procedure”.
- For the Hub plugin, select the one that matches your label printer type. If you have any doubts, please contact us through our support@azumuta.com email.
- For the fields under “Configuration”, please consult the image under the video.
- If necessary, you can also add additional notes for this label printer under the “Notes” field. These notes will be displayed on your workspace’s list of peripheral devices.
- Once you’re done, click on “Add”.
Here’s an explanation of the fields under “Configuration”:
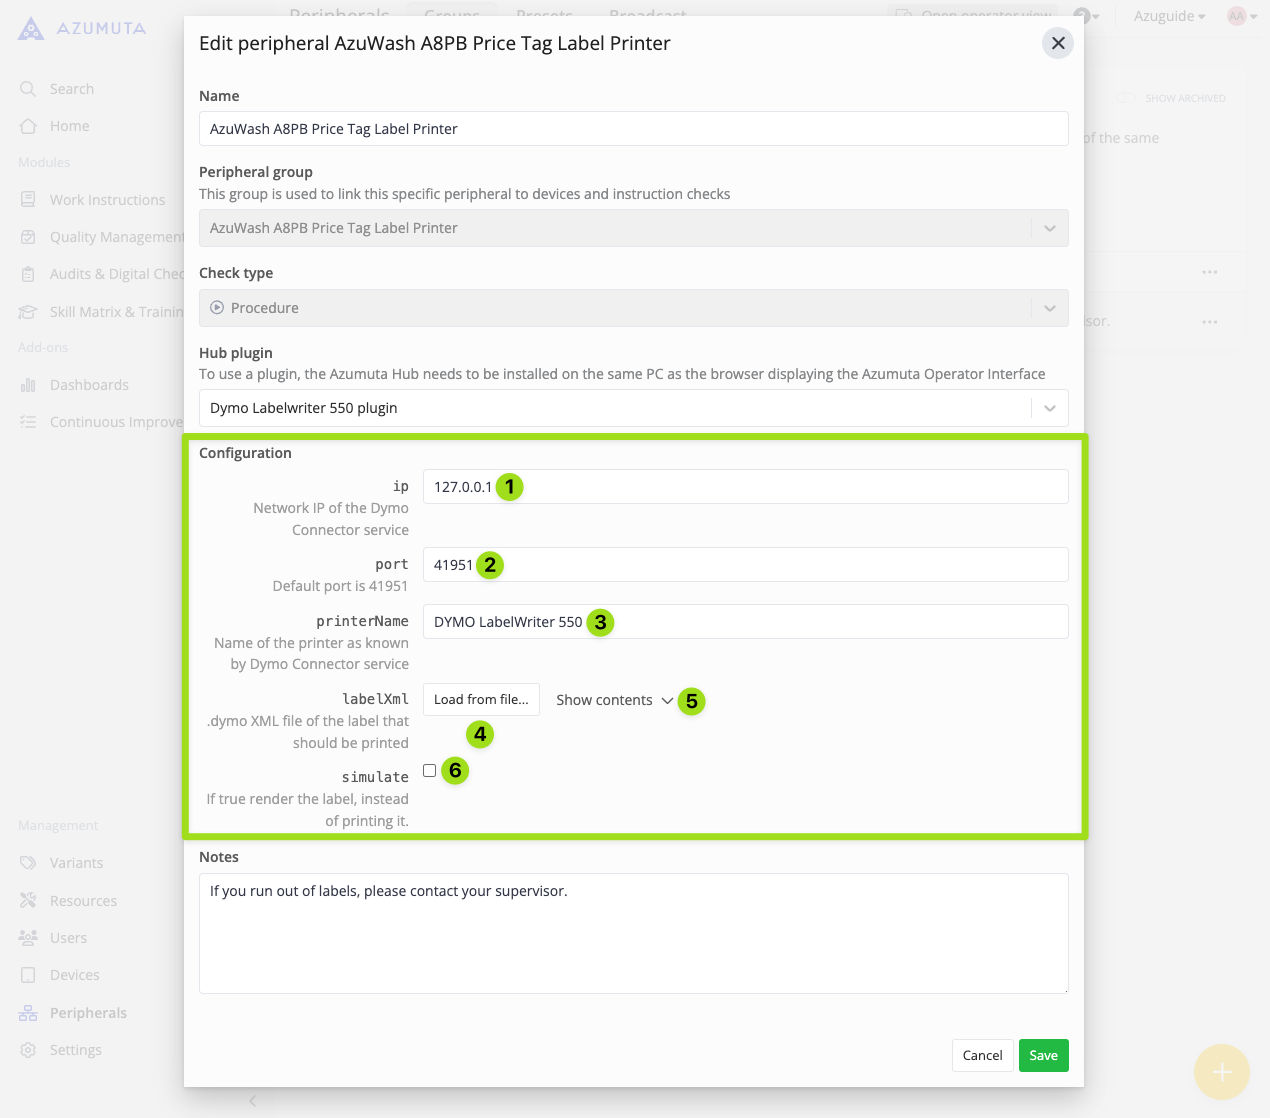
- This is the Network IP of the DYMO Connector service. We recommend you to leave this field as it is.
- This is the port number. We recommend you to leave this field as it is.
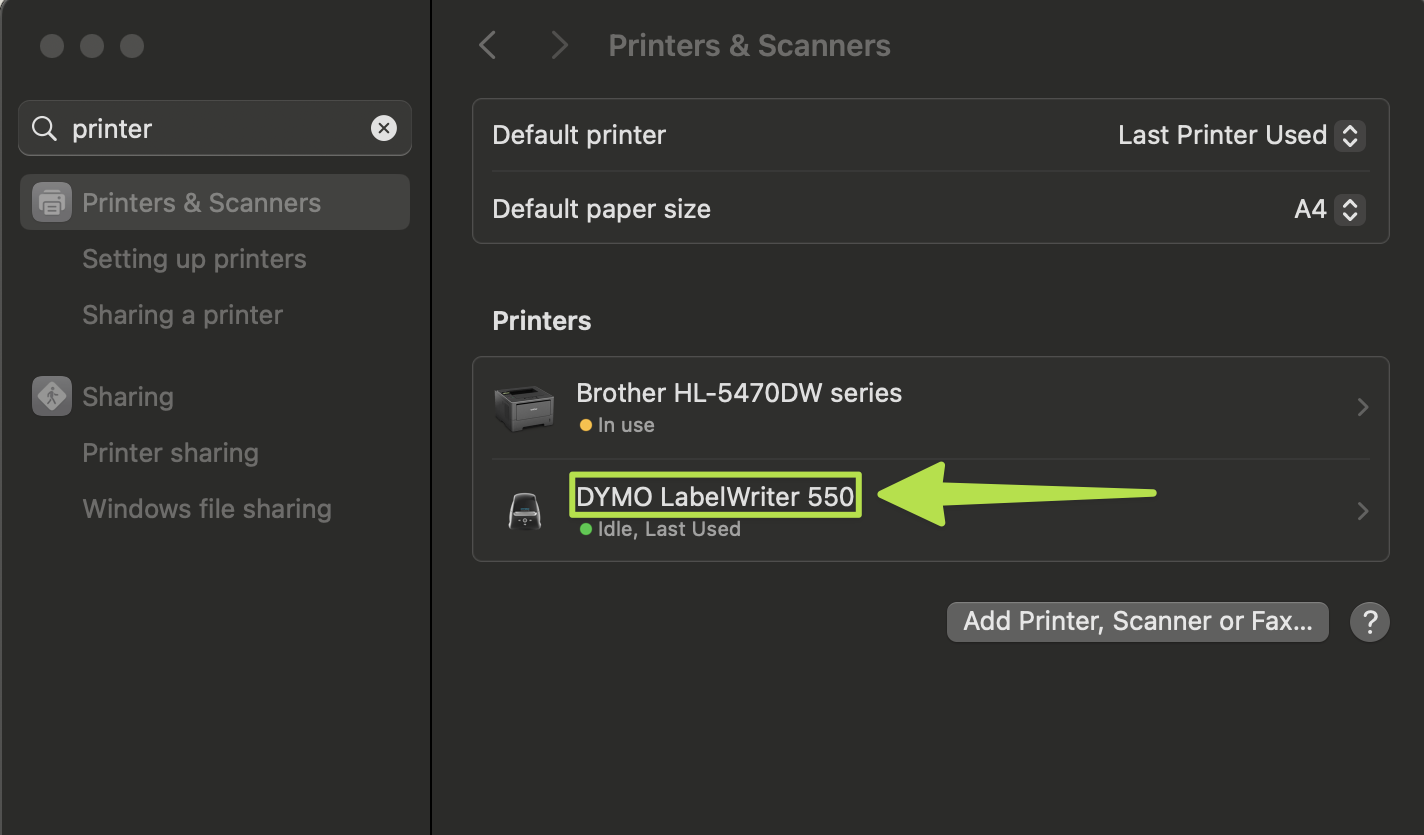
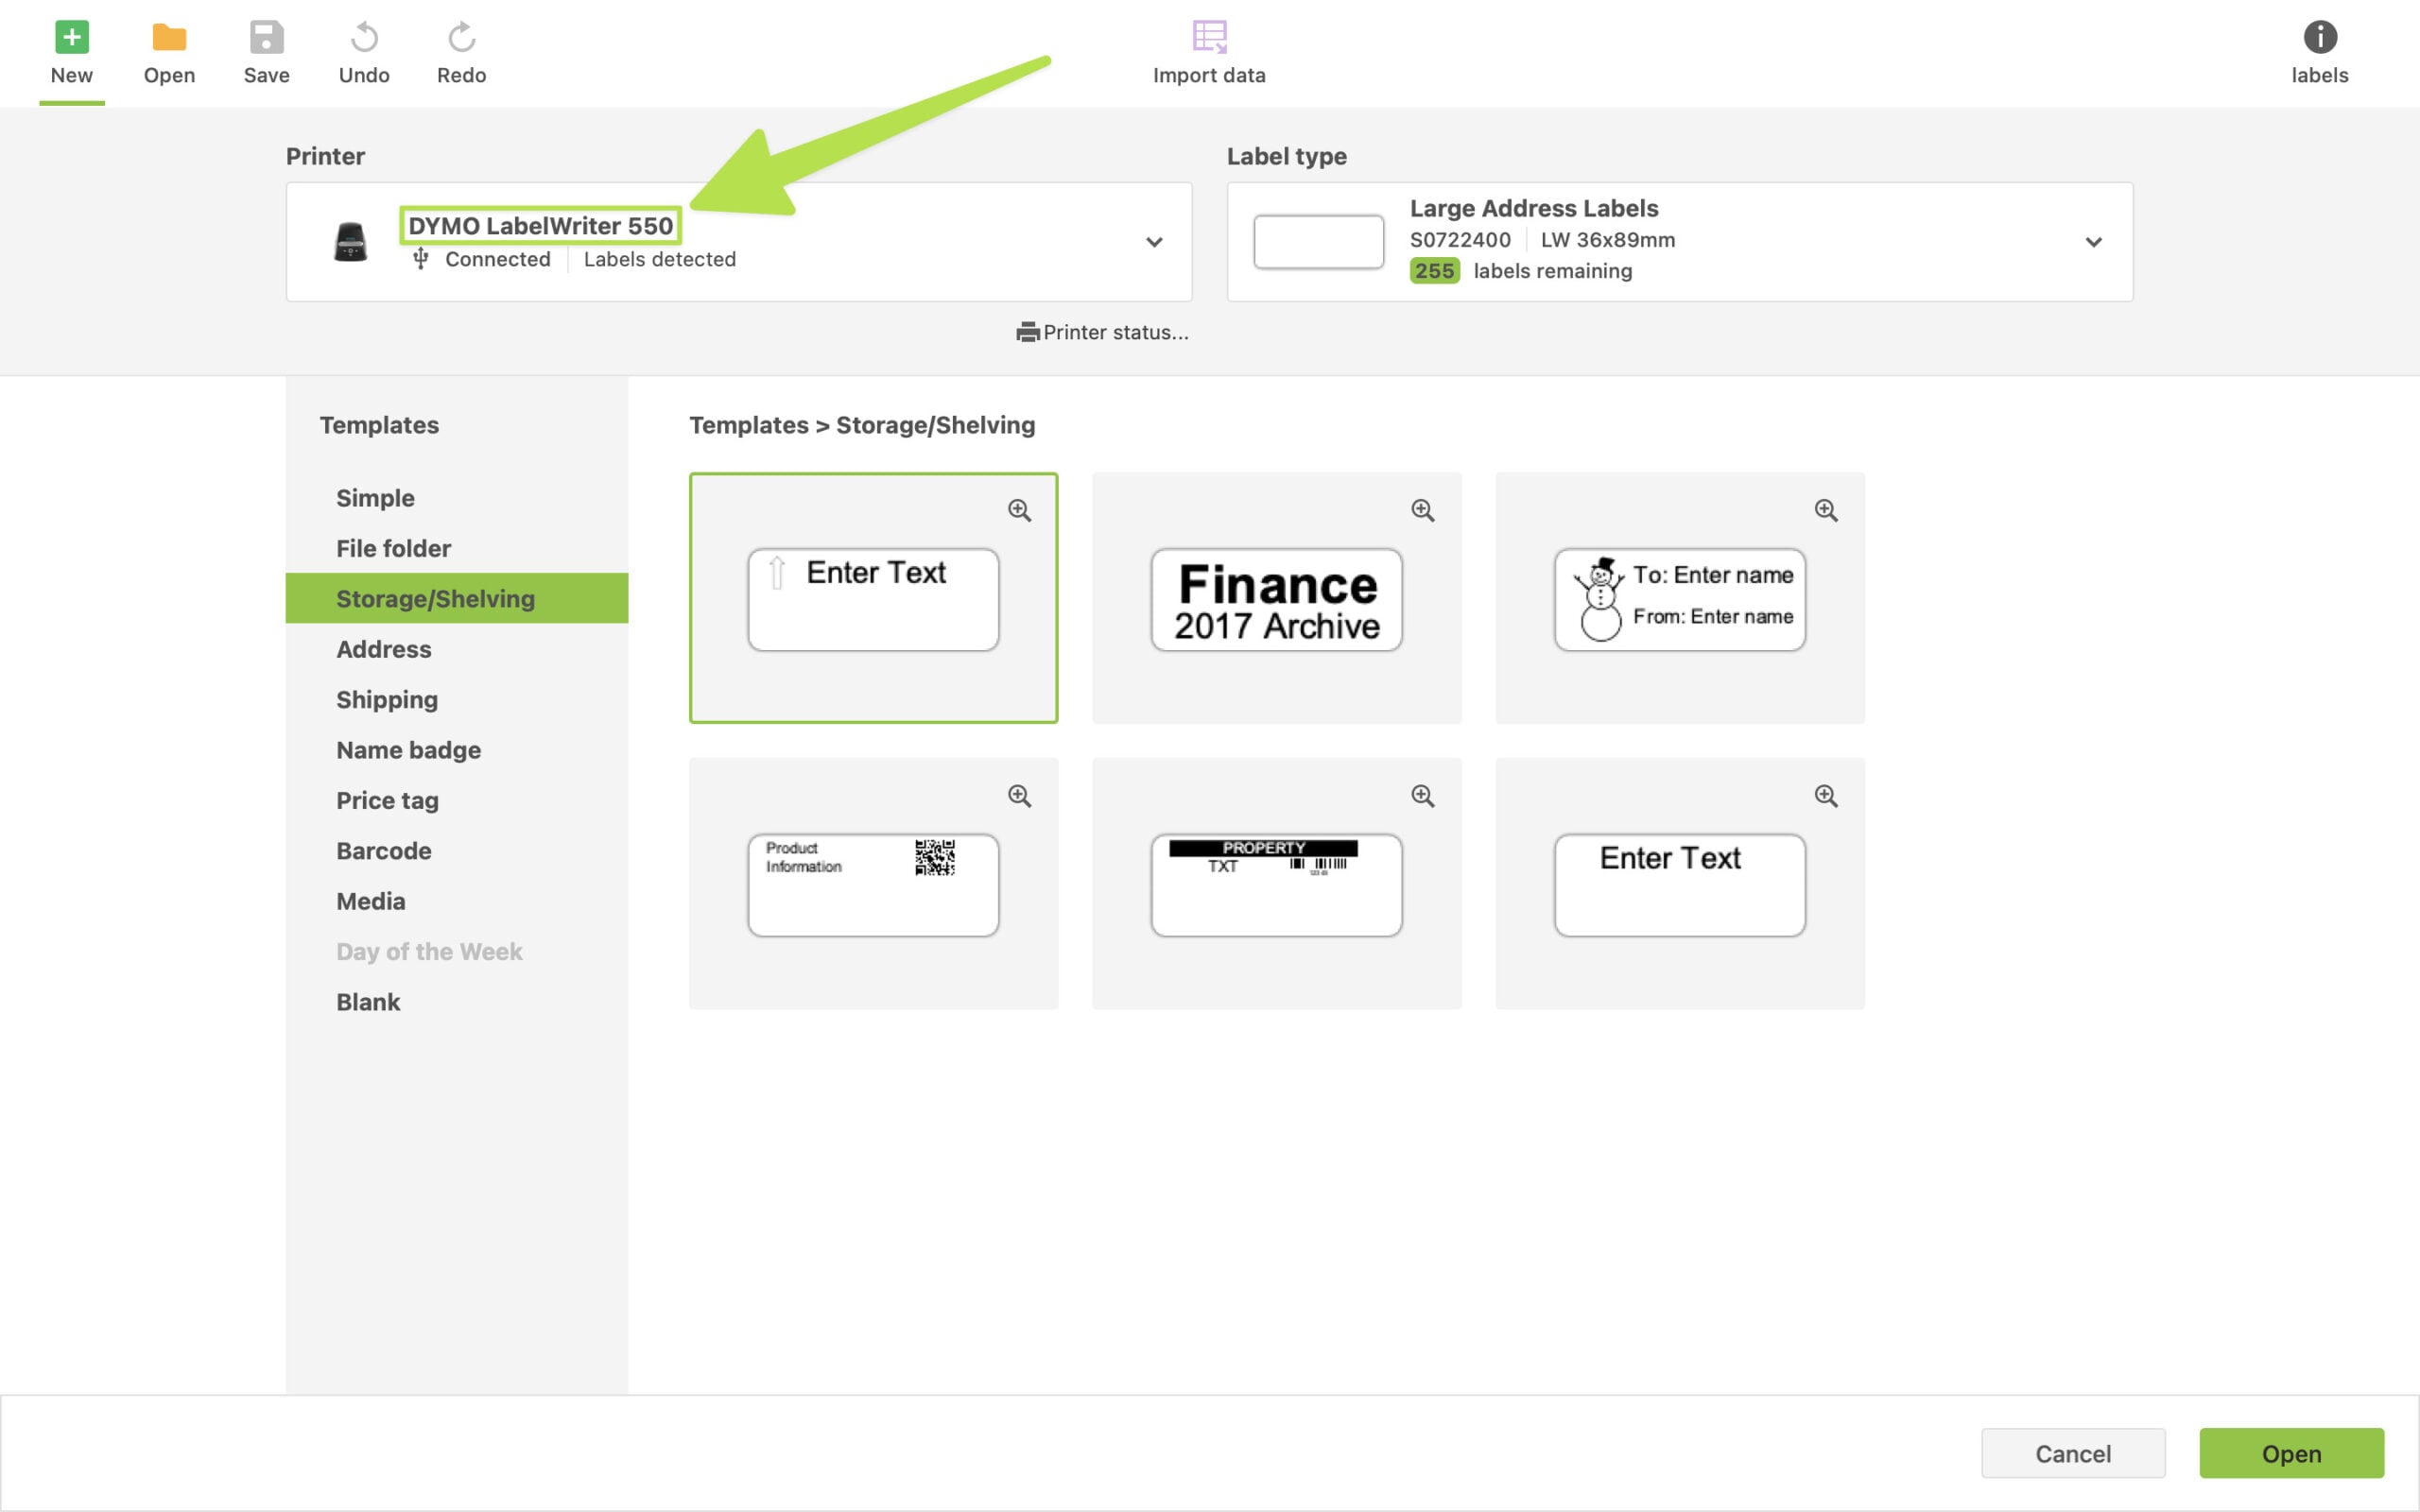
- This is the label printer’s name. Make sure that it’s exactly the same as the label printer’s name on your computer’s list of connected devices (as shown in the first screenshot below) and the label printer’s name on DYMO Connect (as shown in the second screenshot below):
- Upload the label that you’ve designed in phase 2. Please note that you can only upload one label design here. If you want to print multiple label designs, then you must add a label printer to Azumuta for each label design (even if you only have 1 label printer in your plant). For example, let’s say that you need to print 4 different kinds of labels: a shipping label, a storage label, a price tag label, and a name badge label. If that’s the case, then you will need to add 4 label printers to Azumuta. This means that you will need to repeat this phase (phase 3) for 4 times – where you upload the corresponding label design on this field each time you add a label printer to Azumuta.
- (Only if needed) click to open and check the codes related to the label design that was uploaded on No.4.
- If you tick this option, then the label file that you’ve uploaded on No.4 will not be printed, but it will be downloaded by your operator’s device instead.
Phase 4: Enabling the DYMO Label Printer on the Selected Device
The last phase involves enabling the DYMO Label Printer on the selected device that your operators will use to print labels. Here are the steps to enable it:
- Click on “Devices” under “Management”.
- Click on the three-dot icon next to the device where you would like to enable the label printer on.
- Click on “Edit device”.
- Click on the “Peripherals” tab.
- Click on the dropdown menu under “Peripherals for instruction checks”.
- Select the label printer that you would like to enable on this device. You can select multiple label printers.
- Once you’re done, click on “Save”.
If you would like to enable a label printer on multiple devices, then simply repeat this process for each device where you would like to enable this label printer on.
Editing or Deleting a Peripheral Device/Peripheral Group
See how to configure a peripheral group and device to learn how to edit or delete a peripheral device or a peripheral group.