
How to Use a DYMO Label Printer With Azumuta
After you’ve integrated your DYMO label printer into your Azumuta workspace, you can use it right away. Utilizing a DYMO label printer with Azumuta involves 2 phases, which are:
- Phase 1: An Admin Adds a Procedure Check to an Instruction Step
- Phase 2: An Operator Prints the Label(s) Using the Procedure Check
Phase 1: An Admin Adds a Procedure Check to an Instruction Step
A label needs to be printed by using a procedure check. That’s why, in the first phase, an admin needs to add and set up a procedure check for an instruction step. Here’s how to do it:
- Navigate to the instruction step where you would like to add a procedure check into, and click on “Open”.
- Click the “Check” tab.
- Select “Procedure”.
- Configure the procedure check (we will explain the details in the guide section under the video).
How to Configure a Procedure Check
In this guide section, we will show you the configuration options of a procedure check. The procedure check configurations can be divided into 5 option sections:
- Operator Preview
- Peripheral Options
- Button Options
- General Options
- Double-Check Options
Operator Preview
The operator preview shows how the procedure check will appear on an operator’s screen. The edits that you’ve made on the other 4 option sections will be automatically applied here in real-time.
Therefore, after you’ve finished configuring all other configuration options, it’s a good idea to consult the operator preview. That way, you can check whether everything is in order, before assigning it to an operator.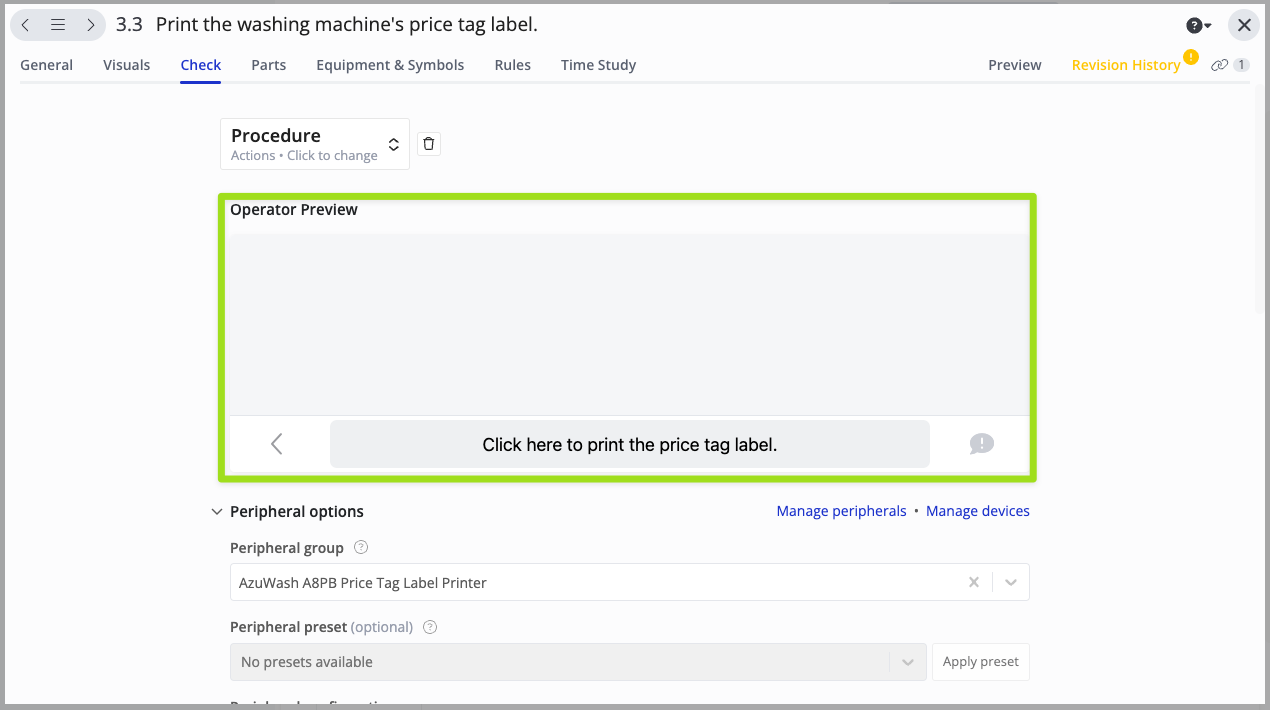
Peripheral Options
The settings here mainly revolve around configuring the printing task that your operator will execute.
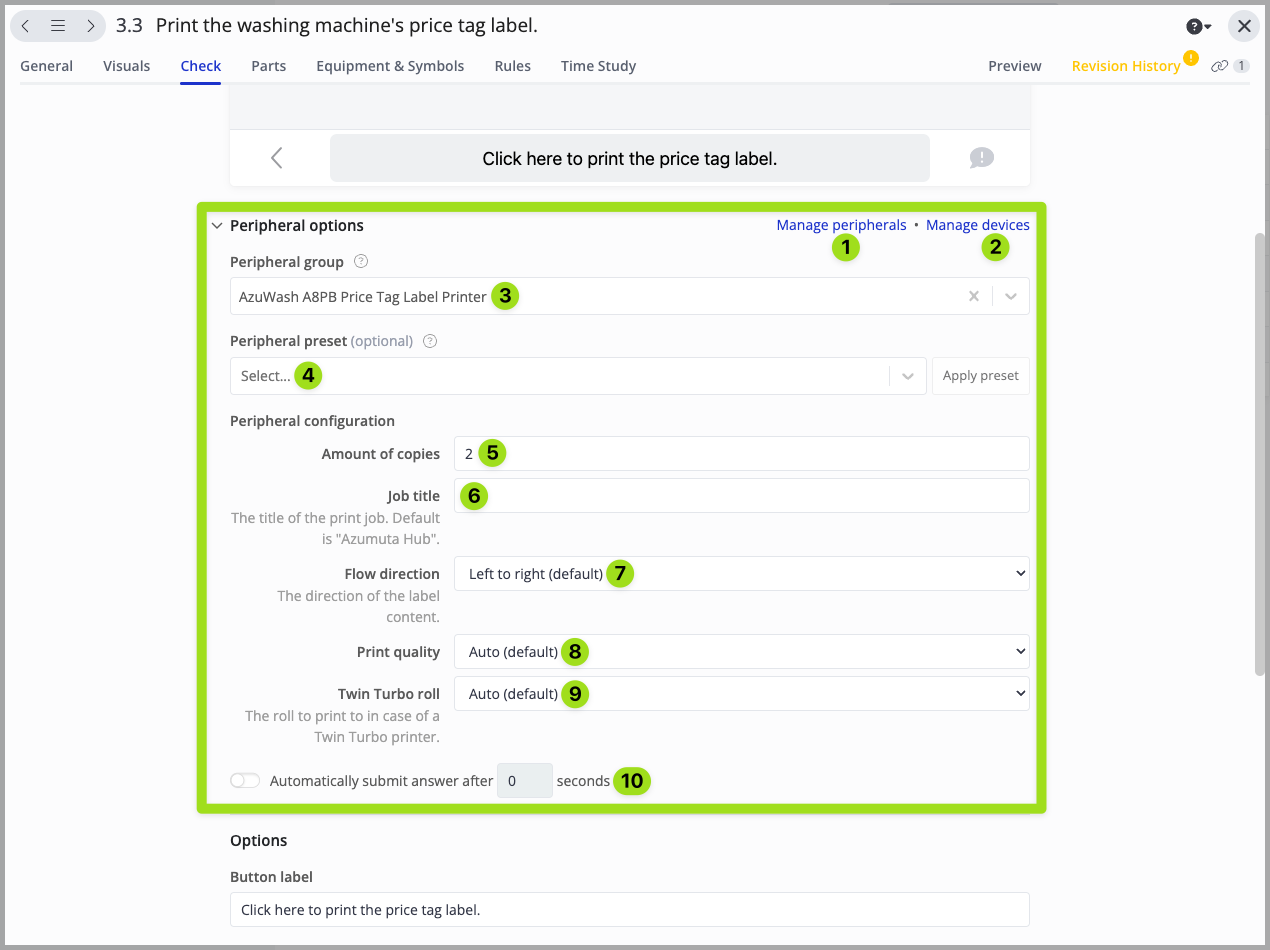
- Click to manage the peripheral devices that are linked to your Azumuta workspace.
- Click to manage the devices that are linked to your Azumuta workspace.
- Select the peripheral group that your operator will use to print the label(s). Hover your cursor over the question mark icon to learn more.
- Select the peripheral preset that your operator will use to print the label(s). Hover your cursor over the question mark icon to learn more.
- Select the number of label(s) that will be printed.
- Select the name of the printing job(s) that will come from this instruction step. This name will appear on your printer’s list of printing jobs. If you leave this field blank, then the printing job(s) will have the following name format: Azumuta Hub – Work Instruction ID (API Attribute).
- Select the printing direction of the label(s).
- Select the print quality of the label(s).
- Select whether the label printer will use the left or right roll to print the label(s). Please note that this option only applies to the DYMO LabelWriter 450 Twin Turbo Direct Thermal Label Printer. If your operator will use another type of label printer, then you can ignore this option.
- Select whether to turn on the auto-submit feature (and configure the auto-submit time). If this is turned on, then your operator won’t need to click on the button to print the label(s).
Button Options
Use the settings here to configure the button that your operator will need to click on in order to print the label(s).
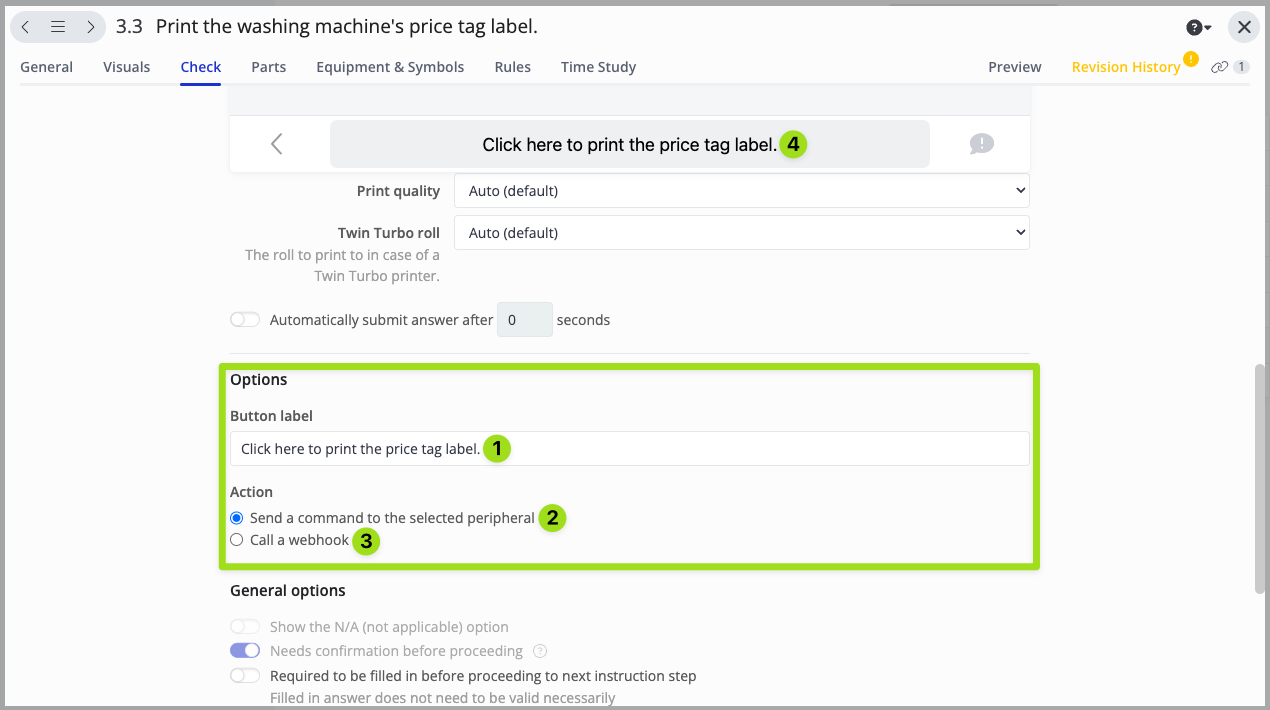
- Type in the text that will appear on the button that your operator must click on in order to print the label(s) – as shown in No.4.
- If you select this option, then the label(s) will be printed directly by your label printer.
- If you select this option, then you will open the webhook configurations. A webhook is a tool that’s commonly used to send & receive data across multiple platforms. Please contact us through support@azumuta.com to know more about how your shop floor can benefit from webhooks.
- This is a preview of the button that your operator must click in order to print the label(s).
General Options
These are the generic product check settings that administer the general properties of a product check.
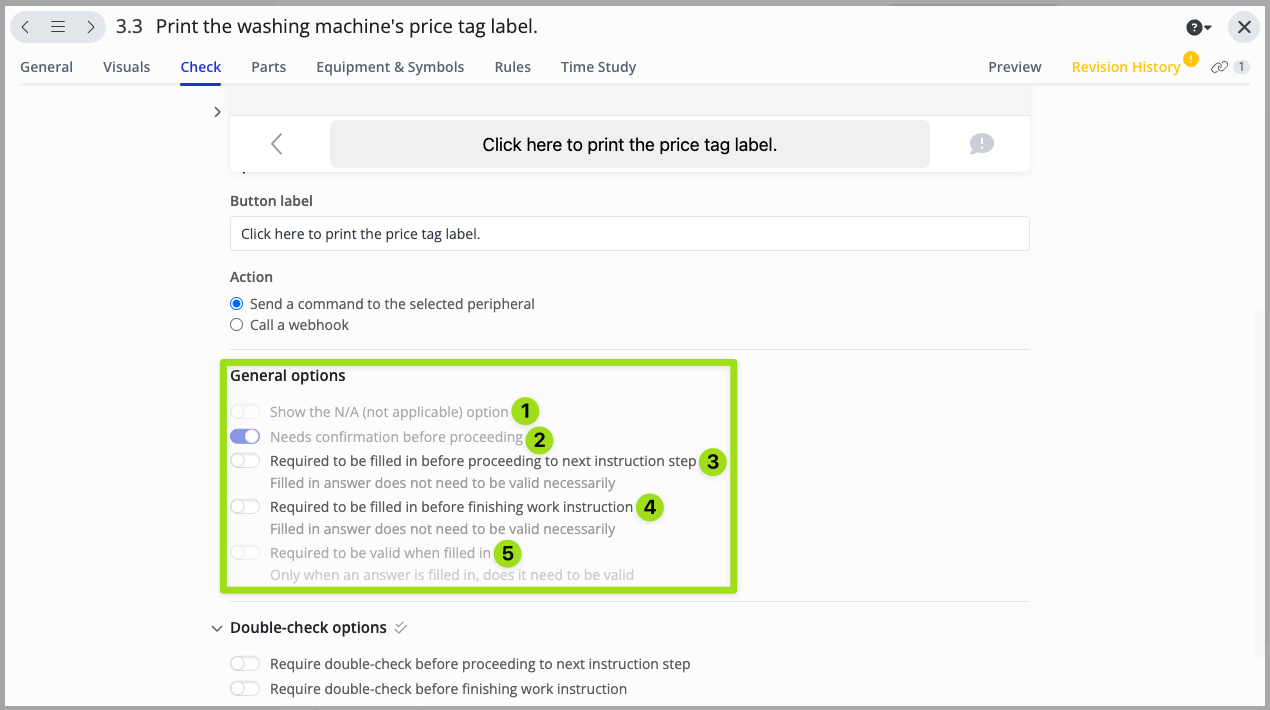
- Select whether to allow the operator to input the answer(s) to this product check as “not applicable/NA” (this toggle can’t be activated on this product check).
- Select whether to enable a pop-up confirmation menu to appear before the operator proceeds to the next instruction step (this toggle can’t be deactivated on this product check).
- Select whether this product check must be filled in before the operator can proceed to the next instruction step.
- Select whether completing this product check is mandatory in order to finish the work instruction.
- Select whether the operator’s answer must correspond to the pre-set requirements (this toggle can’t be activated on this product check).
Double-Check Options
See the double-checks for an instruction step guide for more details.
Phase 2: An Operator Prints the Label(s) Using the Procedure Check
After an admin has finished setting up the procedure check, an operator can use it to print the label(s). Printing label(s) as an operator is an easy and straightforward process. Here’s what you will need to do as an operator:
- Turn on your DYMO label printer.
- Connect your DYMO label printer to your device (either using a USB cable or a wireless network). Please ensure that it remains connected throughout the entire label printing process.
- Open the hub that you’ve received from Azumuta, and keep it open throughout the entire label printing process. Please contact us through our support@azumuta.com email to get this hub.
- Navigate to the instruction step that contains the procedure check that has been prepared by the admin.
- Ensure there’s an indicator showing that your DYMO label printer is connected to your device (as shown in the image below):
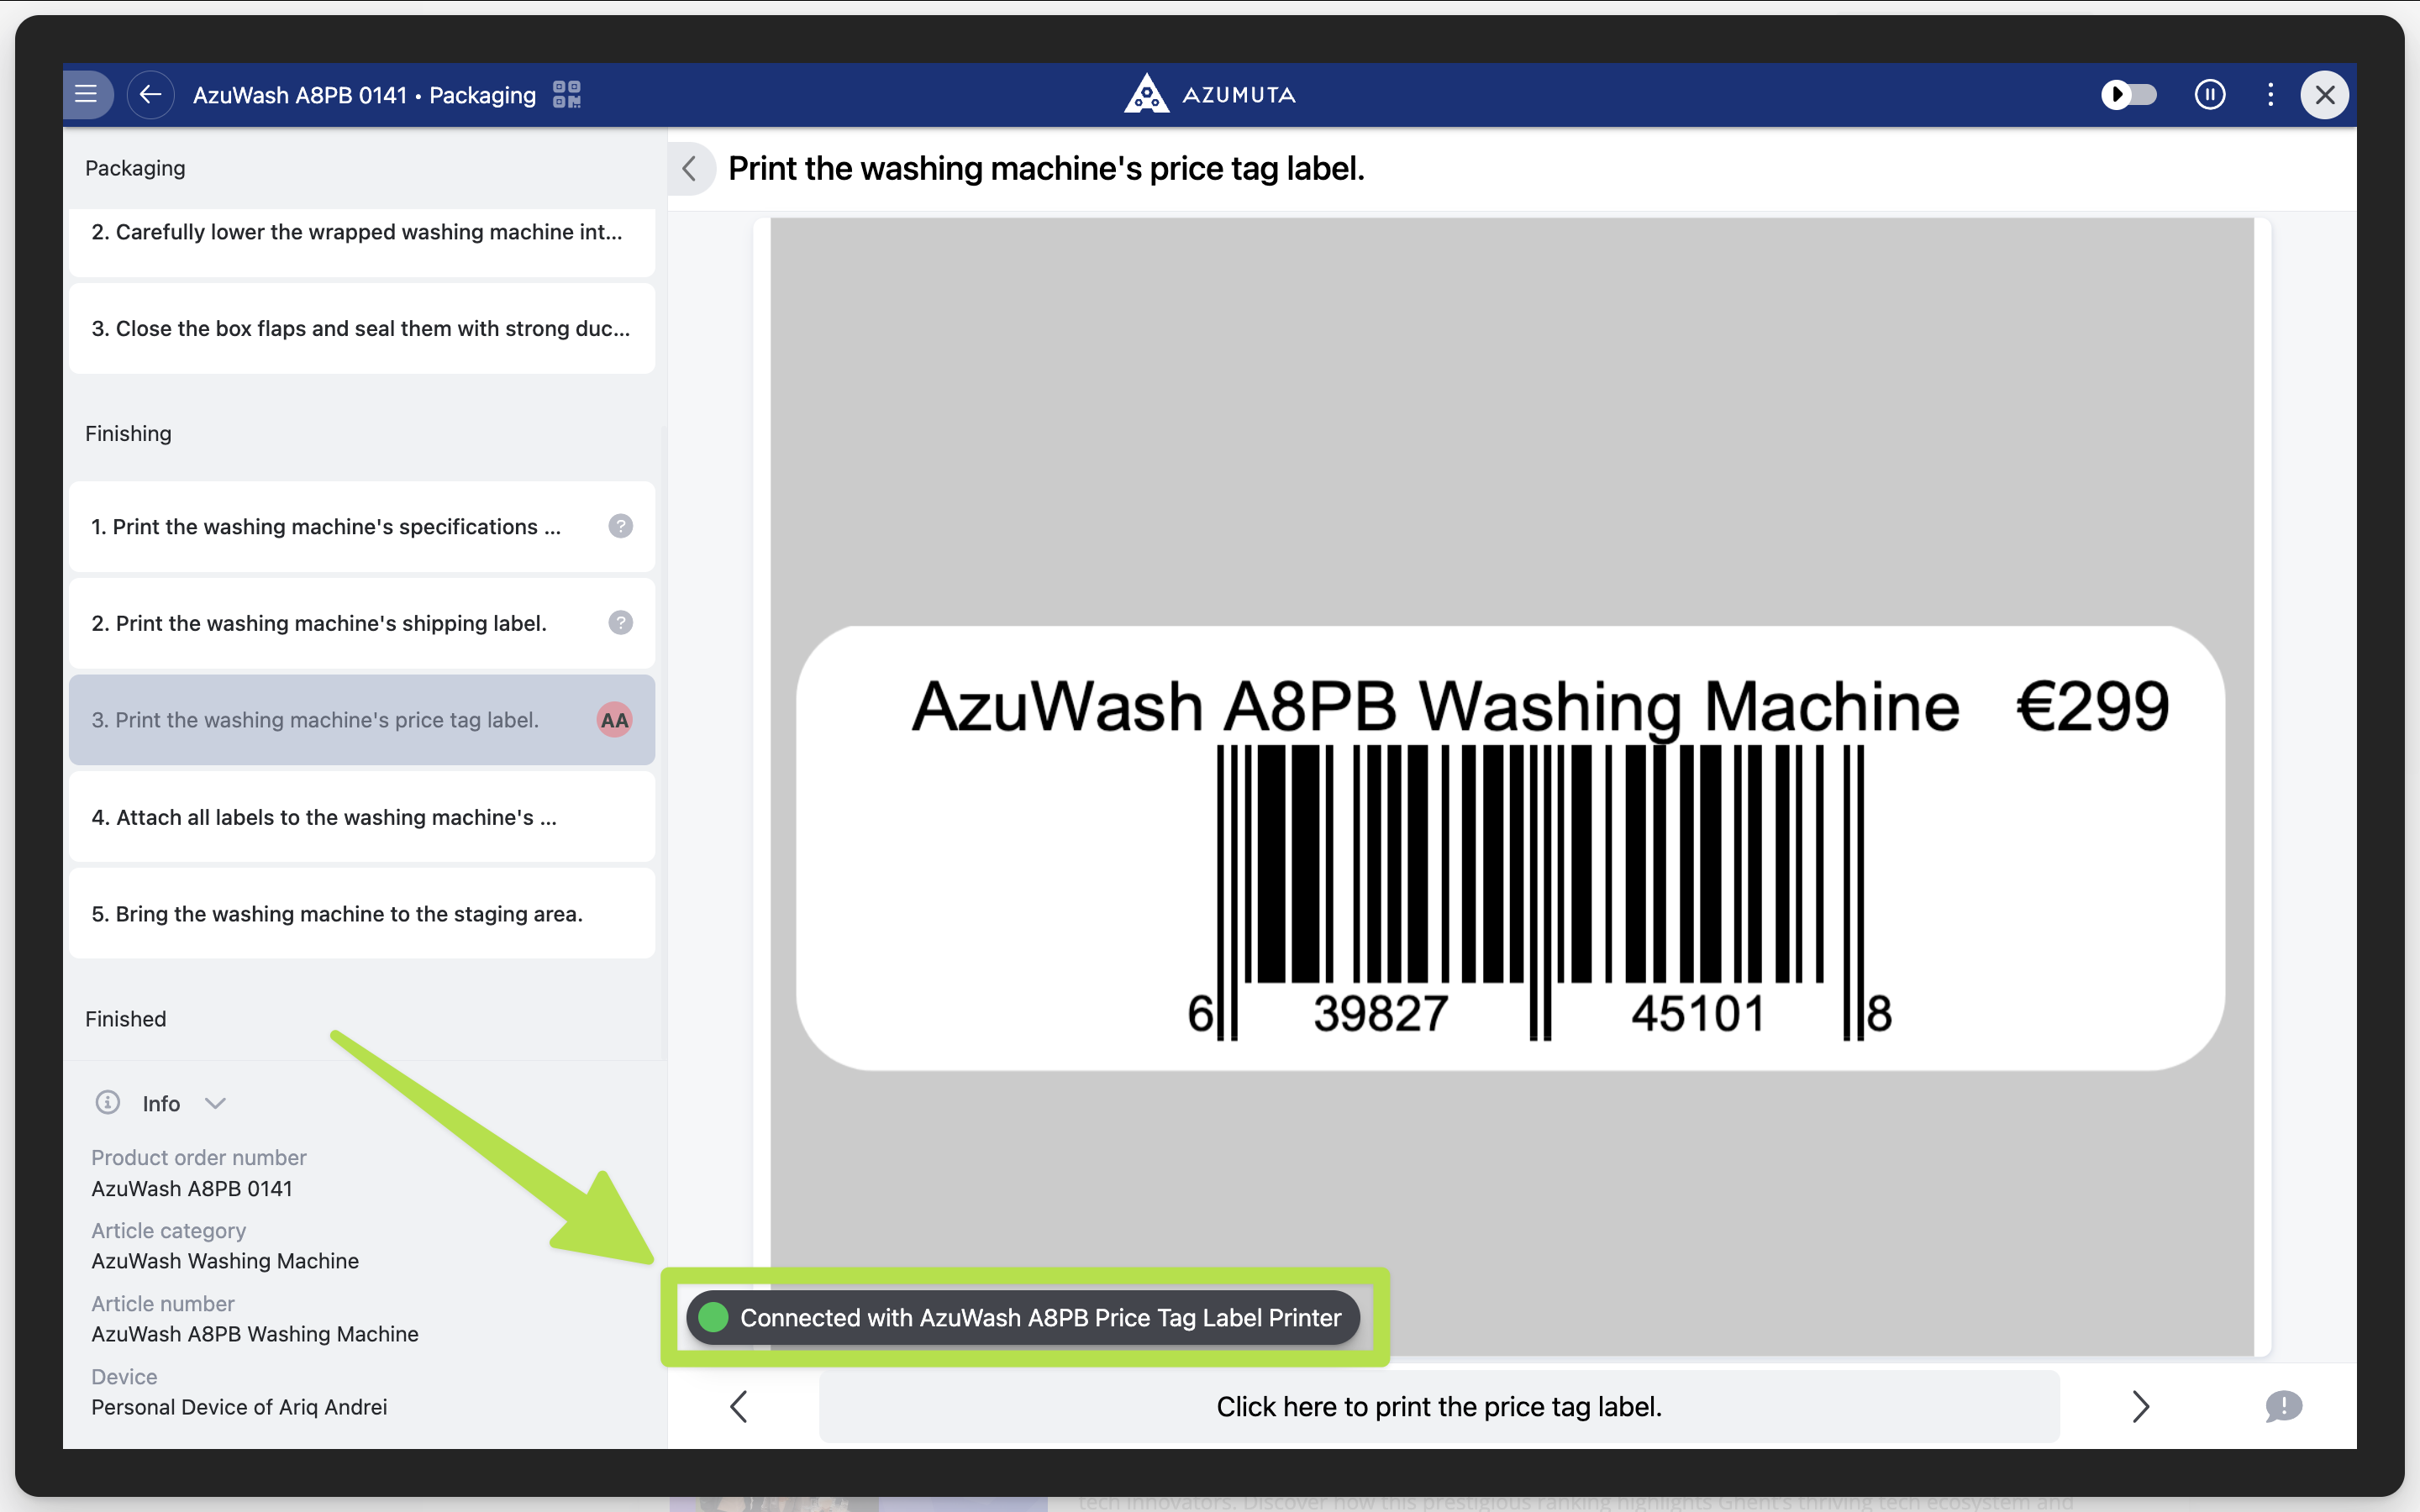
- Click on the button at the bottom of your screen.
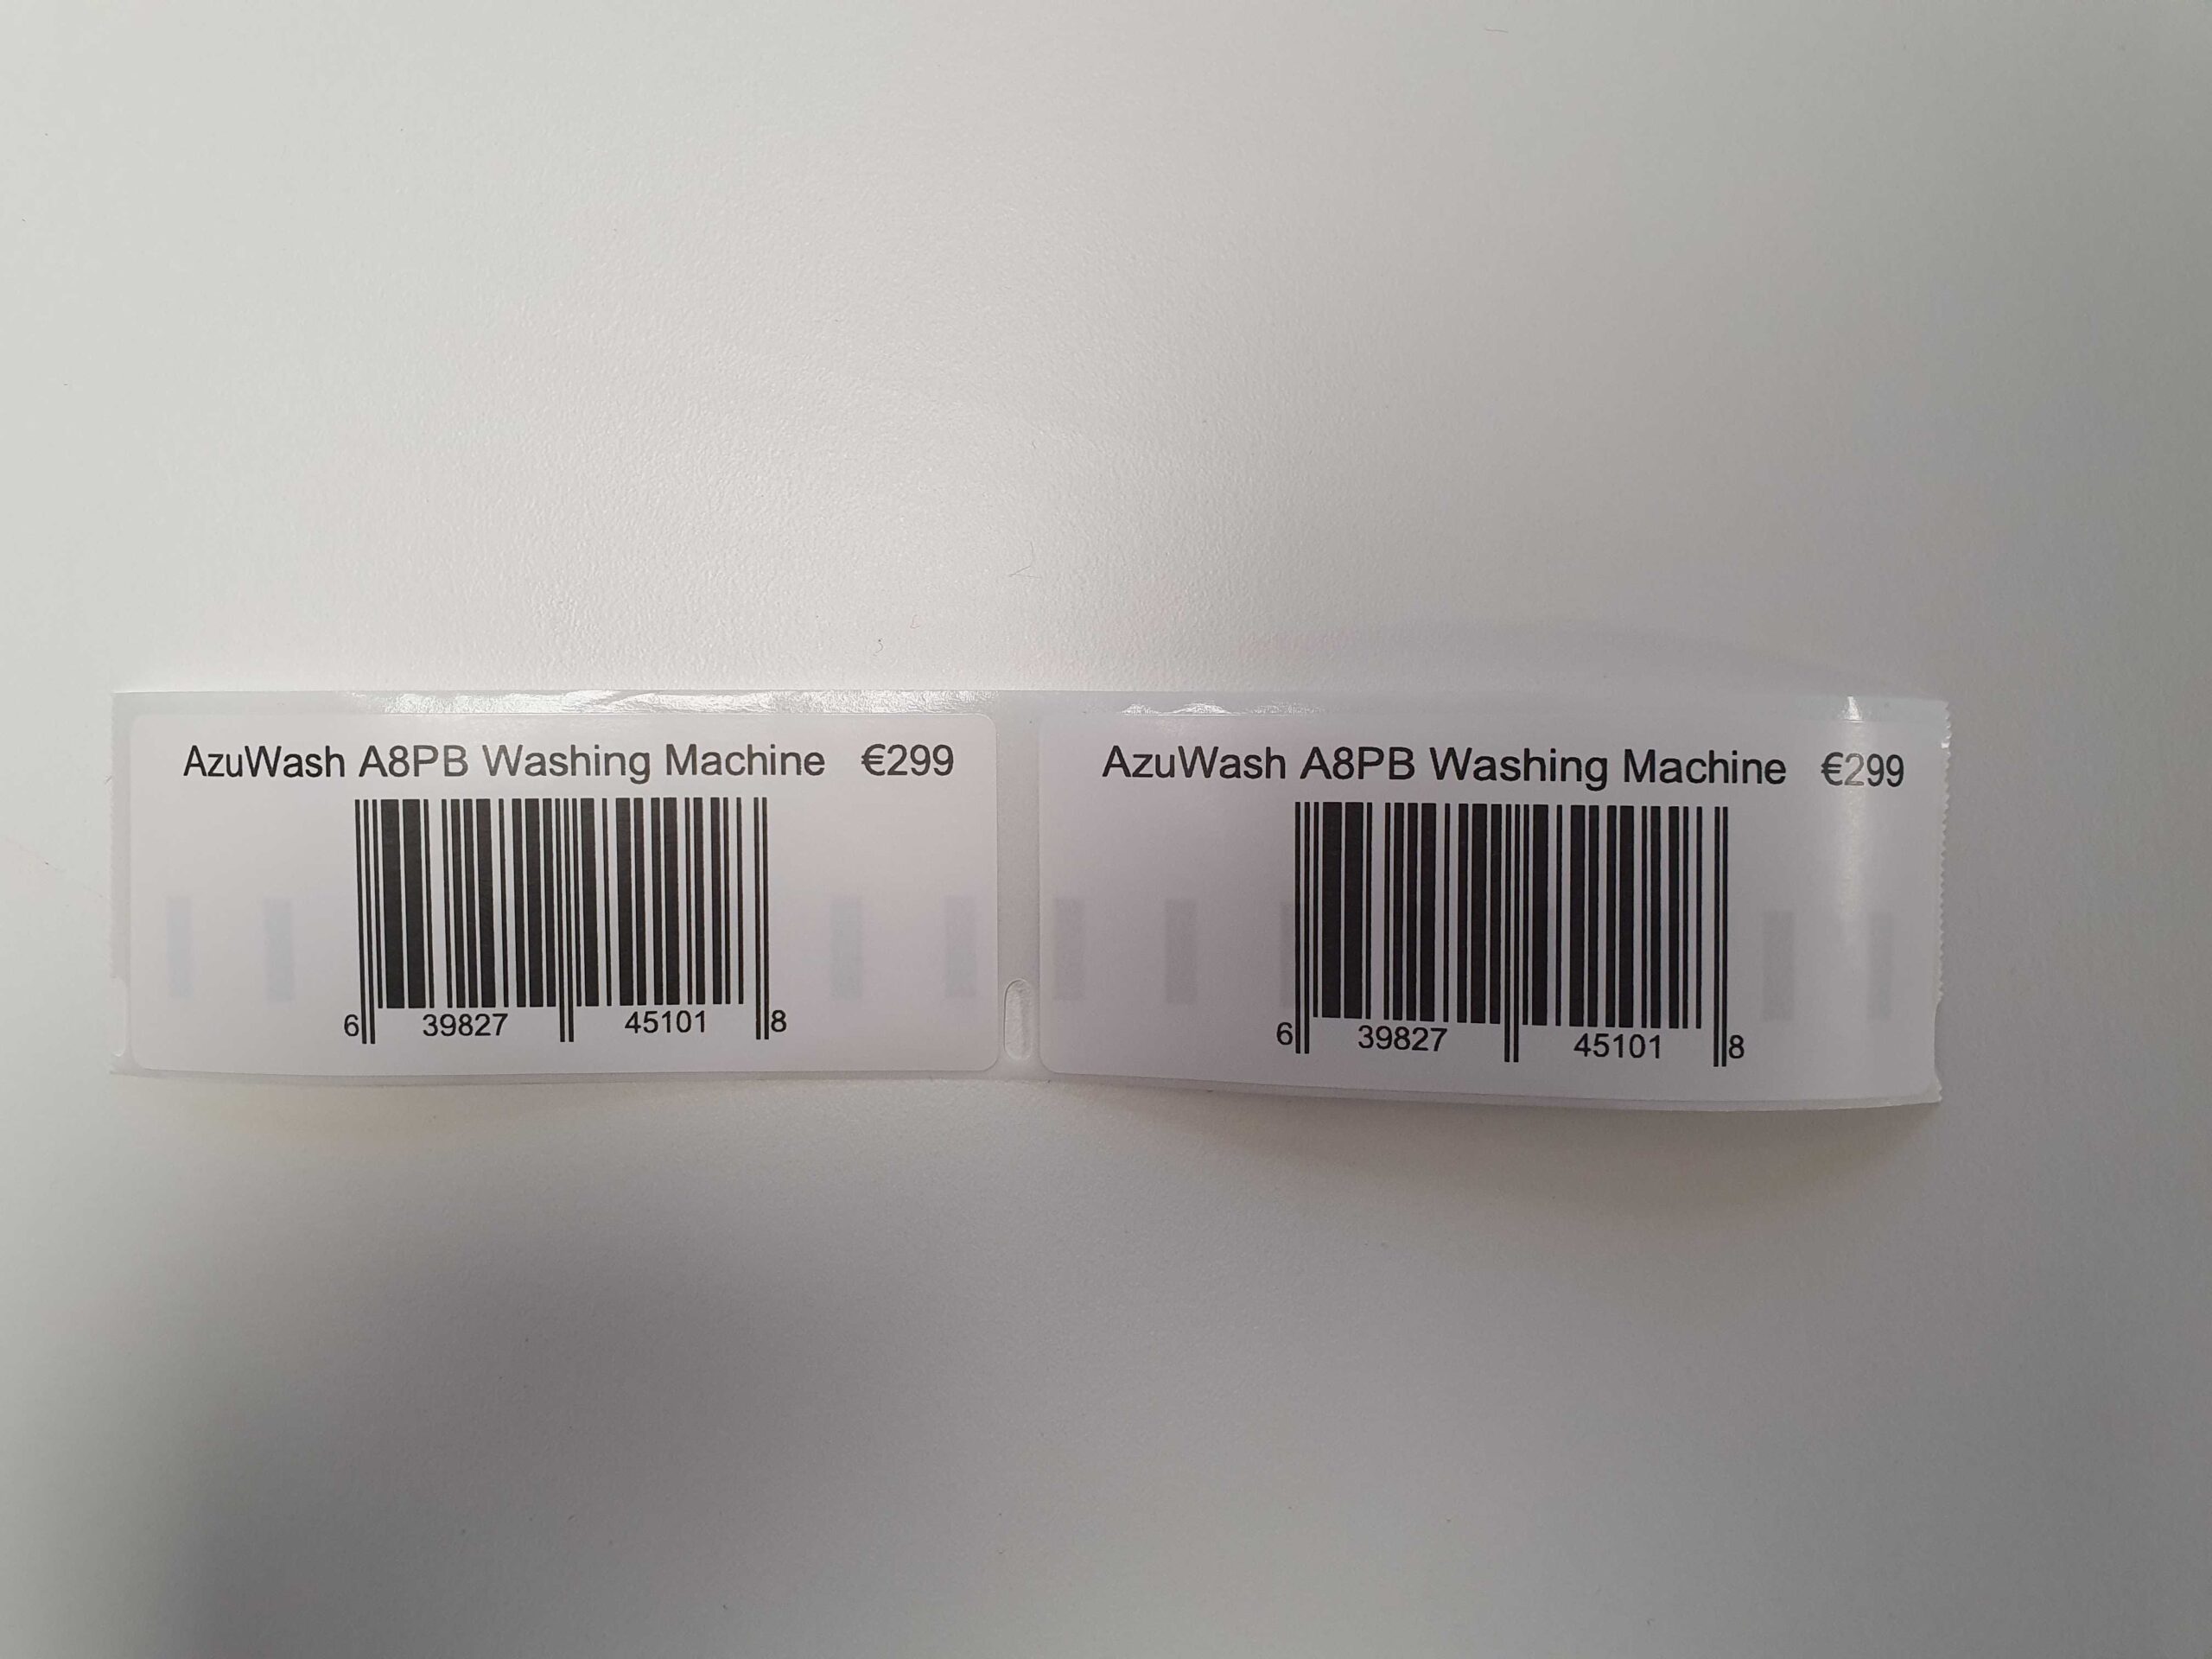
Afterward, the label(s) will be printed by your DYMO label printer.
These are the labels that we’ve printed:
Moreover, check out the video below to see a quick overview of how the DYMO label printer – Azumuta integration works: