
Peripheral Presets for a Digital Torque Wrench
What Is a Peripheral Preset?
In Azumuta, a peripheral device-supported product check can be configured extensively to meet your shop floor needs. However, setting up a product check takes some time. If you have to manually set up a product check every time you would like to use it in an instructions step, it will take a large chunk of your valuable time.
What if there’s a way where you only need to set up a peripheral device-supported product check once, save this configuration, and then reuse it again in the future?
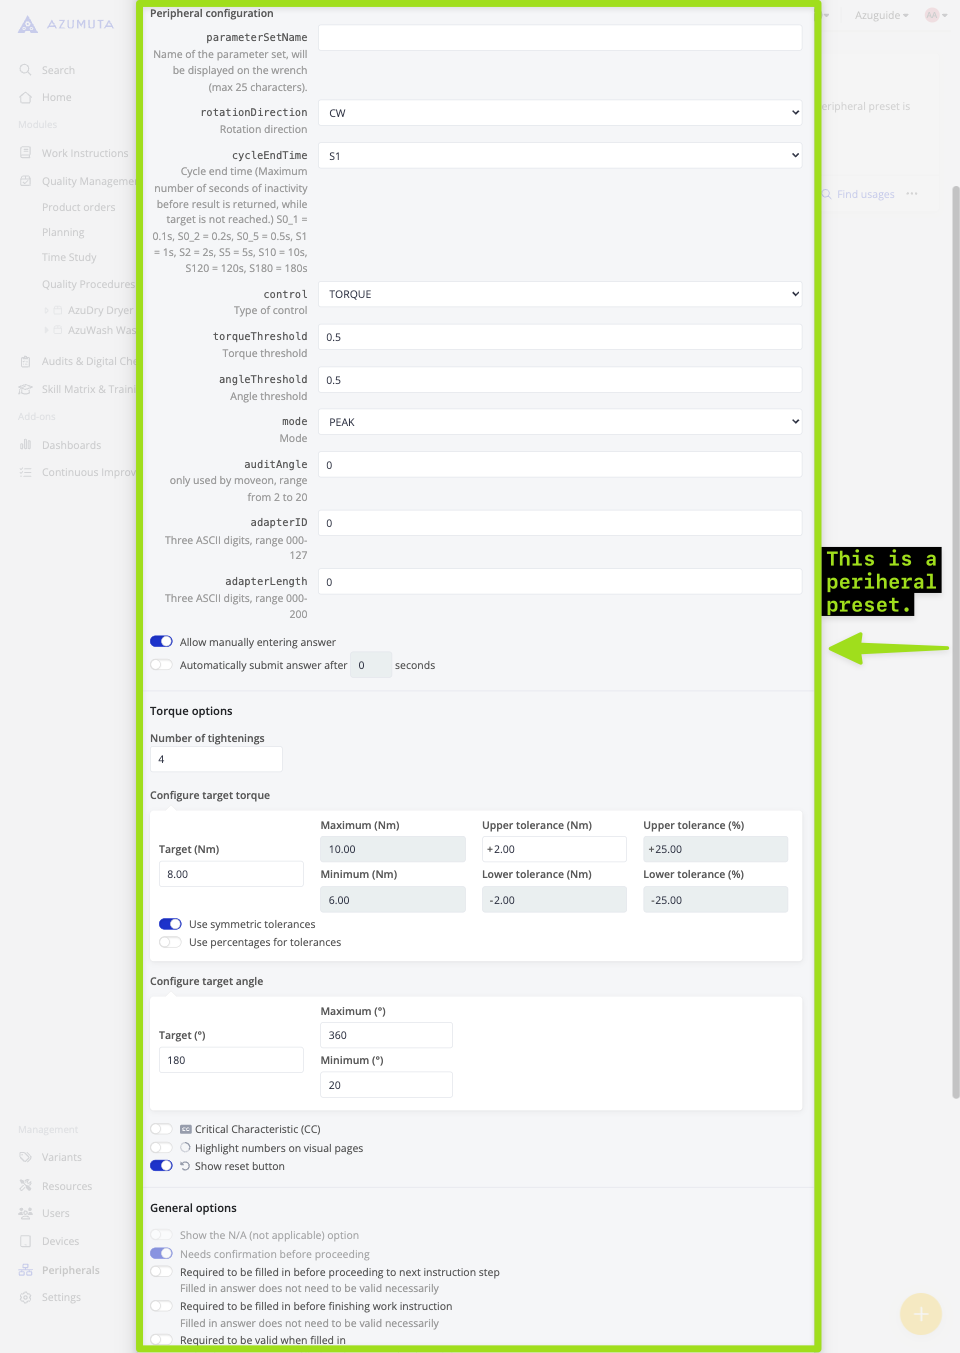
Well, peripheral presets are the answer to that. A peripheral preset is a peripheral device-supported product check configuration that has been saved and can be reused again perpetually. That way, you don’t have to manually configure it each time you would like to use it on an instruction step – saving you time in the process.
How to Create a Peripheral Preset
Before creating a peripheral preset, make sure that you’ve integrated your digital torque wrench into your workspace.
With that being said, here’s how to create a peripheral preset for a digital torque wrench:
- Click on “Peripherals” under “Management”.
- Click on the “Presets” tab.
- Click on the yellow plus button.
- Fill in the existing fields on each peripheral option as desired. We will provide an explanation of each peripheral option under the video.
- When you’re done, click on “Add” at the bottom of the menu.
When creating a peripheral preset, you will need to configure several options. You will find the guide for each option below:
Basic Options
These options cover the most basic elements of the peripheral preset: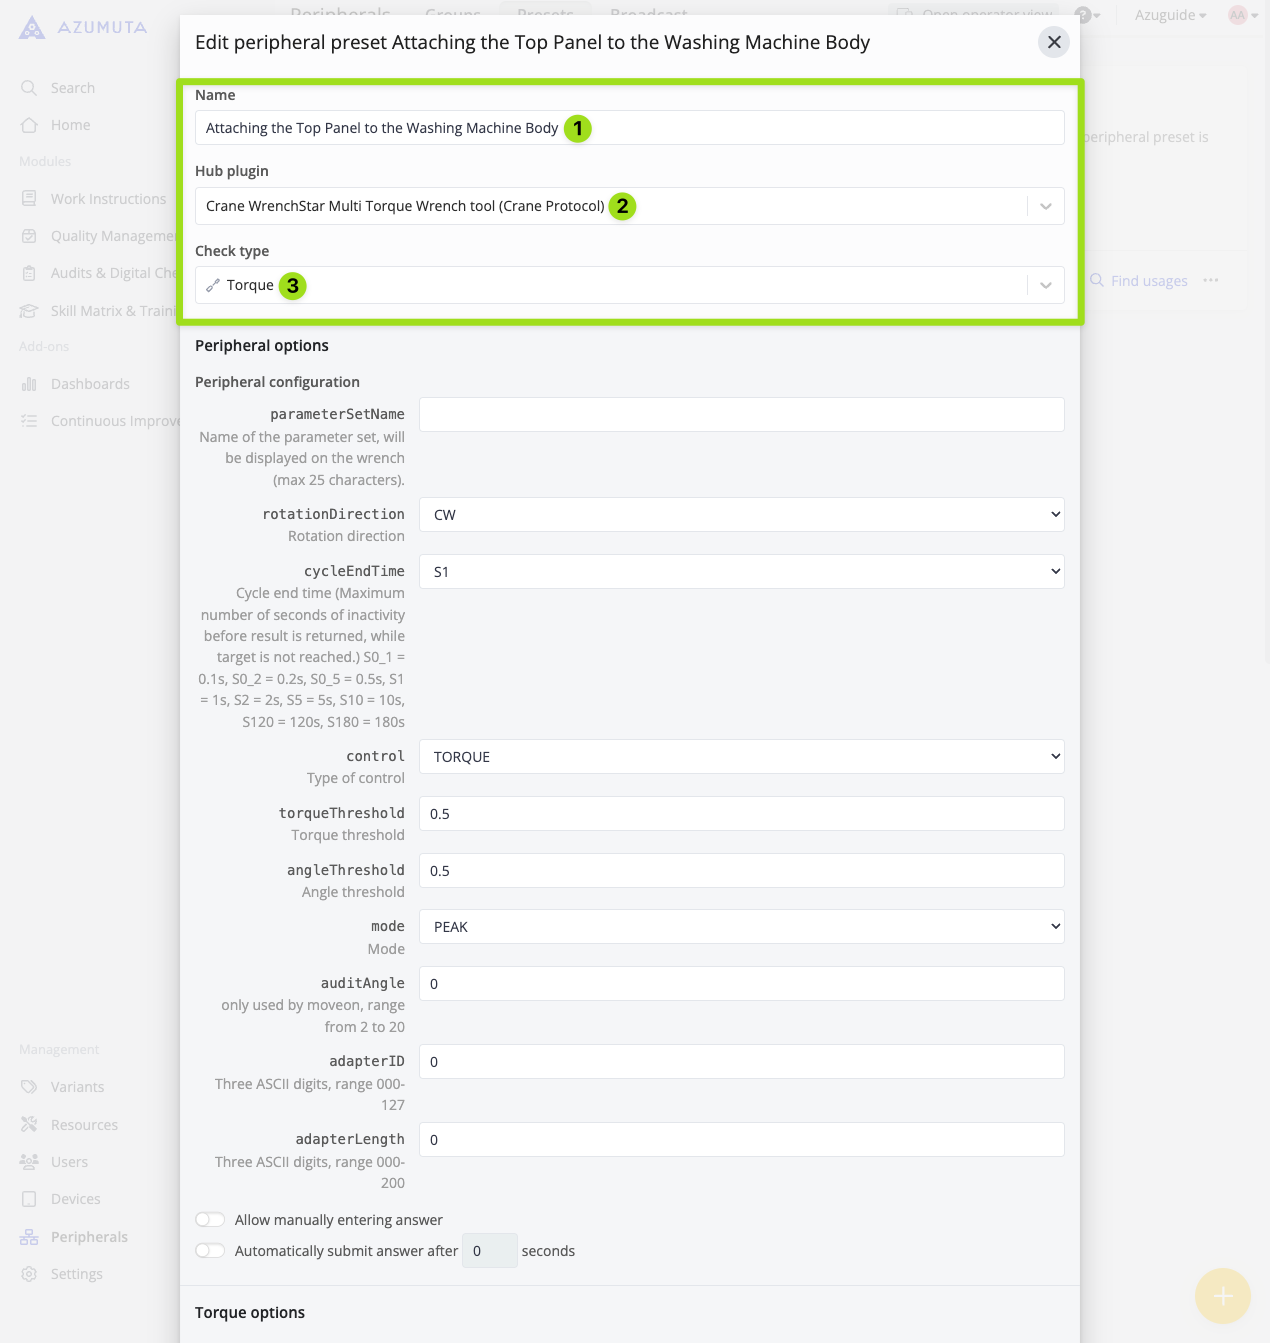
- Type the peripheral preset’s name in this field.
- Select the hub plugin that corresponds to your digital torque wrench. Should you have any doubts, please contact us through our support@azumuta.com email.
- Select the product check type (you should always choose “Torque” in this field).
Peripheral Options
These options mainly concern the digital torque wrench settings:
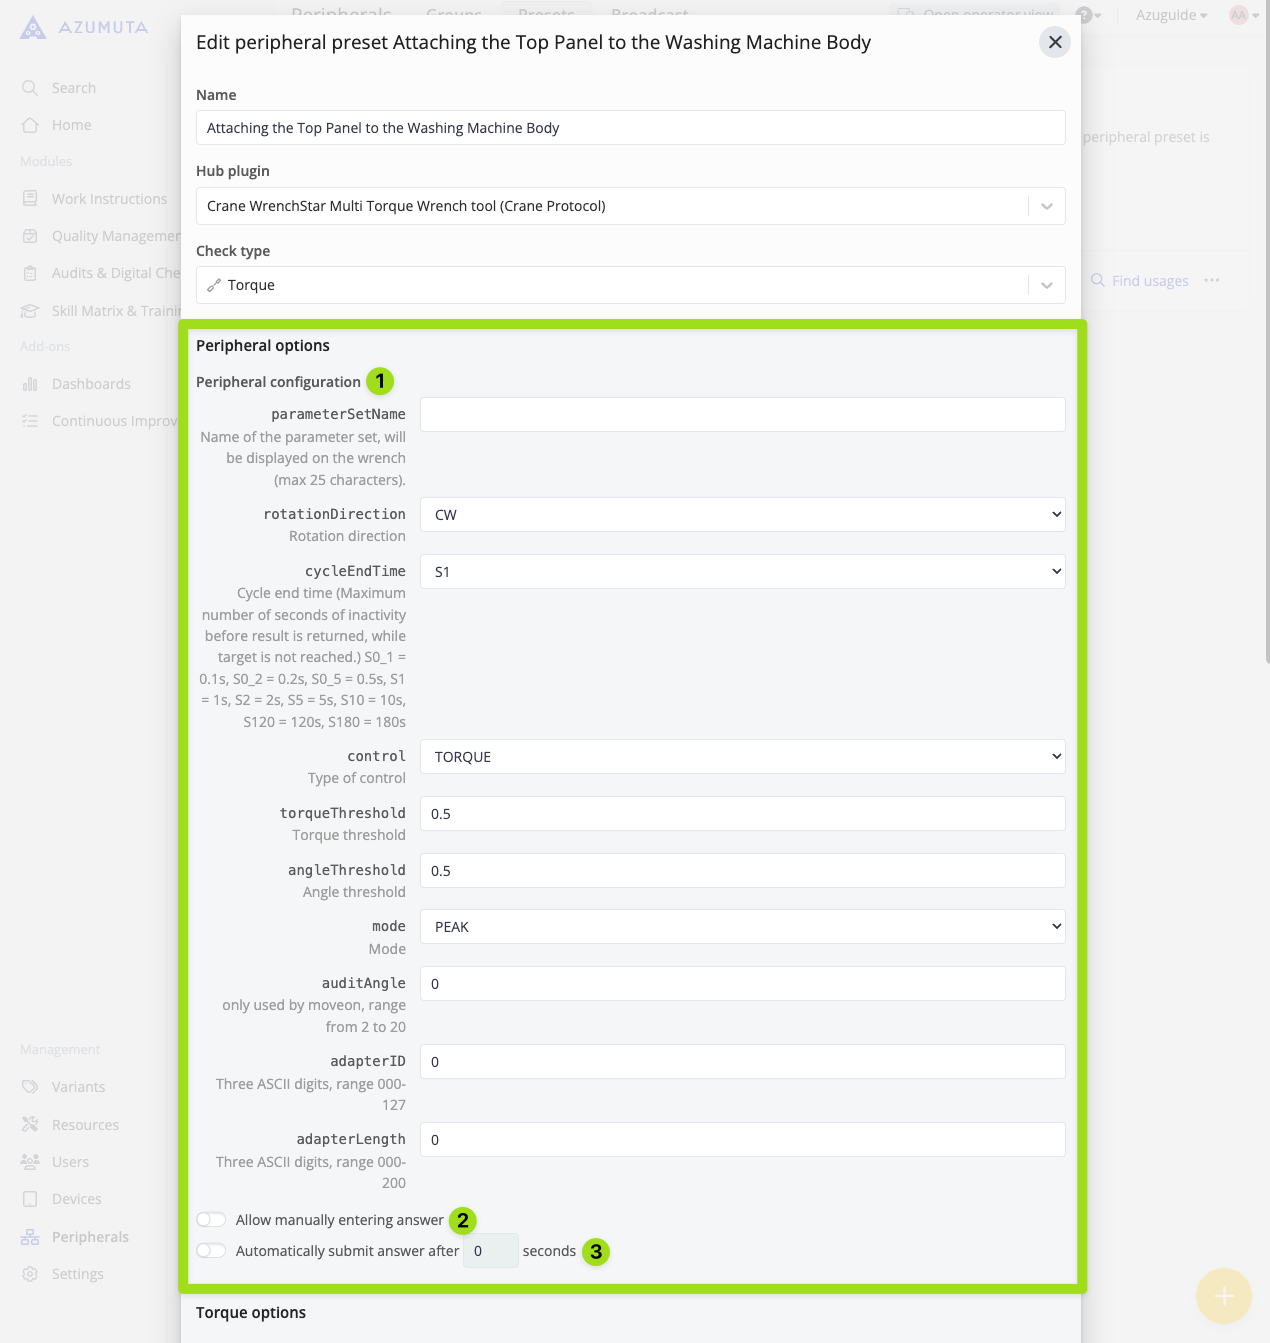
- You can adjust the digital torque wrench’s configurations on the fields below “Peripheral configuration”. The existing fields will differ based on the selected hub plugin. Due to the complexity of these configurations, we recommend you to leave these fields as they are. Should you have any questions, please contact us through our support@azumuta.com email.
- Select whether to allow your operators to manually type in the answer to a torque check – without the need to use a digital torque wrench to perform the required torquing tasks.
- Select whether to turn on the auto-submit feature (and configure the auto-submit time). If this is turned on, then all answers to a torque check will be automatically submitted after the auto-submit time has elapsed. Thus, your operator won’t need to click on the submit button after they’ve finished all tightenings within a torque check.
Torque Options
These options are the most important part of the peripheral presets. These options allow you to set the standards that must be followed by your operators when performing a torque check:
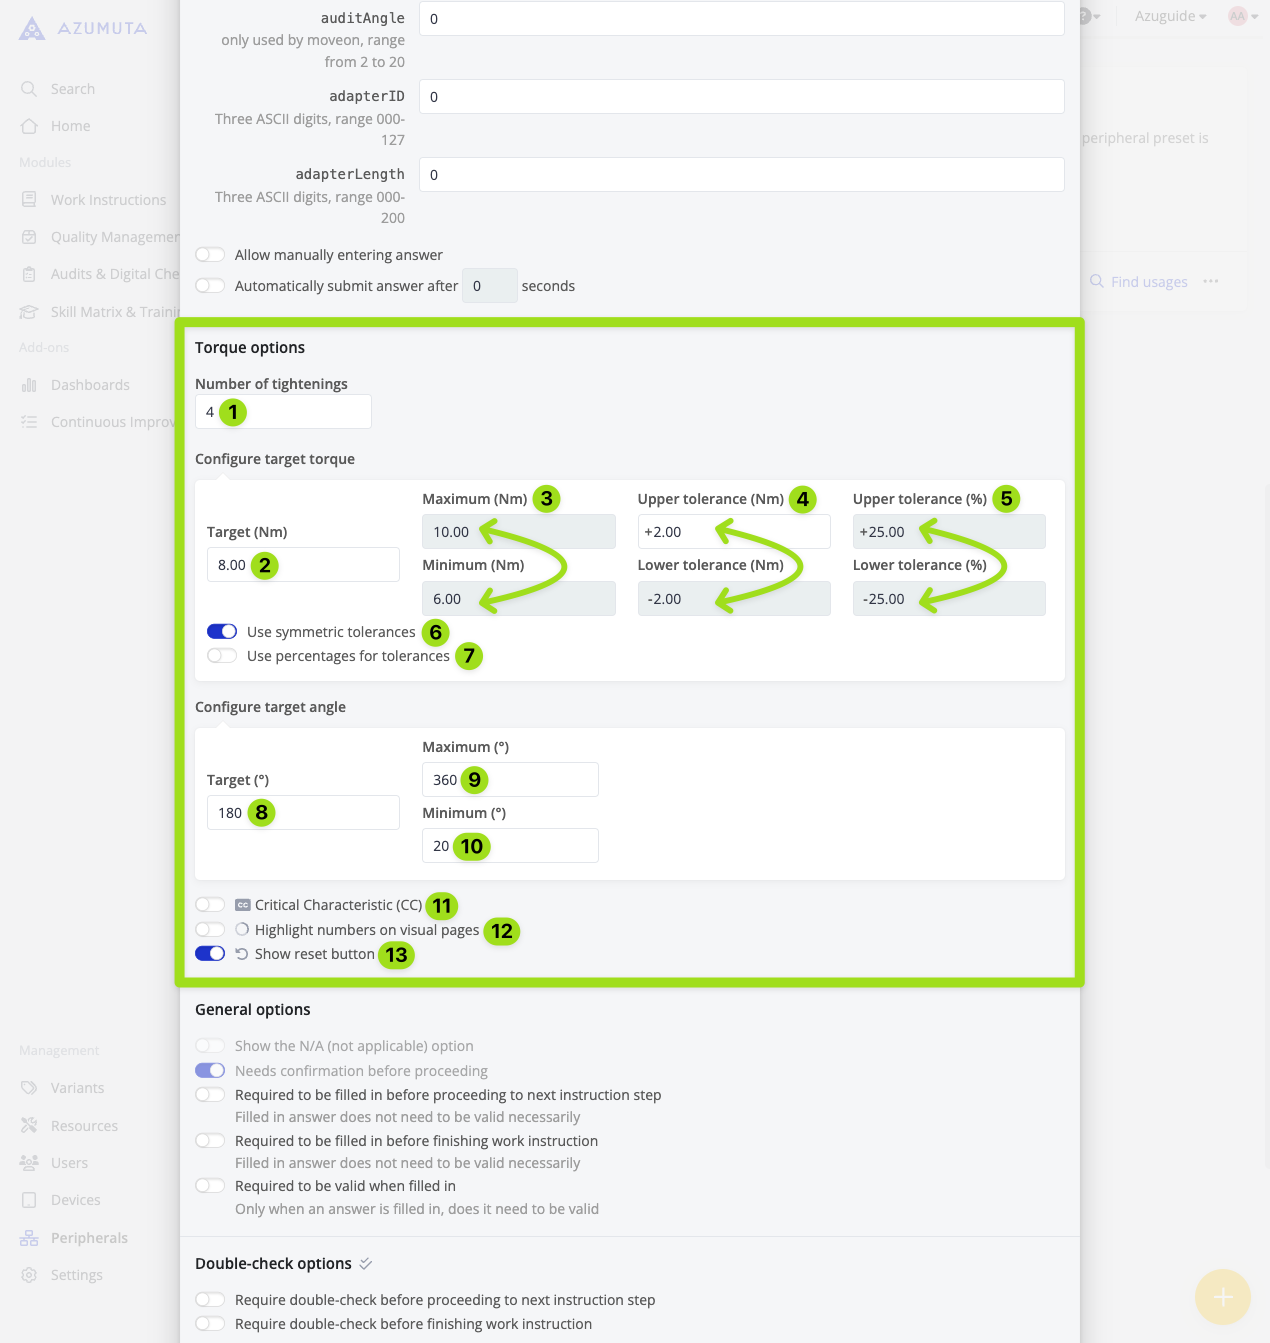
- Input the number of torque tightening(s) that an operator must do within a torque check.
- Input the targeted torque value that an operator should deliver at each tightening.
- These two fields underneath show the tolerated maximum and minimum torque values that your operator must deliver at each tightening. You can’t edit these two fields manually. Instead, you should use the fields on No.4 or No.5 instead.
- Input the tolerated deviations from the targetted torque value (measured in nominal Newton-meter/Nm) on these 2 fields. You can also input “0” if you tolerate no deviations. If you want to use these 2 fields, then make sure that the toggle on No.7 is off.
- Input the tolerated deviations from the targetted torque value (measured in percentage) on these 2 fields. You can also input “0” if you tolerate no deviations. If you want to use these 2 fields, then make sure that the toggle on No.7 is on.
- If you switch this toggle on, then the tolerated maximum & minimum torque values (be it on Nm or percentage) will be automatically synchronized.
- If this toggle is on, then you will use the fields on No.5 (and not on No.4). On the other hand, If this toggle is off, then you will use the fields on No.4 (and not on No.5).
- Input the targeted torquing angle that your operator should adhere to at each tightening.
- Input the tolerated maximum to the torquing angle that your operator should adhere to at each tightening.
- Input the tolerated minimum to the torquing angle that your operator should adhere to at each tightening.
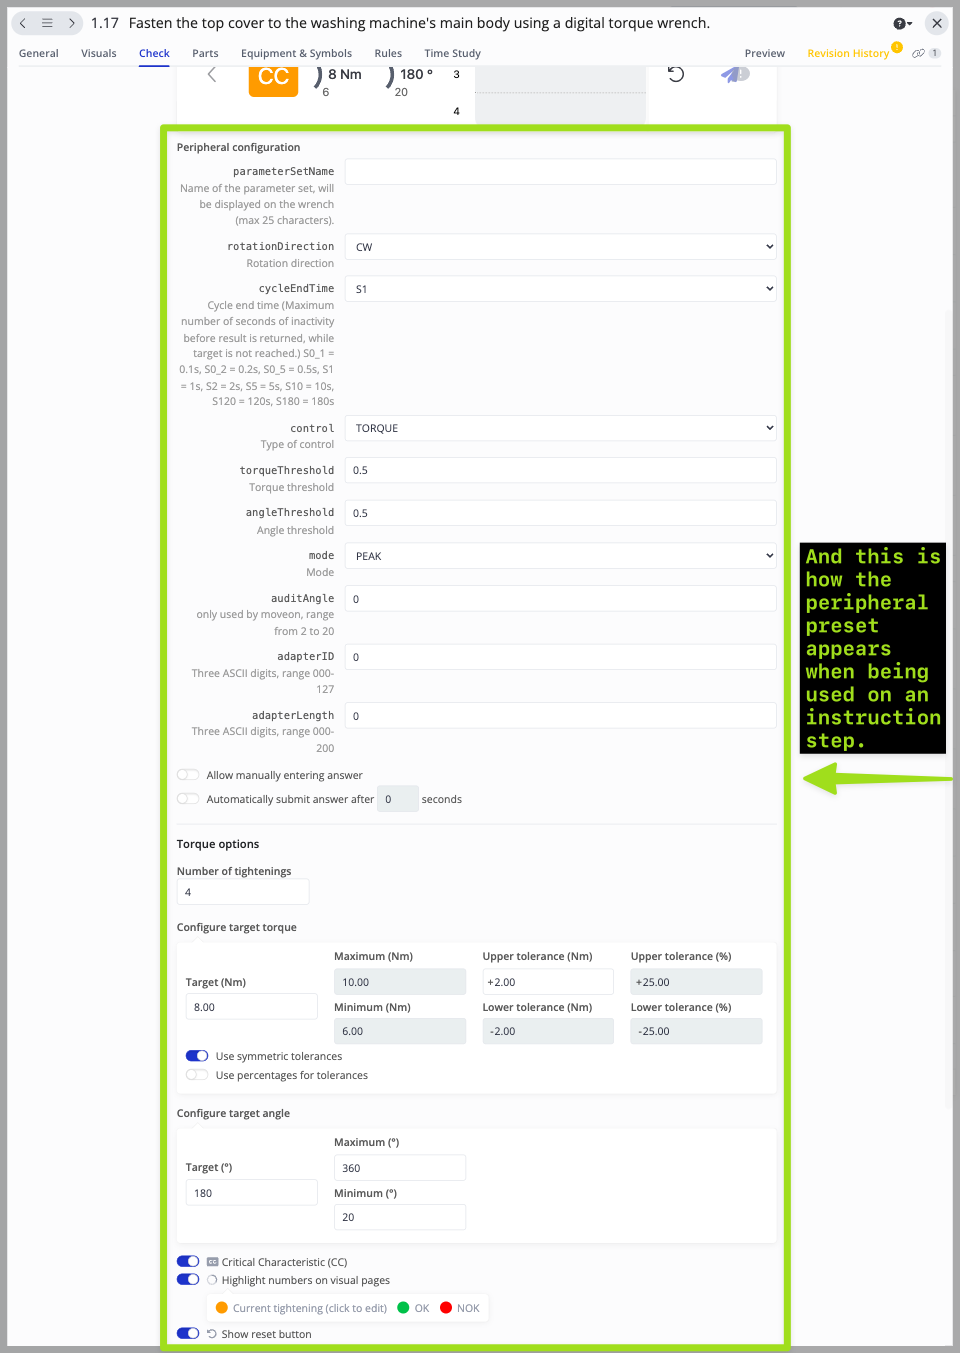
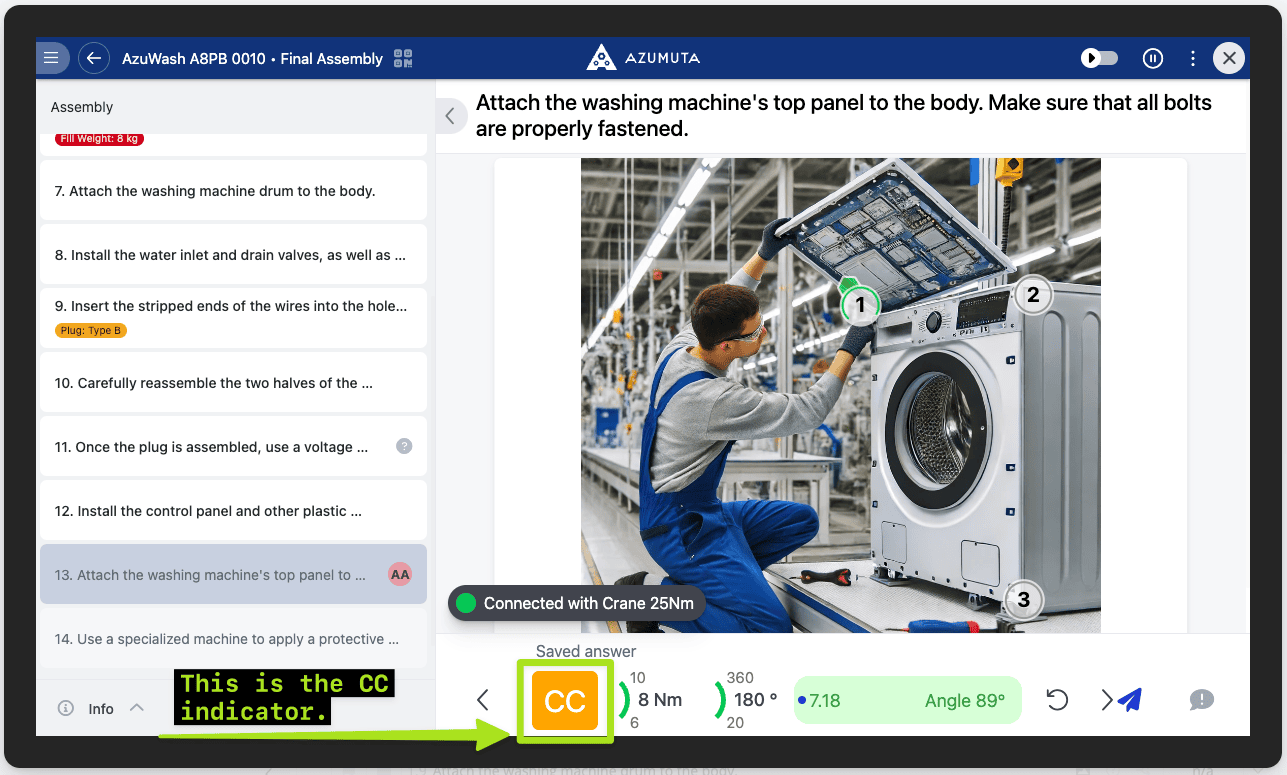
- If this toggle is on, then you will have the Critical Characteristic (CC) indicator. It emphasizes to your operator that this particular instruction step is critical and that there’s no room for error. Take a look at the image below to see the CC indicator.
- If this toggle is on, then you can add numbers with a highlighter on this particular instruction step. Each number’s highlighter is color-coded: green for tightenings that fulfill the standards set by the admin (OK) and red for tightenings that don’t fulfill these standards (NOK). These two colors are fixed and can’t be edited. However, you can edit the color of the number highlighter of the tightening that the operator should currently do. For example in the image below, tightening 1 is OK, tightening 2 is NOK, and the operator is currently on tightening 3 (we set the custom color to be yellow).

- Select whether you would like to display the reset button on the operator’s screen. The reset button can be used by the operator to re-do a tightening.
General Options
These are the generic product check options that administer the general attributes of a product check:
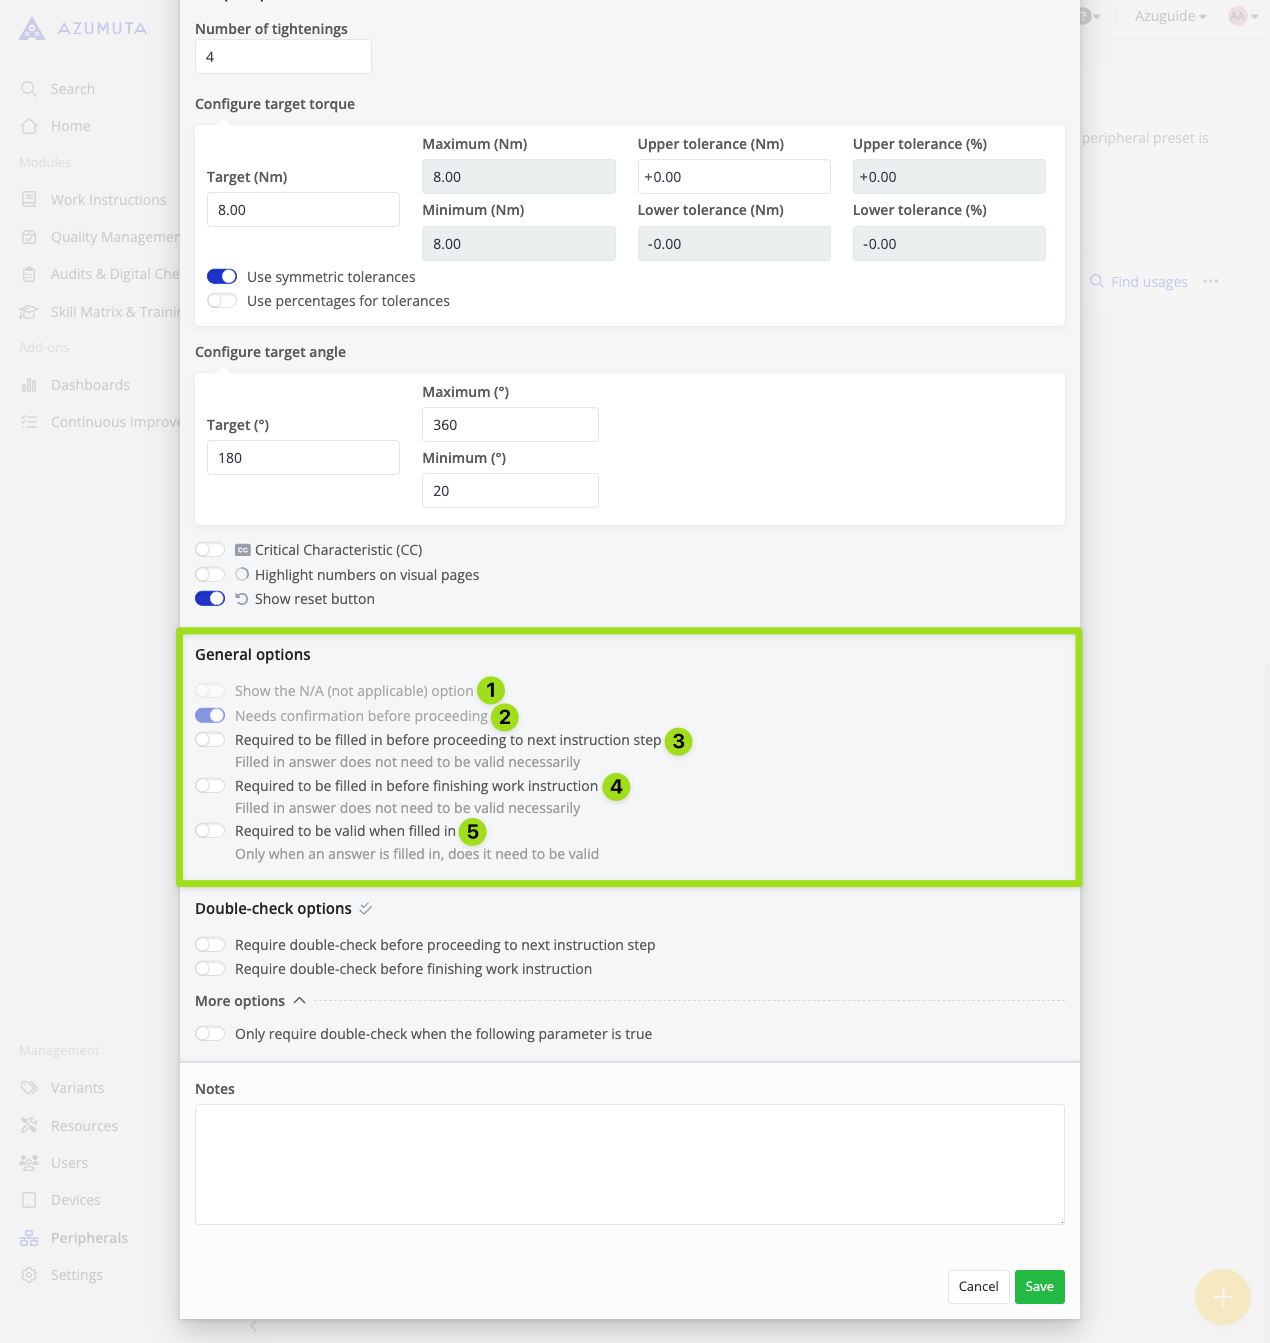
- Select whether to allow the operator to input the answer(s) to this product check as “not applicable/NA” (this toggle can’t be activated on this product check).
- Select whether the answer(s) to this check can only come from a peripheral device (this toggle can’t be deactivated on this product check).
- Select whether this product check must be filled in before the operator can proceed to the next instruction step.
- Select whether completing this product check is mandatory in order to finish the work instruction.
- Select whether the answer(s) to this product check should conform to the pre-set format & tolerated value limits.
Double Check Options
See the double checks for an instruction step guide for more details.
How to Add a Peripheral Preset to a Product Check
After you’ve created the peripheral preset, you can use it on a torque check (so you won’t have to manually configure that torque check anymore in the future). Here’s how:
- Navigate to an instruction step where you would like to use that peripheral preset on, and click on “Open”.
- Click the “Check” tab.
- Select “Torque”.
- Click on the dropdown menu under “Peripheral group”, and select the corresponding peripheral group.
- Click on the dropdown menu under “Peripheral preset (optional)”, and select the desired peripheral preset.
- Click on “Yes”.
- The options underneath will be automatically configured to match the peripheral preset. However, you can still edit it manually, if desired.
How to Edit a Peripheral Preset
- Click on “Peripherals” under “Management”.
- Click on the “Presets” tab.
- Click on the three-dot icon next to the peripheral preset that you would like to edit
- Click on “Edit”.
- Perform the desired edits.
- After you’re done with your edits, click on “Save”.
How to See in Which Instruction Steps Is a Peripheral Preset Being Used
- Click on “Peripherals” under “Management”.
- Click on the “Presets” tab.
- Click on “Find Usages” next to the desired peripheral preset.
- Scroll down, and you will see the list of instruction steps that are linked to that peripheral preset under “Instruction steps”. You can also click on any of them, and you will be redirected to its instruction step editor afterward.
You can also use the tools highlighted in the image below to narrow your search: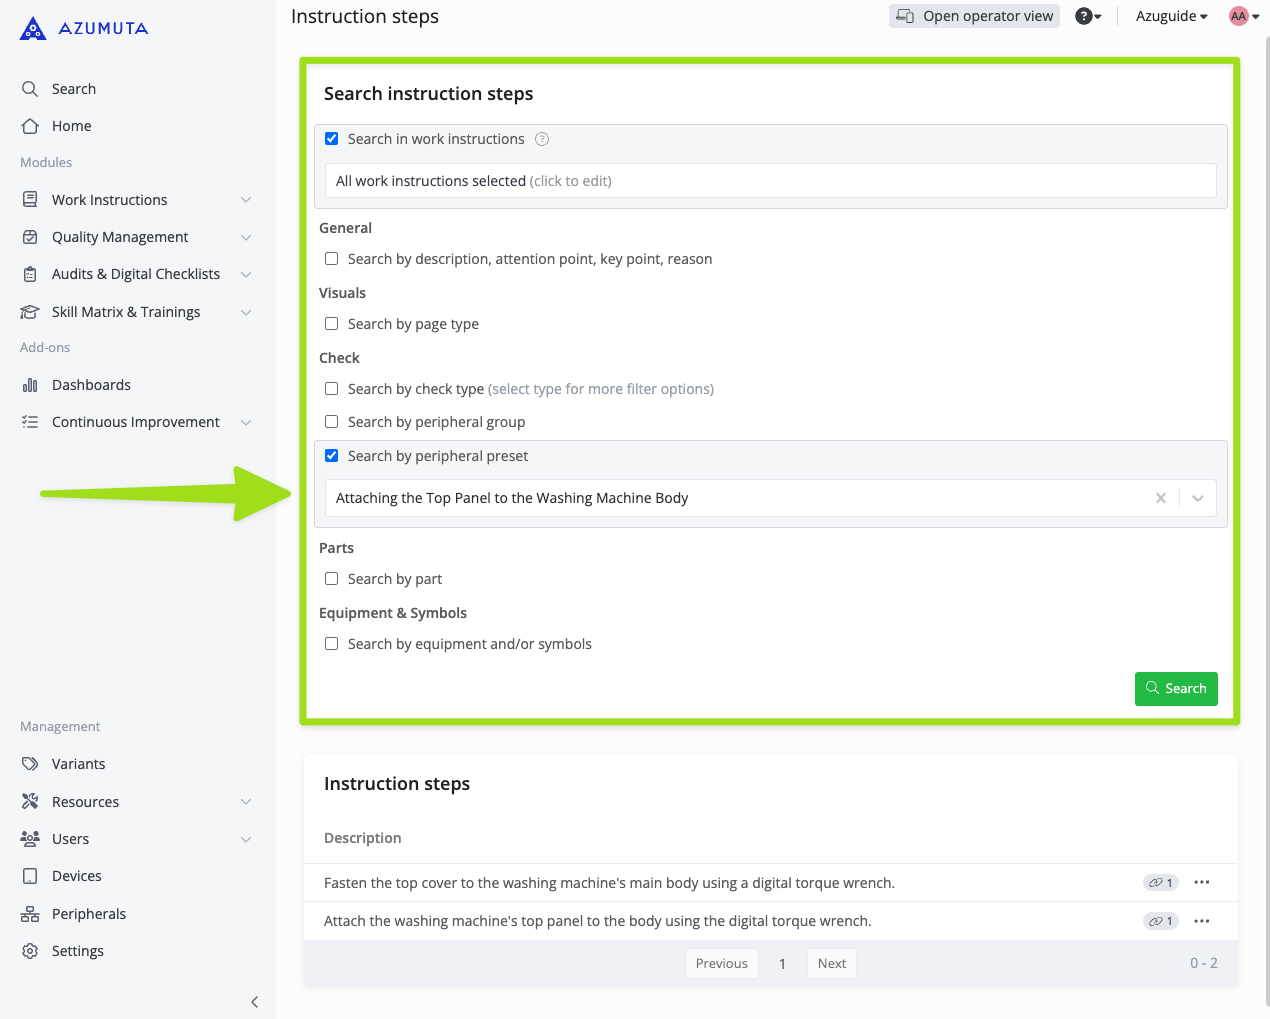
How to Delete a Peripheral Preset
- Click on “Peripherals” under “Management”.
- Click on the “Presets” tab.
- Click on the three-dot icon next to the peripheral preset that you wish to delete.
- Click on “Remove”.
- Click on “Remove” again.