Azumuta Knowledge Base

Get started quickly or discover Azumuta in detail.

Quick Start

  • What Are the Quick Start Guides?
  • Quick Start: Azumuta Basics
  • Quick Start: The Freely Consultable Work Instructions Module
  • Quick Start: The Quality Management Module
  • Quick Start: The Audits & Digital Checklists Module
  • Quick Start: The Skill Matrix & Trainings Module
  • Quick Start: The Dashboards Add-on
  • Quick Start: The Continuous Improvement Add-on

How to Use Azumuta

  • Introduction to Azumuta
  • Welcome to Azumuta
    • Introduction to Azumuta
    • Navigating the Homepage (Admin View/Azumuta on Web)
    • Navigating the Sidebar (Admin View/Azumuta on Web)
    • The Navigation Breadcrumb
    • The Search Bar
    • How to Edit Your Azumuta Profile
    • Glossary
  • Work Instructions
    • What Is a Work Instruction?
    • What Is a Freely Consultable Work Instruction?
    • How to Create a Work Instruction
      • How to Create a Work Instruction
      • How to Add an Instruction Block to a Work Instruction
      • How to Add an Instruction Step to a Work Instruction
    • How to Edit a Work Instruction
      • How to Edit an Instruction Block
      • How to Edit an Instruction Step
      • How to Edit or Delete a Work Instruction or a Folder
      • How to Preview a Work Instruction
      • How to Improve a Work Instruction With Azumuta Intelligence
    • How to Use the Instruction Step Editor
      • Navigating Through the Work Instruction Step Editor
      • General
      • How to Add a Visual Page to a Work Instruction Step
      • How to Add an Image to a Work Instruction
      • How Does the Image Library Work?
      • Visuals in a Work Instruction
      • Parts
      • Equipments & Symbols
      • Videos
      • 3D Files
      • Link to Another Work Instruction or Instruction Step
      • SharePoint PDF
      • Time Study
    • Product Checks
      • What Is a Product Check?
      • Adding a Product Check to a Work Instruction
      • Basic Product Checks
      • Advanced Product Checks
      • Mandatory Product Checks and Fast Forward Mode
      • Double-Checks for an Instruction Step
      • Rules: Basic
      • Rules: Advanced
      • Peripherals
    • Variants
      • What Is a Variant?
      • How to Add a Variant and Use It in a Work Instruction
      • How to Edit a Variant
    • How to Create the Official Version of a Work Instruction
      • How to Create an Official Version of a Work Instruction
      • Single Person Approval
      • Multi Person Approval: Creating an Approval Board and an Approval Flow
      • The Approval Board Layout
      • Multi Person Approval: How to Edit or Delete an Approval Board
      • Multi Person Approval: How to Edit or Delete an Approval Flow
      • How to Enable Multi-Person Approval
      • How to Submit, Accept, and Decline an Approval Request
      • Triggers for Approval Boards and Approval Requests
    • How to See a Work Instruction's Revision History
      • Revision History
    • How to Add an Attachment to a Work Instruction
      • How to Add an Attachment to a Work Instruction
    • How to Print a Work Instruction or Save it as a PDF File
      • How to Print a Work Instruction or Save It as a PDF File
      • How to Print an Instruction Step or Save It as a PDF File
    • How to Share a Work Instruction
      • Sharing a Work Instruction/Folder/Article Category/Article (Public Sharing & Private Sharing)
    • Azumuta App: Work Instructions
      • Creating a Work Instruction via the Azumuta App
      • Editing a Work Instruction via the Azumuta App
      • Viewing a Work Instruction as an Operator
      • Work Instructions Layout from the Operator’s Perspective
      • How to Open an Attachment on the App
    • How to Export and Import a Work Instruction
      • What Is Exporting and Importing a Work Instruction?
      • How to Export and Import a Work Instruction
      • Converting a Microsoft Office Document into an Azumuta Work Instruction
  • Quality Management
    • What Is the Quality Management Module?
    • How to Create a Work Instruction on the Quality Management Module
      • How to Create a Work Instruction on the Quality Management Module
      • How to Populate a Work Instruction on the Quality Management Module
      • How to Edit a Work Instruction on the Quality Management Module
      • Recordings in the Quality Management Module
    • Articles and Article Categories
      • What Is an Article Category? What Is an Article? And What’s the Difference?
      • How to Create and Edit an Article Category (via Azumuta on Web)
      • How to Create and Edit an Article Category (via the App)
      • How to Create and Edit an Article
      • How to Share an Article or An Article Category Publicly
    • How to Create a Product Order
      • What Is a Product Order?
      • What Are the Available Methods on Creating a Product Order?
      • How To Create a Product Order Manually
      • How to Create a Product Order Automatically Based on ERP Configuration
      • How to Create a Batch Order
      • How to View Created Product Orders
    • How to Activate a Product Order
      • How to Activate a Product Order
    • How to Edit a Product Order
      • How to Edit a Product Order (Basic)
      • How to Edit a Product Order (Advanced)
    • How to Execute a Product Order
      • How to See Product Orders from the App
      • How to Execute a Product Order
    • How to Filter a Product Order
      • Filtering, Sorting, and Searching for Product Orders and Batch Orders
    • Product Order Linking
      • Product Order Linking
    • Parameters
      • What Is a Parameter?
      • How to Link Parameters to an Article
      • How to Create a Product Order Based on an Article That Has Pre-Configured Parameters
      • How to Link Parameters to a Manually Created Product Order Based on Article Category
      • How to Link Parameters to a Product Order Automatically Created In Azumuta Based on ERP Configuration
      • How to Check Which Parameters Are Linked to a Product Order?
      • How to Use Parameters on an Image in a Work Instruction
      • How to Use Parameters in a Work Instruction Step
      • How to Use a Parameter in a Product Check
      • Performing Calculations With Parameters
    • How To Monitor A Product Order
      • How to Download the Microsoft Excel Report of a Specific Product Order or Multiple Product Orders
      • How To Monitor The Status Of A Product Order
      • How to View the Work Instruction Report for a Product Order in Azumuta
      • Triggers for Product Orders and Article Categories
    • Docx Reporting for Product Orders
      • Introduction to Docx Reporting for Product Orders
      • How to Add a Docx Report to an Article Category
      • How to Download a Docx Report from a Product Order
      • How to Update a Docx Report on an Article Category
      • How to Edit or Delete a Docx Report on an Article Category
      • Basic Tags on a Docx Report
      • Answer Tags (Basic)
      • Answer Tags (Advanced)
      • Variant Tags
      • Displaying Images on a Docx Report
      • Ticket Tag
      • Parameter Tags
      • Conditional Parameter Tags
      • Recap Tags
  • Audits & Digital Checklists
    • What Is the Audits & Digital Checklists Module?
    • How to Create an Audit
      • How to Create an Audit
      • How to Populate an Audit
      • How to Edit an Audit
      • Recordings in the Audits & Digital Checklists Module
    • How to Use the Planning Tool for Audits
      • Introduction to the Planning Tool for Audits
      • Planning Tabs for Audits
      • The Planning Tab’s Sidebar Settings (for Audits)
      • Events in a Planning Tab (for Audits)
      • How to Adjust the Time Zoom and Navigate to a Specific Date in the Planning Calendar (for Audits)
    • How to Plan an Audit
      • How to Plan an Audit via the Planning Calendar
      • How to Plan an Audit Based on Automatic Triggers
    • How to Execute an Audit
      • How to Execute an Audit as an Operator
      • How to Execute an Audit as an Admin
    • How to Edit a Scheduled Audit
      • How to Edit and Delete a Scheduled Audit
    • How to View an Audit Report
      • How to View and Download an Audit Report
    • Docx Reporting for Audits
      • Introduction to Docx Reporting for Audits
      • Tags to Use on a Docx Report (for Audits)
      • How to Add a Docx Report to an Audit
      • How to Download a Docx Report for an Audit Event
      • How to Update a Docx Report on an Audit
      • How to Edit or Delete a Docx Report (for Audits)
  • Skill Matrix & Trainings
    • What Is the Skill Matrix & Trainings Module?
    • How to Create a Work Instruction on the Skill Matrix & Trainings Module
      • How to Create a Work Instruction on the Skill Matrix & Trainings Module
      • How to Populate a Work Instruction on the Skill Matrix & Trainings Module
      • How to Edit a Work Instruction on the Skill Matrix & Training Module
      • Recordings in the Skill Matrix & Trainings Module
    • Competence Management
      • Skill Matrix: The Basics
      • How to Input the Competency Level of an Employee
      • How to View an Employee’s Personal Profile Page
      • Mandatory Training Indicator on a Work Instruction
    • How to Use the Planning Tool for Training Activities
      • Introduction to the Planning Tool for Training Activities
      • Planning Tabs for Training Activities
      • The Planning Tab’s Sidebar Settings (for Training Activities)
      • Events in a Planning Tab (for Training Activities)
      • How to Adjust the Time Zoom and Navigate to a Specific Date in the Planning Calendar (for Training Activities)
    • How to Plan, Execute, Edit, and Delete a Training
      • How to Plan a Training as an Admin
      • How to Plan a Training via the App as an Operator
      • How to Execute a Planned Training
      • How to Edit and Delete a Scheduled Training
    • How to View a Training Report
      • How to View a Training Report
  • Continuous Improvement
    • What Is the Continuous Improvement Add-on?
    • What Is a Ticket and an Issue?
    • How to Create an Improvement Board and an Improvement Flow
    • The Improvement Board Layout
    • How to Edit or Delete an Improvement Board
    • How to Edit or Delete an Improvement Flow
    • How to Add a Checklist to a Ticket
    • How to Submit a Ticket as an Operator
    • How to See the List of Issues and Open an Issue in the App
    • How to Follow up on a Submitted Ticket
    • How to Do Docx Reporting with Ticket Information
      • Introduction to Docx Reporting for Tickets
      • Tags to Use on a Docx Report (for Tickets)
      • How to Add a Docx Report to an Improvement Flow
      • How to Download a Docx Report from a Ticket
      • How to Update a Docx Report (for Tickets)
      • How to Rename or Delete a Docx Report (for Tickets)
  • Dashboards
    • What Is a Widget and a Dashboard?
    • How to Add a Widget and a Dashboard
    • Continuous Improvement Widgets
      • Amount of Issues per Status Over Time (Bar Chart)
      • Amount of Issues per Improvement Flow (Pie Chart)
      • Amount of Issues per Improvement Flow (Bar Chart)
      • Lost Hours Tracking Based on the Issue’s Improvement Flow (Pareto Chart)
      • Lost Hours Tracking Based on Checklist Answer (Pareto Chart)
      • Amount of Issue Checklists per Flow (Pareto Chart)
      • Amount of Issue Checklists per Answer (Pareto Chart)
    • Audit Widgets
      • Audit Report Widget
      • Answers on Number Checks Over Time (Line Chart) – for Audits
      • Audit Scores per Zone (Bar Chart)
      • Audit Scores Over Time per Zone (Line Chart)
      • Audit Scores Over Time per Zone (Heatmap)
      • Amount of Audits Over Time (Timeline)
      • Chosen Audit Answers
      • Amount of Finished Audits per User
    • Product Order Widgets
      • Product Order Report Widget
      • Answers on Number Checks Over Time (Line Chart) for Product Orders
      • Product Order Status Widget
      • The Amount of Product Orders per Status Table Widget (Grouped Based on Articles)
      • The Amount of Product Orders per Status Table Widget (Grouped Based on Batches)
      • Product Order Kanban Board Widget
      • Control Chart
      • Control Board (Individual Zones)
      • Control Board (Grouped Zones)
    • General Widgets
      • Notes Widget
    • How to Configure a Widget
      • Adjusting a Widget’s Timespan
      • Editing a Widget
    • How to Configure a Dashboard
      • How to Configure a Dashboard
  • Login
    • How to Login to Azumuta on Web
      • How to Login to Azumuta on Web as an Admin
    • How to Login to the Azumuta App
      • How to Login to the Azumuta App
      • How to Login to the Azumuta App With an Identifier
      • How to Login to the Browser Version of the App
      • How to Login to the Browser Version of the Azumuta App Using an Identifier
    • How to Reset Your Password
      • How to Reset Your Password
  • Azumuta App/Operator View
    • Introduction to the Azumuta App
    • How to Install the Azumuta App
    • The Azumuta App Homepage
    • How to Pin a Module/Folder/Article Category/Zone to the Homepage and the Sidebar on the App
    • Translating a Work Instruction as an Operator
    • The App's Sidebar
      • Using the Sidebar on the App
      • How to Switch Between Different User Accounts on the App
      • How to Sign Out from the App
  • Management
    • Variants
      • How to See the List of Variants on Your Workspace
      • How to Edit, Unlink, and Delete a Variant
    • Resources
      • What Is a Resource?
      • How to See the List of Parts in Your Workspace
      • How to Add, Edit, and Delete a Part
      • How to See the List of Equipment on Your Workspace
      • How to Add, Edit, and Delete an Equipment
      • How to See the List of Symbols in Your Workspace
      • How to Add, Edit, and Delete a Symbol
    • Users
      • How to Add a User Account to Azumuta
      • How to Manage User Accounts on a Workspace
      • How to Manage User Groups
      • User Rights
        • What Is a User Right?
        • How to Hide and Unhide a Module/Add-On/Functionality from Your Workspace
        • User Rights: The Management Tab
        • User Rights: The Explore Tab
        • User Rights: The Work Instructions Tab
        • User Rights: The Quality Management Tab
        • User Rights: The Audits & Digital Checklists Tab
        • User Rights: Skill Matrix & Trainings
        • User Rights: The Continuous Improvement Tab
    • Devices
      • How to See the List of Devices That Are Logged in on Your Workspace
      • How to Add, Edit, and Delete a Device
      • How to Set a Device to Automatically Open the First Pinned Item
      • Device Settings: The Basics
      • Device Settings: Work Instructions-Related
      • Device Settings: Product Order-Related
      • Device Settings: Peripheral-Related
  • Azumuta Connectivity
    • Introduction
    • Peripherals
      • What Is a Peripheral Device?
      • How to Add a Peripheral Device to Your Azumuta Workspace
      • How to Use a Peripheral Device
      • How to Configure a Peripheral Group or a Peripheral Device
      • Peripheral Presets
      • DYMO Label Printer
        • Why Should You Integrate Your DYMO Label Printers to Azumuta?
        • How to Integrate a DYMO Label Printer to Azumuta
        • How to Use a DYMO Label Printer With Azumuta
        • Peripheral Presets for a DYMO Label Printer
      • Digital Torque Wrench
        • Why Should You Integrate Your Digital Torque Wrenches to Azumuta?
        • How to Integrate a Digital Torque Wrench to Your Azumuta Workspace
        • Using a Digital Torque Wrench (Torque Check)
          • What Is a Torque Check?
          • How to Add a Torque Check to an Instruction Step
          • How to Perform a Torque Check
          • Peripheral Presets for a Digital Torque Wrench
    • Integrating With an ERP
      • ERP Integration
      • Azumuta’s REST API
      • Using Your Data in the REST API
      • Simple Entry Integration
    • Triggers
      • What Is a Trigger?
      • How to Edit an Delete a Trigger
      • Triggers for Article Categories and Product Orders
      • Triggers for Continuous Improvement Issues and Approval Requests
      • Triggers for Improvement Boards and Approval Boards
      • How to See the List of Triggers in Your Workspace and Each Trigger’s Usage History
  • Azumuta Intelligence
    • What Is Azumuta Intelligence?

What's New?

  • What Are the “What’s New” Guides?
  • 2025
    • 2025 Updates Recap
    • April 2025 [Release v0.503.0]
      • Image Padding on Docx Reports
      • New API Docs for Batch Orders
      • New Filter to Distinguish Product Orders and Batch Orders
      • Enhancements to the Public Sharing Functionality
      • Importing Work Instructions from Microsoft Office
      • Card View for Items
      • Official Microsoft Word, Excel, and PowerPoint Icons
      • Higher Precision Timeslots for Training Events
      • Enhanced UI for Linked Work Instructions and Instruction Steps
    • March 2025 [Release v0.500.0 - v0.502.0]
      • Instant Work Instruction Translation
    • February 2025 [Release v0.493.0 - v0.499.0]
      • Using REST API Endpoint to Upload & Remove Attachment on Issues
      • Updated Video Editor
      • Parameters Can Now Be Included on Microsoft Excel Product Order Reports
      • Plan Training Activities Directly from a Skill Matrix
      • The Approval Workflows Are More Accessible Now
      • Unlimited Product Orders Selection
    • January 2025 [Release v0.491.0 - v0. 492.0]
      • Work Instruction UI Enhancement: Expandable Tag Lists
      • Keyboard Shortcuts in Editing Work Instructions
      • In-Line Text Editing in Work Instructions
      • Webhook on Peripheral Integrations
      • Regular Expressions (RegEx) on Rules
  • 2024
    • 2024 Updates Recap
    • December 2024 [Release v0.490.0]
      • Confirmation Pop-up Menu to Prevent Unwanted Edits in Variant Configurations
    • November 2024 [Release v0.485.0 - v0.489.0]
      • Improved UI for Top-Level Items
      • Filtering Product Orders Based on Their Parameters
      • Enhanced Docx Reporting Capabilities for Torque Checks and Parts Checks
      • Choosing a Peripheral Group to be Used by Quality Controllers in Double-Checks
      • New UI for Article and Article Category Search
    • October 2024 [Release v0.481.0 - v0.487.0]
      • Quick Access Options on the Items in the App’s Search Bar
      • Print Multiple Labels in One Go Using Dymo Printers
      • Upload Date Filter on the Image Library
      • Duplicate Instruction Steps
      • Accidental Deletion Deterrent
      • New Toggle to Prevent the Automatic Transition of Issues Between Columns in Improvement Boards
    • September 2024 [Release v0.480.0]
      • Simple Entry Integrations
      • Automatically Proceed to the Next Instruction Step After Finishing the Parts Check
      • Filtering Product Orders Based on Execution Date
    • August 2024
      • Attachment on Parts
      • Timer for Instruction Steps
      • 3 New Audit Widgets
      • The “Show Archived” Option Has Been Moved
    • July 2024
      • Permissions Tab in Improvement Boards and Approval Boards
      • Variants Are Now Displayed on the Work Instruction Approval Menu
    • June 2024
      • Issues Will Now Automatically Move to the Next Column When There Are No Remaining Outstanding Actions
      • Comparison Tool in Work Instruction Approval Requests
      • Reassigning Signature Requests
      • Global Triggers for Article Categories and Issues
    • April 2024
      • Configurable JSON Body When Using Webhooks
      • Trigger Usage History
      • Tooltip Shortcut for the 3D File Viewer
      • New Integration Possibility: BarTender
      • Parts Check
    • March 2024
      • Symbol-Based Workflow Automation
      • Company Logo and Corporate Color Scheme on PDF Templates
    • February 2024
      • The Torque Check Now Has a Torque Angle Gauge
      • 2 New Endpoints for Our REST API Have Been Added
      • 2 New Triggers Were Added
  • 2023
    • 2023 Updates Recap
    • December 2023
      • Preview Specific Instruction Steps in PDF Format
      • Filtering Work Instructions Based on Their Status in the Search Bar
      • Standardized Color Palette
    • November 2023
      • Microsoft Excel Report for Batch Orders
      • New Interface for Part Selection
  • Azumuta
  • Knowledge Base
  • How to Use Azumuta
  • Work Instructions
  • How to Use the Instruction Step Editor
  • 3D Files
View Categories

3D Files

What Is a 3D File in Azumuta? #

A 3D file is the digital rendering of a real-life object in Azumuta. A 3D file can consist of one or multiple meshes.

You can add 3D files to an instruction step in Azumuta. Adding a 3D file will surely enhance clarity and precision on your shop floor, as operators will be able to visualize complex assembly tasks.

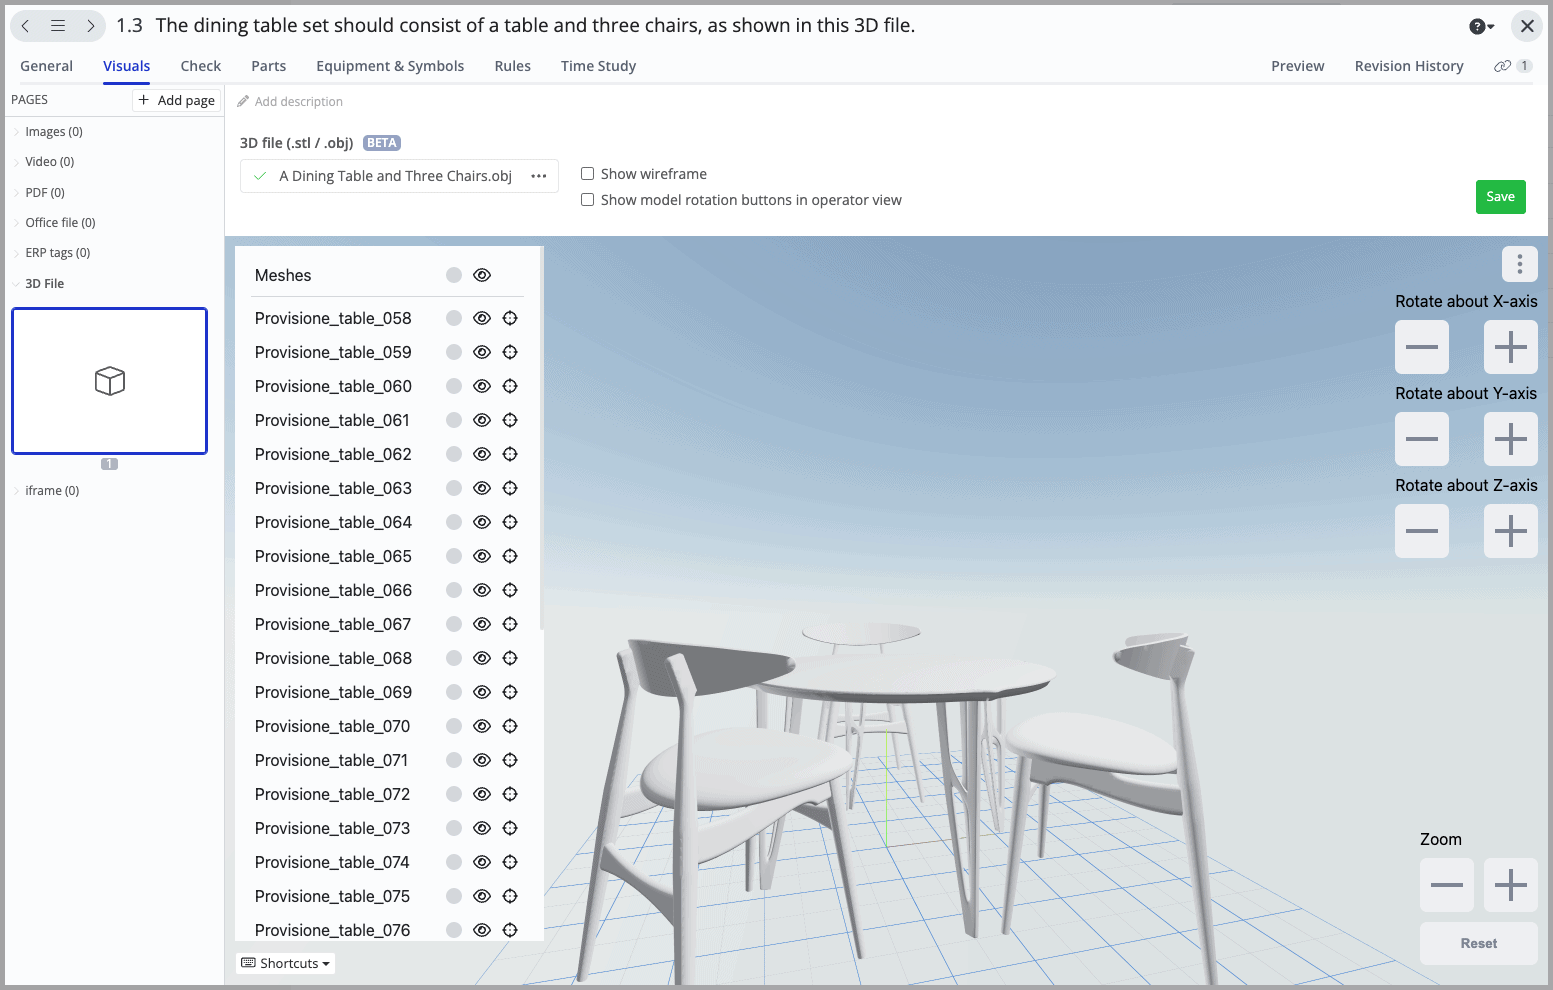
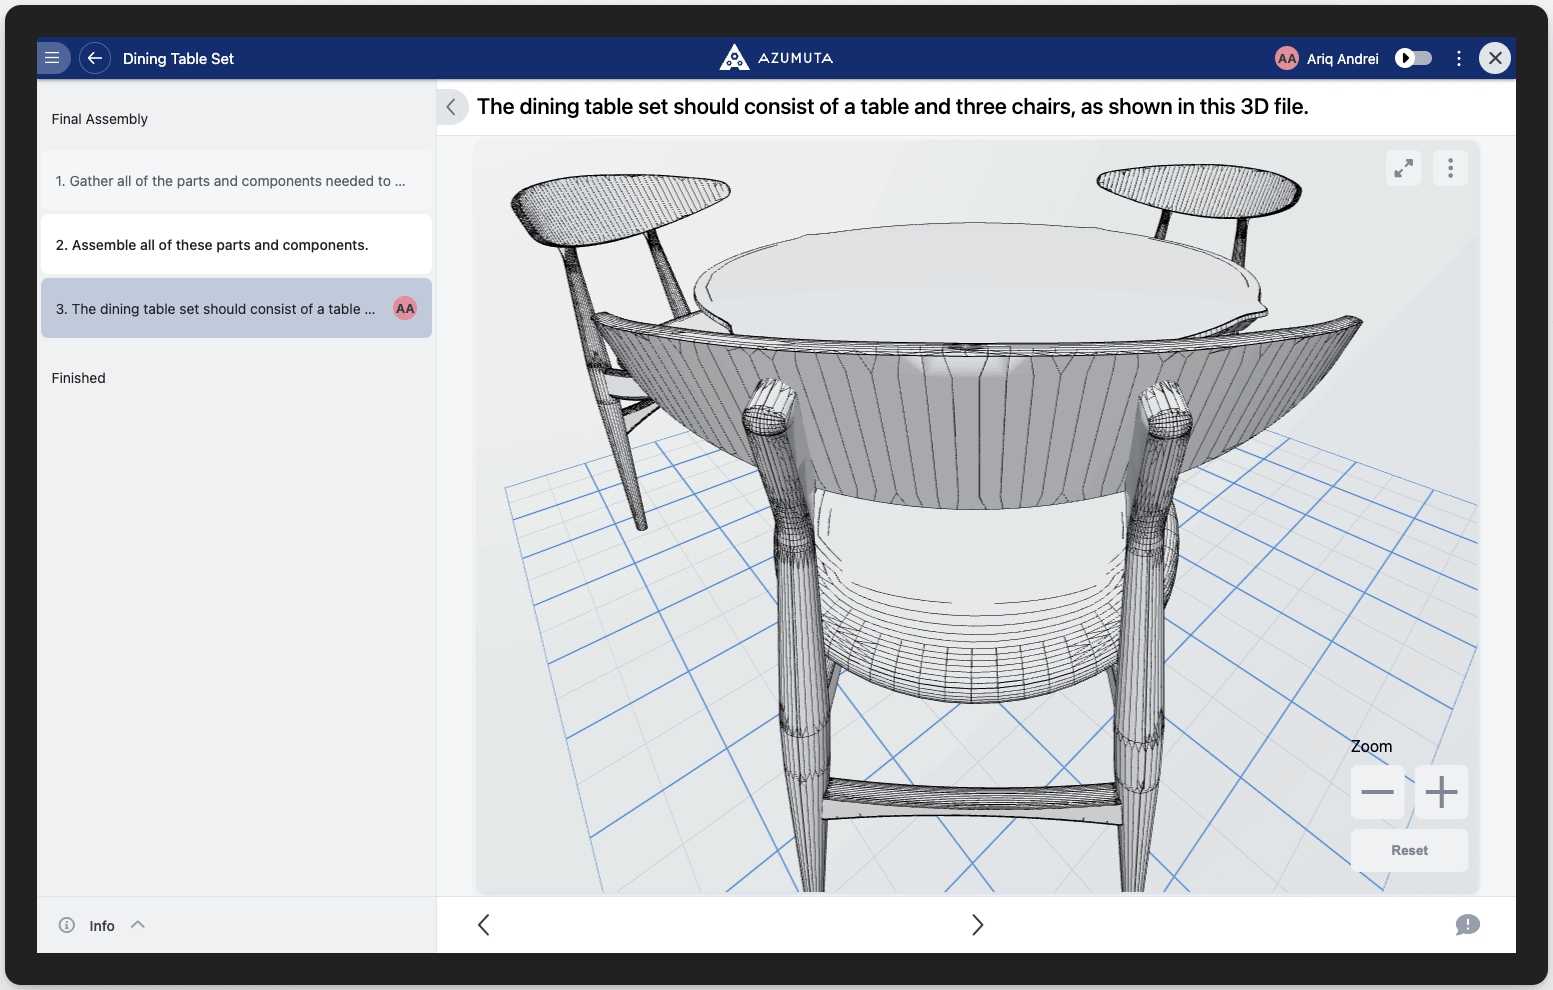
For example, the image below shows how the 3D file of a dining table & 3 chairs appears in Azumuta:

docs what is a 3d file in azumuta


What Is a Mesh? #

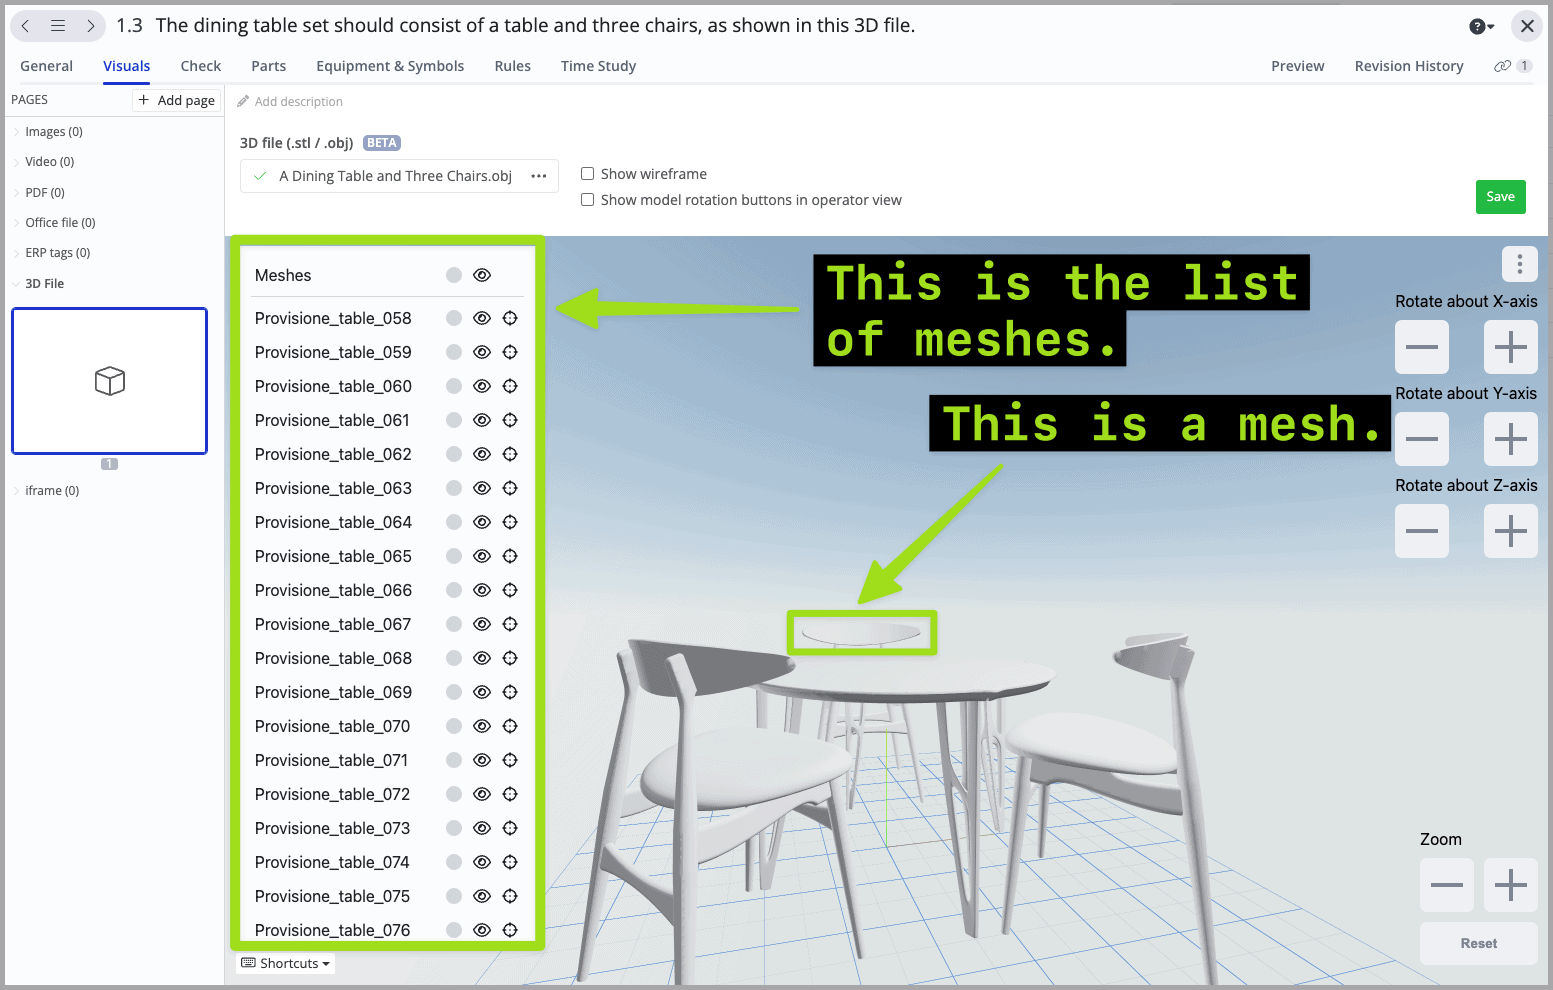
A mesh is a part of a 3D file. For example, in our dining table & 3 chairs 3D file, the backrest on one of the chairs is a mesh, as shown in the image below. Moreover, the list of meshes is also shown in the image below.

docs what is a mesh


In order to see a mesh’s name on the list of meshes or to edit a mesh, simply right-click on that targeted mesh, as shown in the video below.


How to Upload a 3D File to an Instruction Step #

  1. Navigate to the instruction step where you would like to add a 3D file into.
  2. Select the work instruction step that you would like to add the 3D file into, and click on “Open”.
  3. Click on the “Visuals” tab.
  4. Click on “Add page”.
  5. Click on “3D File”.
  6. Upload the file.
  7. Wait until the upload is complete.
  8. Click on “Save”.


Note: At the moment, we can only process ".stl" and ".obj" files. We can't process STEP files yet.


The video below shows how the 3D file will appear on the operator’s screen. The 3D file is not static – an operator can explore it as they wish.


Note: Besides using the minus & plus icons under "Zoom", an operator can also scroll down/up using their mouse to zoom out/zoom in.


Configuring a 3D File #

After you’ve uploaded a 3D file to an instruction step, you can configure it to suit your needs. Here are the available configuration options:


Editing a 3D File #

There are 3 possibilities for editing a 3D file:


  • Rotating a 3D File
  • Changing the Color of a 3D file/a Mesh
  • Hiding/Unhiding a 3D file/a Mesh


Rotating a 3D File #

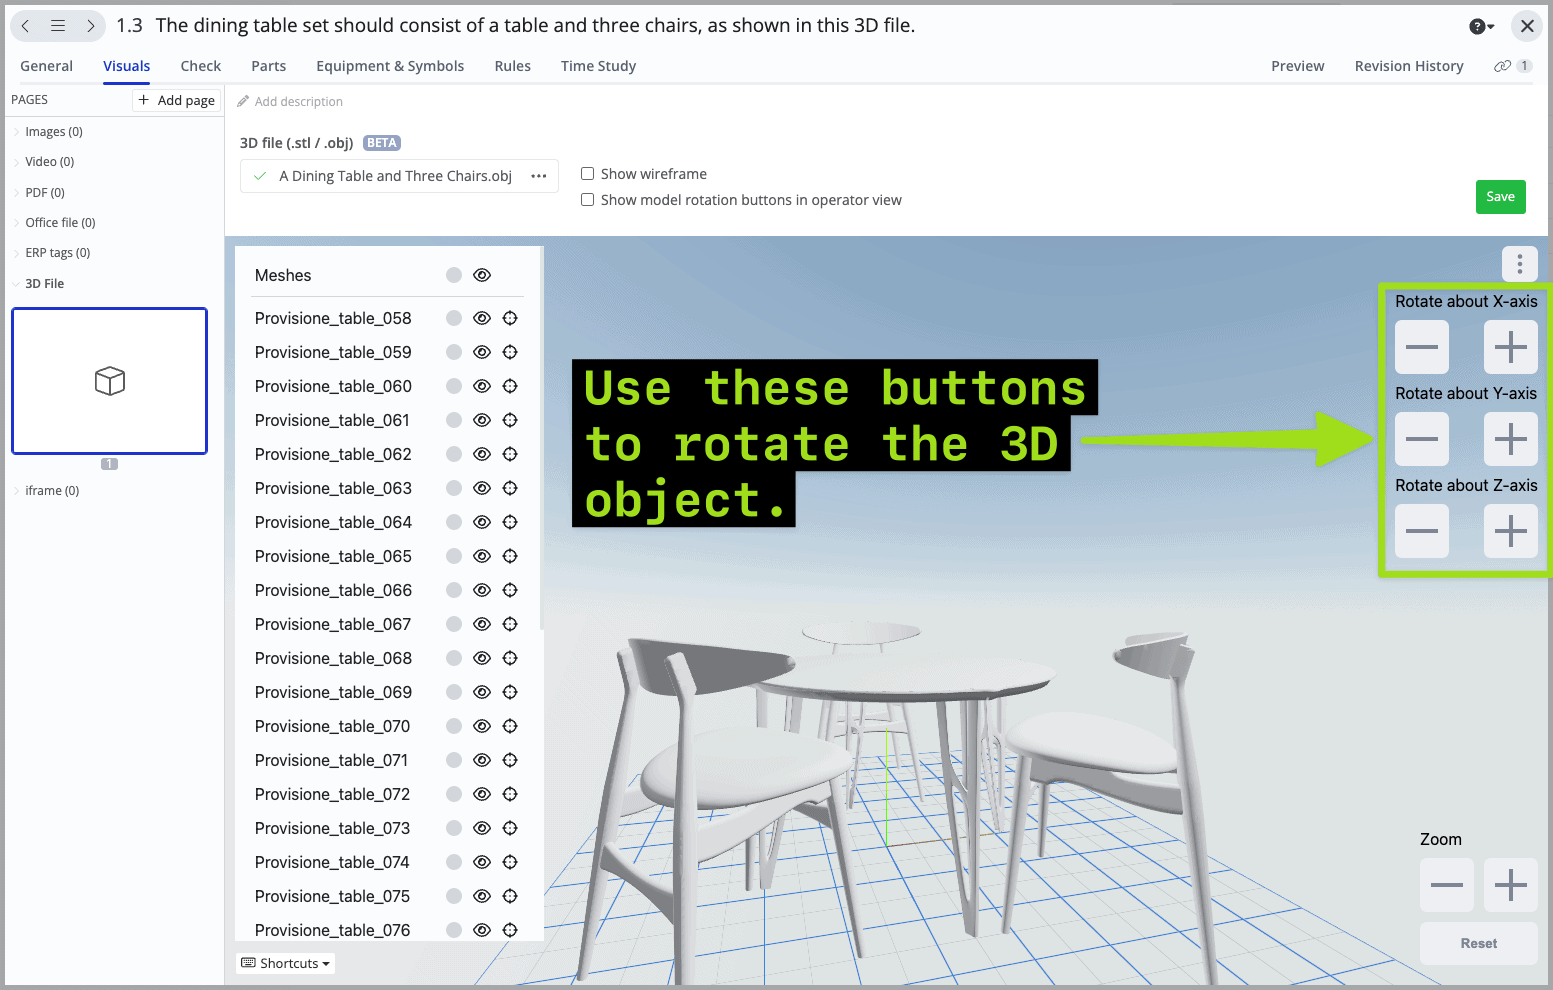
You can rotate a 3D file along its X-axis, Y-axis, and Z-axis. Take a look at the image below to see how you can do it:

docs rotating a 3d file


And, of course, don’t forget to click “Save” after performing the desired rotations.


Note: To reset the 3D file to its original position, simply click on the "Reset" button at the bottom right corner of the screen.


Changing the Color of a 3D File/a Mesh #

In Azumuta, you can change the color of an entire 3D file or the color of a specific mesh. Here’s how.


Changing the Color of a 3D File #
  1. Click on the color icon next to “Meshes”.
  2. Select the desired color. You can also type in a Hex code/RGB code for extra precision.
  3. When you’re done, click on “Save”.


Changing the Color of a Mesh #
  1. Click on the color icon next to the name of the mesh that you would like to change the color of. To learn how to see a mesh’s name, click here.
  2. Select the desired color. You can also type in a Hex code/RGB code for extra precision.
  3. When you’re done, click on “Save”.


Alternatively, you can also change a mesh’s color by:

  1. Right-click the mesh that you would like to change the color of.
  2. Click on “Change color”.
  3. Select the desired color. You can also type in a Hex code/RGB code for extra precision.
  4. Click on the close icon.
  5. When you’re done, click on “Save”.


Hiding/Unhiding a 3D file/a Mesh from the Operator View #

You can hide a 3D file/a mesh from the operator’s view (without deleting this 3D file/mesh from your admin view). Here’s how:


Hiding /Unhiding a 3D File from the Operator View #

To hide a 3D file: click on the eye icon next to “Meshes”. Afterward, click on “Save”.


To unhide a 3D file: click on the crossed-eye icon next to “Meshes”. Afterward, click on “Save”.


Hiding/Unhiding a Mesh from the Operator View #

To hide a mesh: click on the eye icon next to the mesh’s name on the list of meshes.  Click here to know how you can see a mesh’s name. Afterward, click on “Save”.


Alternatively, you can also right-click on the targeted mesh and click on “Hide”. Afterward, click on “Save”.


To unhide a mesh: click on the crossed-eye icon next to the hidden mesh’s name on the list of meshes. Afterward, click on “Save”.


Displaying Only One Mesh and Hiding all Other Meshes (And How to Undo It) #

You can also choose to display one specific mesh only (and hide all other meshes) on the operator’s screen. Here’s how:

  1. Right-click on the targeted mesh.
  2. Click on “Show only this”.
  3. Click on “Save”.


And here’s how to undo it:

  1. Right-click on the only visible mesh.
  2. Click on “Show everything”.
  3. Click on “Save”.


Other Configuration Options #

Besides the aforementioned options, here are the other configuration possibilities that you can do with a 3D file:

docs other configuration options

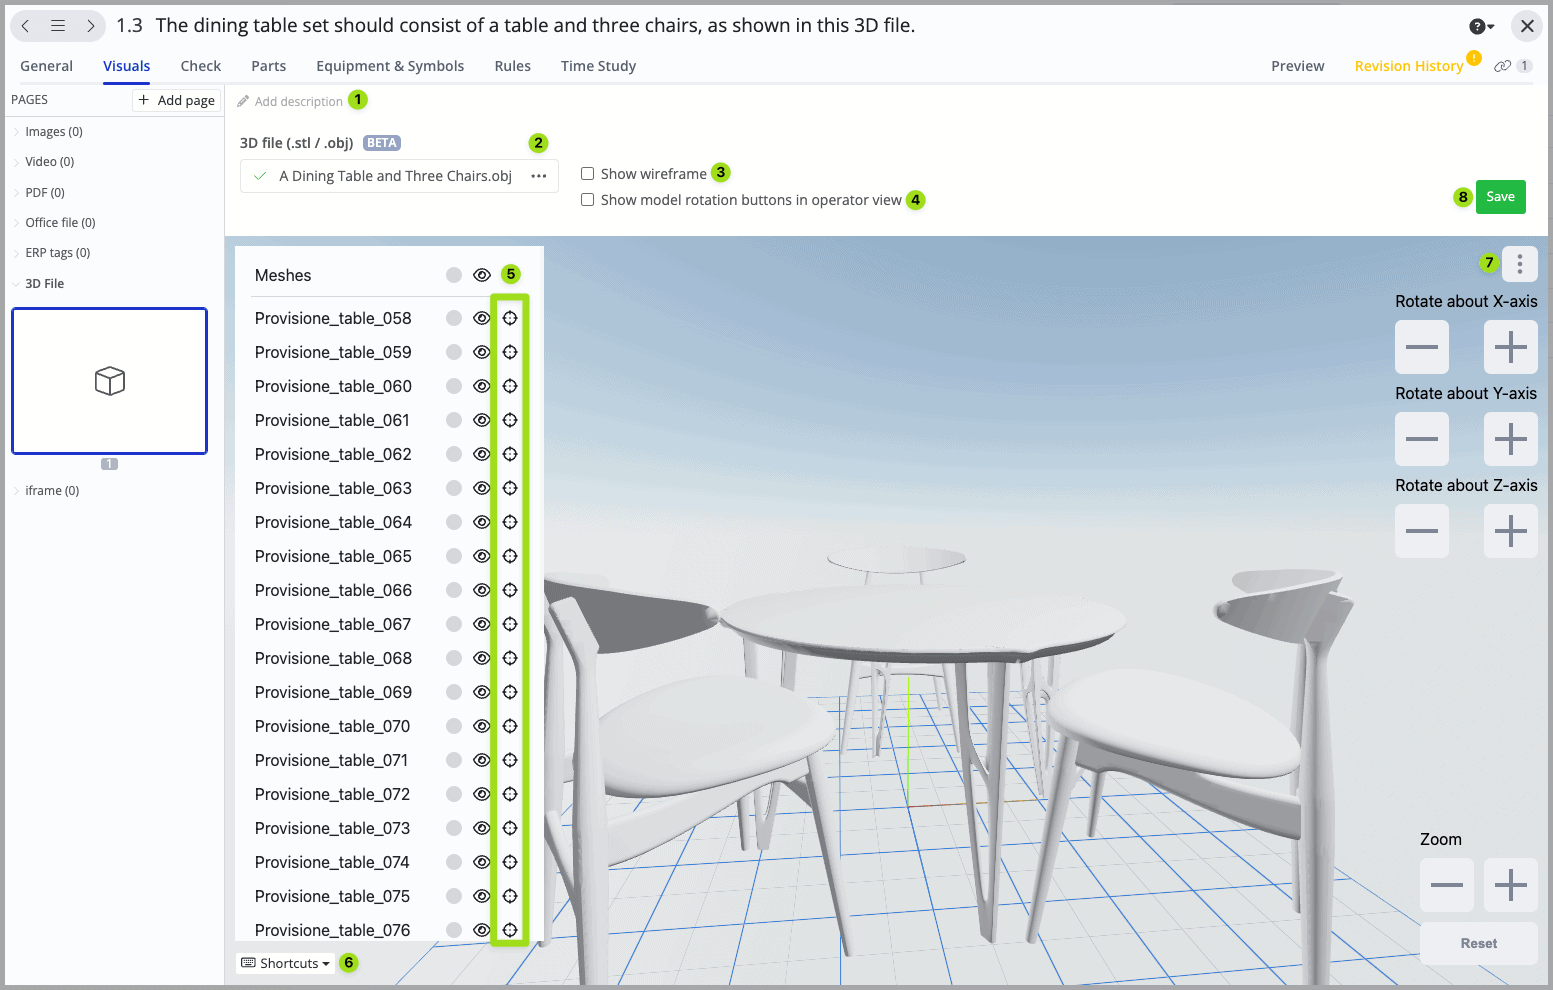
  1. You can type in this 3D file’s description here. This is how it will appear on an operator’s device: docs other configuration options 1
  2. You can see the 3D file’s name below. By clicking on the three-dot icon, you will open the option to download this 3D file and the option to delete this 3D file.
  3. Tick to show the wireframe of the 3D object (on both the admin view & operator view). Wireframe is the visual representation that shows the edges and vertices of the object, forming a skeletal outline of the model. It’s used primarily to understand the structure, shape, and topology of the object without the distraction of surface textures or colors. For example, this is how the backside of the 3D model of a chair with its wireframe shown looks like: docs other configuration options 2
  4. Tick to display the rotate object buttons on the operator view.  This is how these buttons will appear on an operator’s device: docs other configuration options 3 1
  5. This column contains the center-in-view button for each mesh. When clicked, it will center your view to that particular mesh.
  6. Click to open the list of shortcut commands.
  7. Click to open the option to download this 3D file.
  8. After you’ve finished configuring the 3D file, don’t forget to click on “Save”.


How to Delete a 3D File from an Instruction Step #

  1. Navigate to the instruction step that contains a 3D file that you would like to delete, and click on “Open”.
  2. Click on the Click on the “Visuals” tab.
  3. Click on the three-dot icon next to the 3D file’s name.
  4. Click on “Remove file”.
  5. Click on “Remove”.


Do you have further questions? Click here and send us a message!

How can we help?

Updated on 6 September 2024
VideosLink to Another Work Instruction or Instruction Step
Table of Contents
  • What Is a 3D File in Azumuta?
    • What Is a Mesh?
  • How to Upload a 3D File to an Instruction Step
  • Configuring a 3D File
    • Editing a 3D File
      • Rotating a 3D File
      • Changing the Color of a 3D File/a Mesh
        • Changing the Color of a 3D File
        • Changing the Color of a Mesh
      • Hiding/Unhiding a 3D file/a Mesh from the Operator View
        • Hiding /Unhiding a 3D File from the Operator View
        • Hiding/Unhiding a Mesh from the Operator View
        • Displaying Only One Mesh and Hiding all Other Meshes (And How to Undo It)
    • Other Configuration Options
  • How to Delete a 3D File from an Instruction Step