Performing Calculations With Parameters
Calculations With Parameters? What’s That?
In Azumuta, you can perform mathematical calculations with parameter values. Parameter values are not just static data points —they can also be used in mathematical calculations.
For instance, you can calculate product dimensions, material requirements, production time, and many other calculations using parameter values.
Using them will surely enhance the precision of your production processes, help your quality control system, and add an extra layer of traceability. Additionally, they will also (partially) automate your workflow.
This article shows the type of calculations that you can do with parameter values, as well as how to perform them.
Note: Before performing any calculations with a parameter, please make sure that you have set the parameter value type to "Number". See how to set the parameter value type for details.
How to Display a Parameter Value
Before we get into calculations, we will show you how to display a parameter value within an instruction step. To do so, you will need to write a formula on an image visual page. Here’s how to do it from scratch:
- Navigate to the instruction step where you would like to display the parameter value on.
- Click the “Visuals” tab.
- Click on “Add page”.
- Select “Images”.
- Click on “Text Box”.
- Create the text box on the visual page.
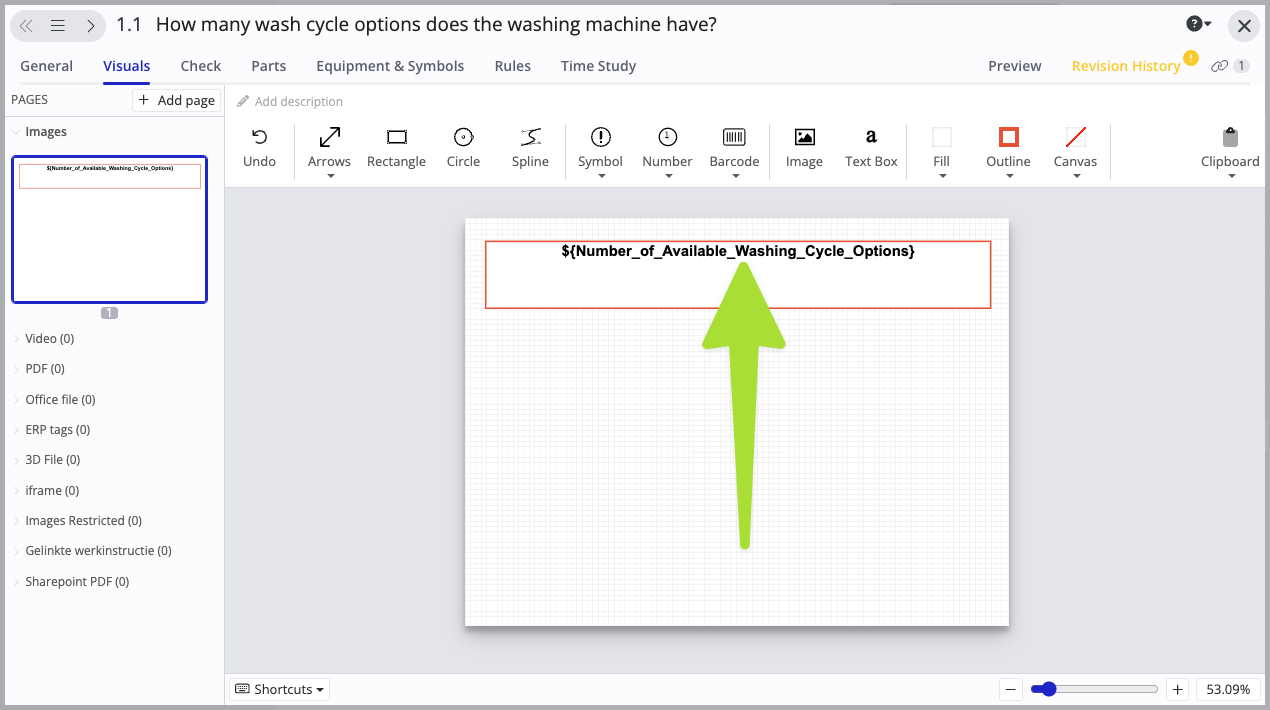
- Write the parameter formula. The parameter formula is ${Parameter key}.
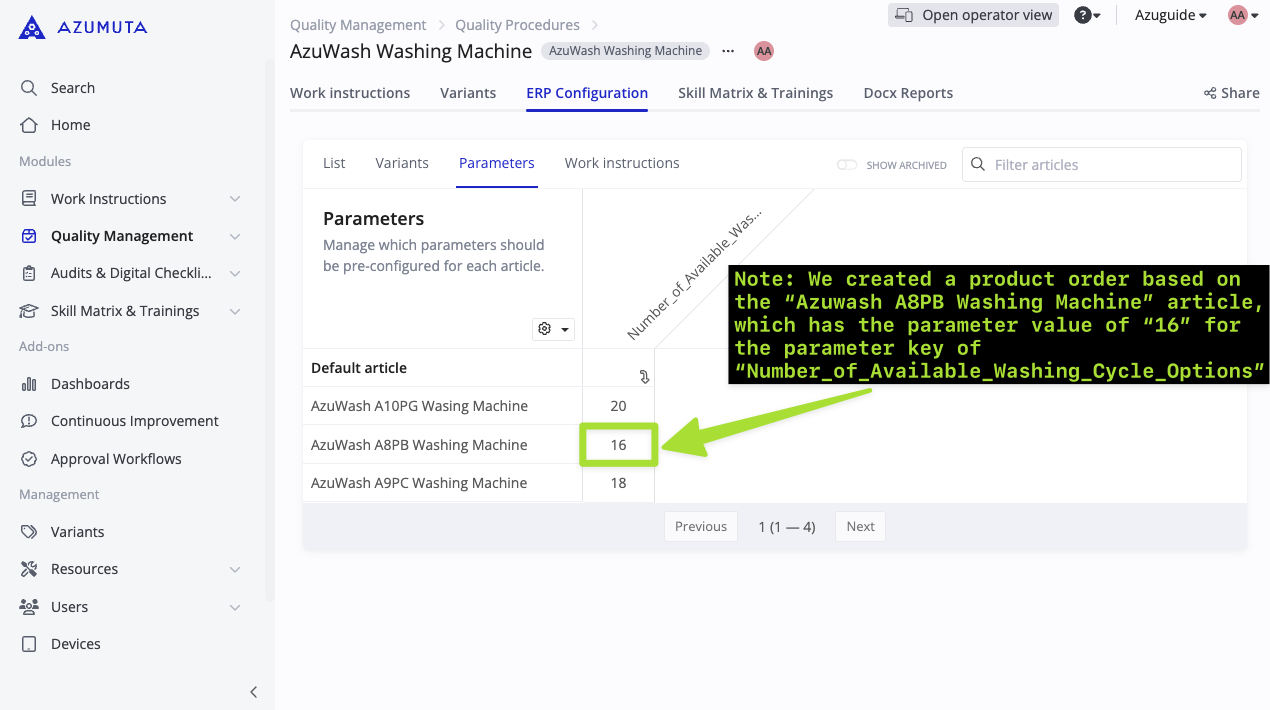
For example, in the video above, we used the parameter key Number_of_Available_Washing_Cycle Options. Therefore, the formula is:
- ${Number_of_Available_Washing_Cycle Options}
As shown in the images below:

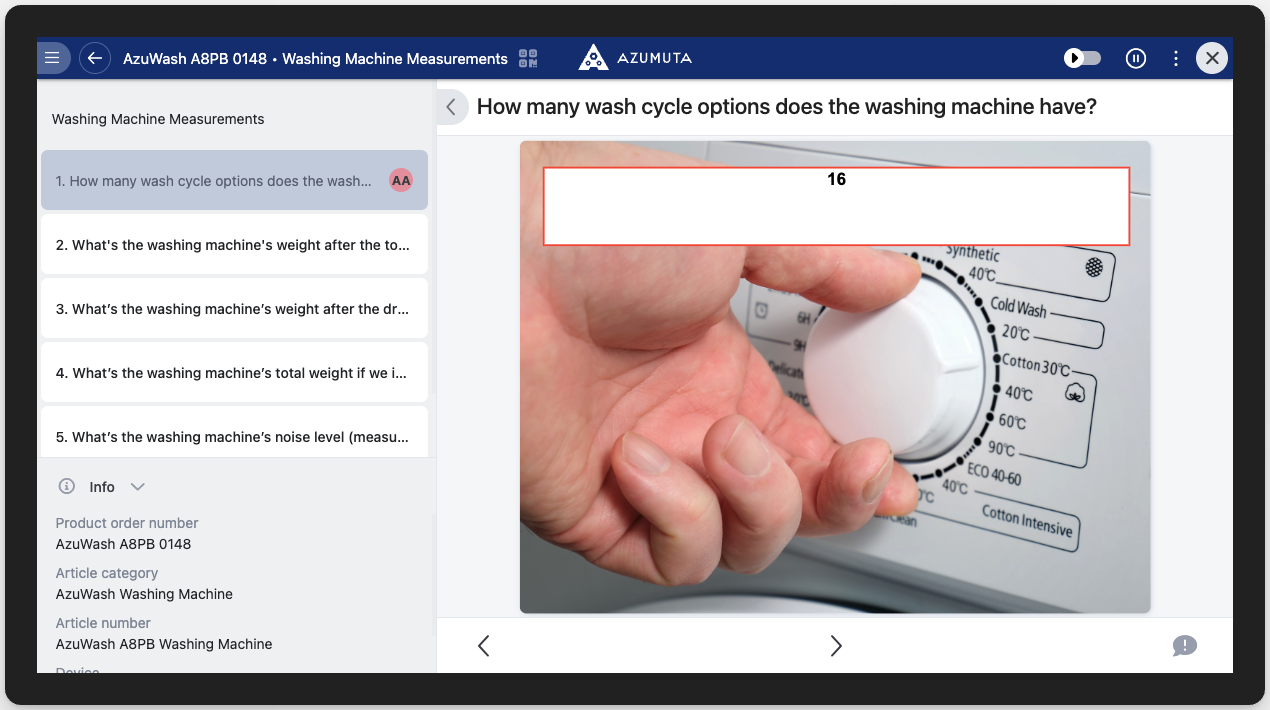
Afterward, on a product order that was made based on an article that contains this specific parameter key, the parameter formula that you wrote will instantly turn into the parameter value on your operator’s screen, as shown in the images below:

In addition, you can also display an image as a background to the parameter formula, as shown below:

And this is how it will appear on the operator’s view:
Basic Calculations With Parameter Values
In the previous guide section, you’ve learned how to display a parameter value on an instruction step. Now, we will show you how to perform basic calculations with parameter values.
At the moment, the basic arithmetic calculations that you can perform are:
- Addition (represented by the + icon)
- Subtraction (represented by the – icon
- Multiplication (represented by the * icon)
- Division (represented by the / icon)
- Remainder/modulo (represented by the % icon)
In the guide sections below, we will show you how to perform:
- A Mathematical Calculation Involving 1 Parameter and an External Number
- A Mathematical Calculation Involving 2 or More Parameters
- A Mathematical Calculation Involving an Operator Input
- Adding a Unit of Measurement to the Calculation
Mathematical Calculation Involving 1 Parameter and an External Number
We will start with the simplest one: performing a mathematical calculation involving 1 parameter and an external number. An external number means a number that is not a parameter value.
To perform this type of calculation, you’ll need to write the following as the parameter formula on the instruction step:
- ${=Parameter key and the calculation that you would like to perform}
See the list of icons for each arithmetic equation above.
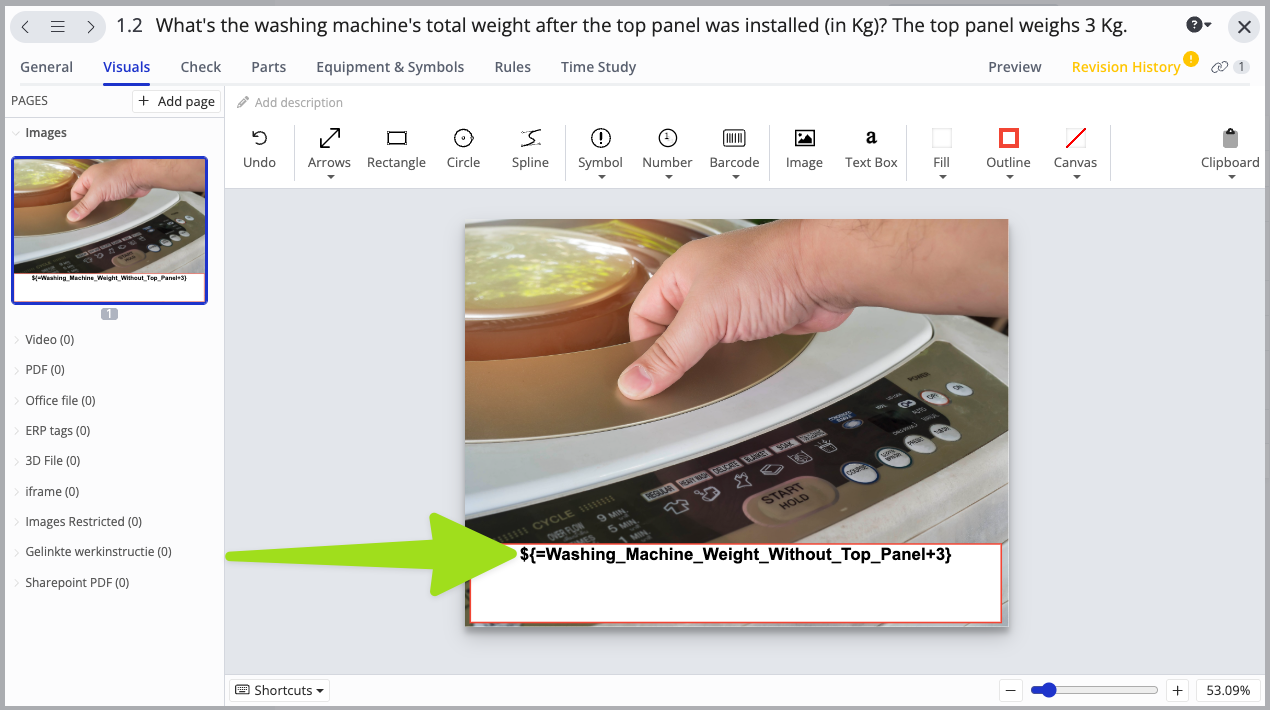
Example
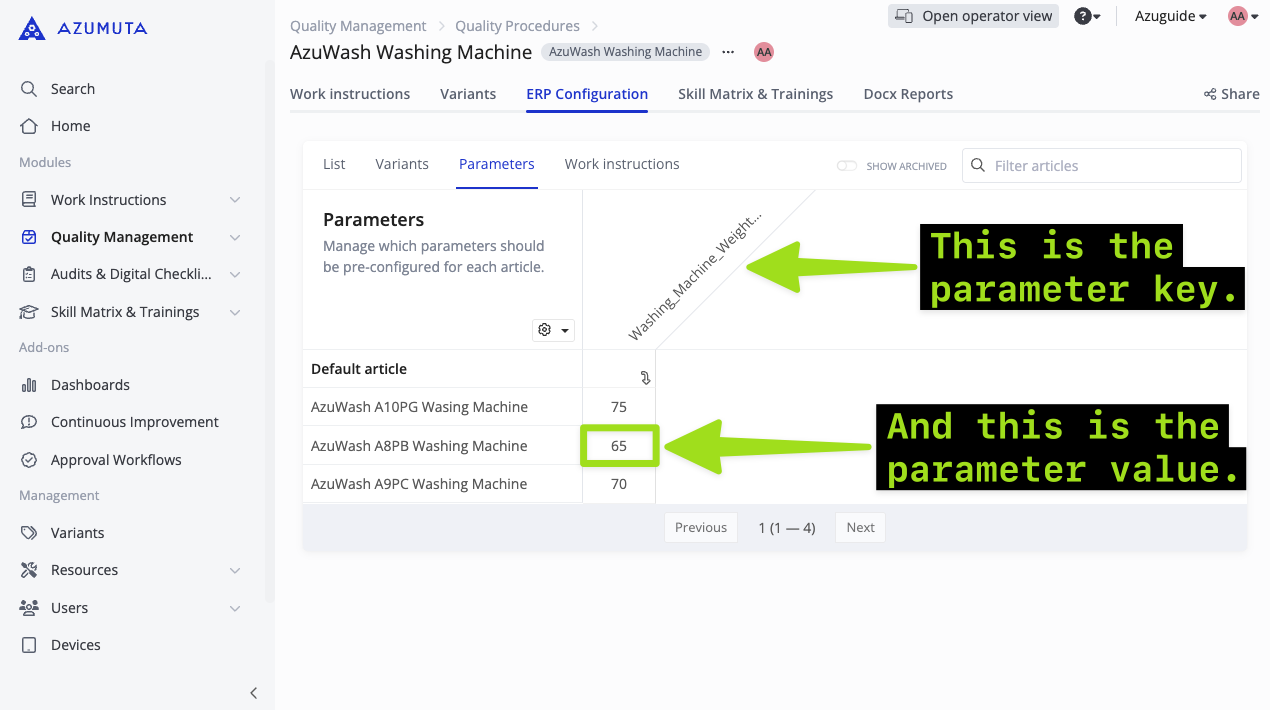
For example, you want to calculate a washing machine’s total weight after the top panel has been installed. We will do this with the “AzuWash A8PB Washing Machine”. The washing machine’s weight (without the top) is represented by the parameter key Washing_Machine_Weight_Without_Top_Panel, as shown in the image below:
Meanwhile, all washing machines (regardless of the type) will use the same top panel – which weighs 3 Kg.
Therefore, this is the formula that should be written to perform the said calculation:
- ${=Washing_Machine_Weight_Without_Top_Panel+3}
As shown in the image below:
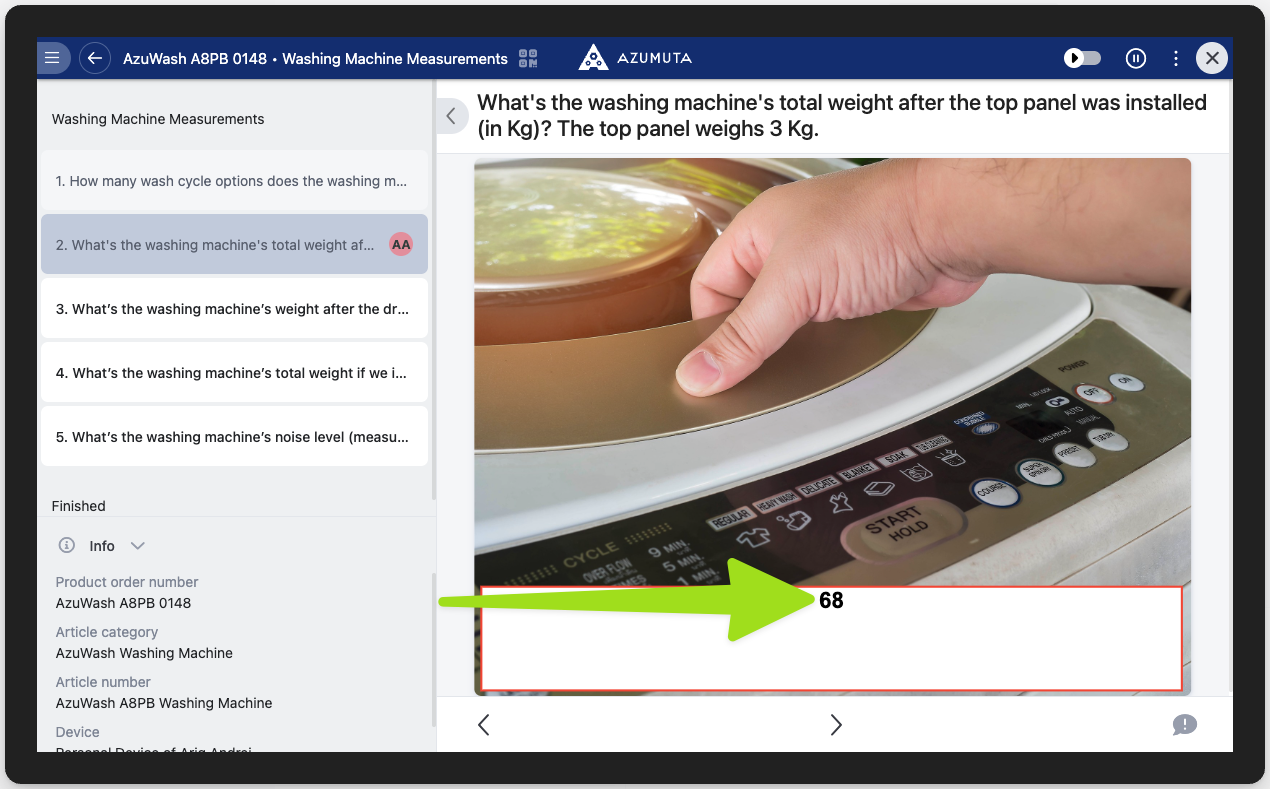
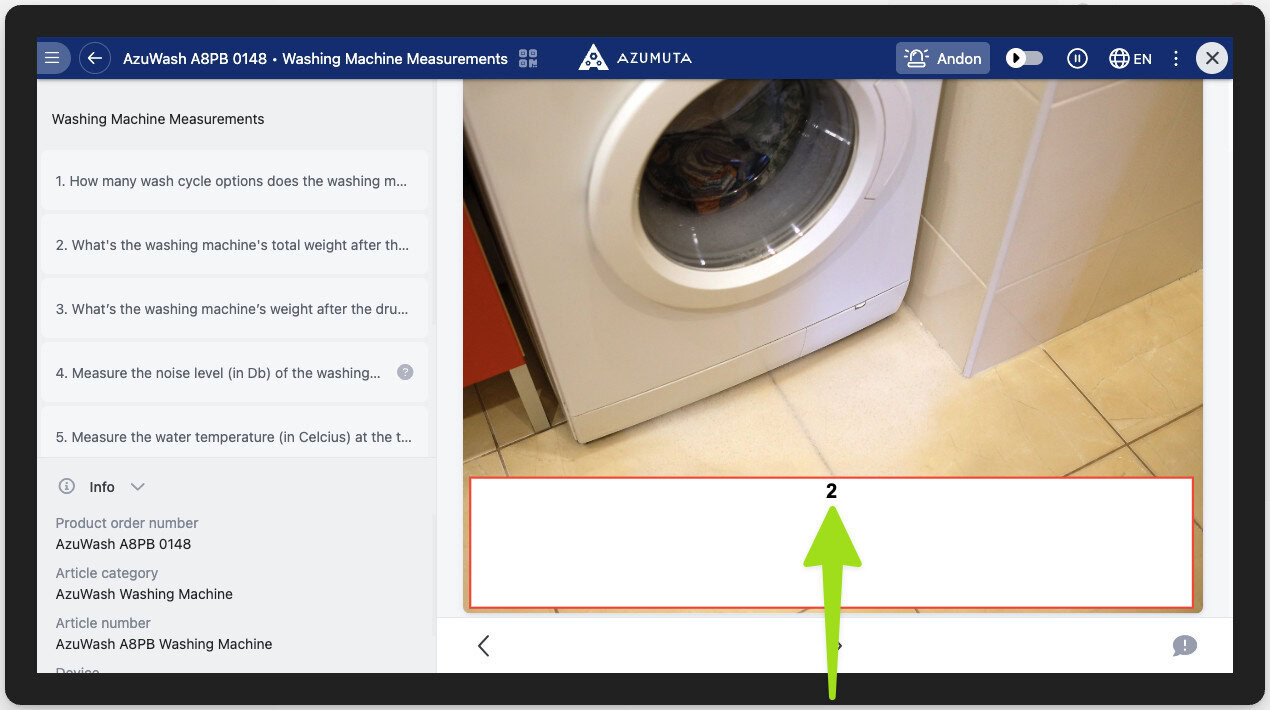
And this is how it will appear on the operator’s view. It shows “68”, which is the result of 65+3 (65 is the parameter value, and 3 is the external number):
Mathematical Calculation Involving 2 or More Parameters
We will proceed with something more complex: performing a mathematical equation with 2 or more parameters. Here’s what you can do:
- Summing 2 or more parameter values
- Subtracting a parameter value from another parameter value
- Performing a multiplication using 2 or more parameters
- Performing a division using 2 or more parameters
- Performing a modulo calculation using 2 or more parameters
See the list of icons for each arithmetic equation above.
Example
For example, our hypothetical factory produces 3 types of washing machines. Each of them has a different body weight & drum weight:
- AzuWash A8PB
- Washing machine body weight: 65 Kg
- Washing machine drum weight: 10 Kg
- AzuWash A9PC
- Washing machine body weight: 70 Kg
Washing machine drum weight: 12 Kg
- Washing machine body weight: 70 Kg
- AzuWash A10PG
- Washing machine body weight: 75 Kg
Washing machine drum weight: 14 Kg
- Washing machine body weight: 75 Kg
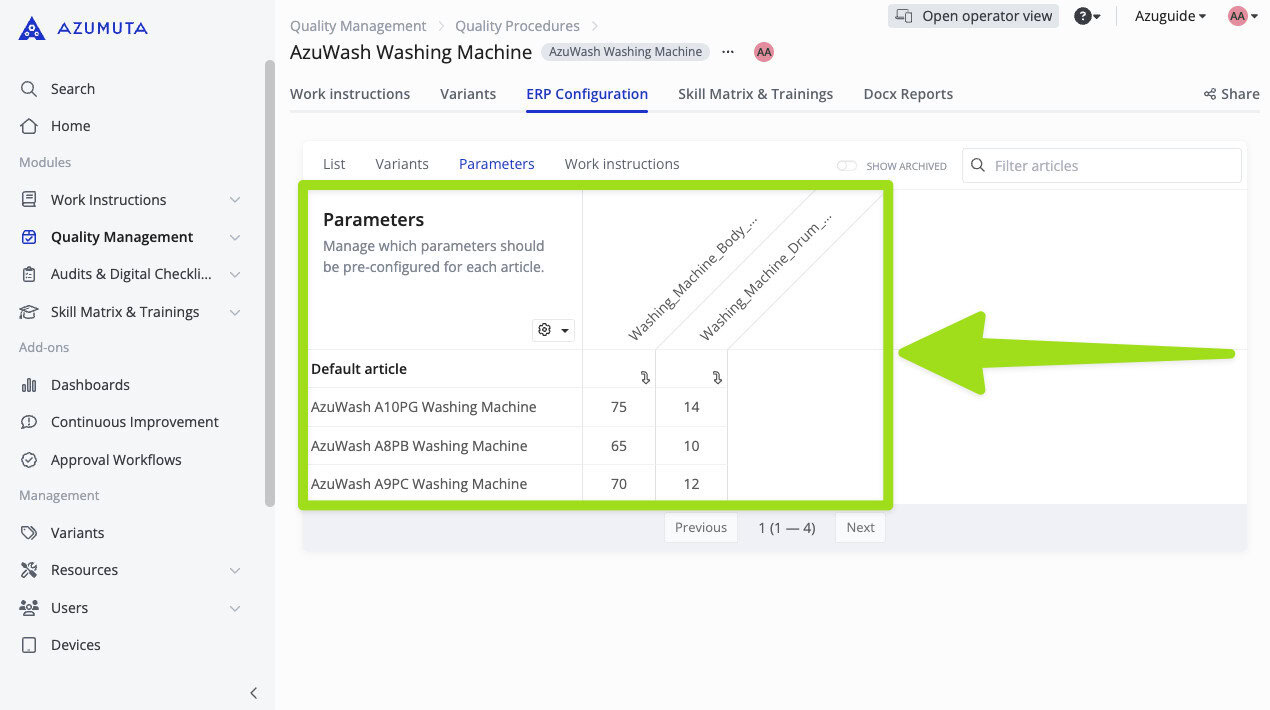
Parameter key for washing machine body weight: Washing_Machine_Body_Weight
Parameter key for washing machine drum weight: Washing_Machine_Drum_Weight
You want to calculate a washing machine’s total weight after the washing machine drum has been installed. This means summing the weight of the washing machine body and the washing machine drum.
Therefore, this is the formula that should be written to perform the said calculation:
- ${Washing_Machine_Body_Weight+Washing_Machine_Drum_Weight}
As shown in the image below:
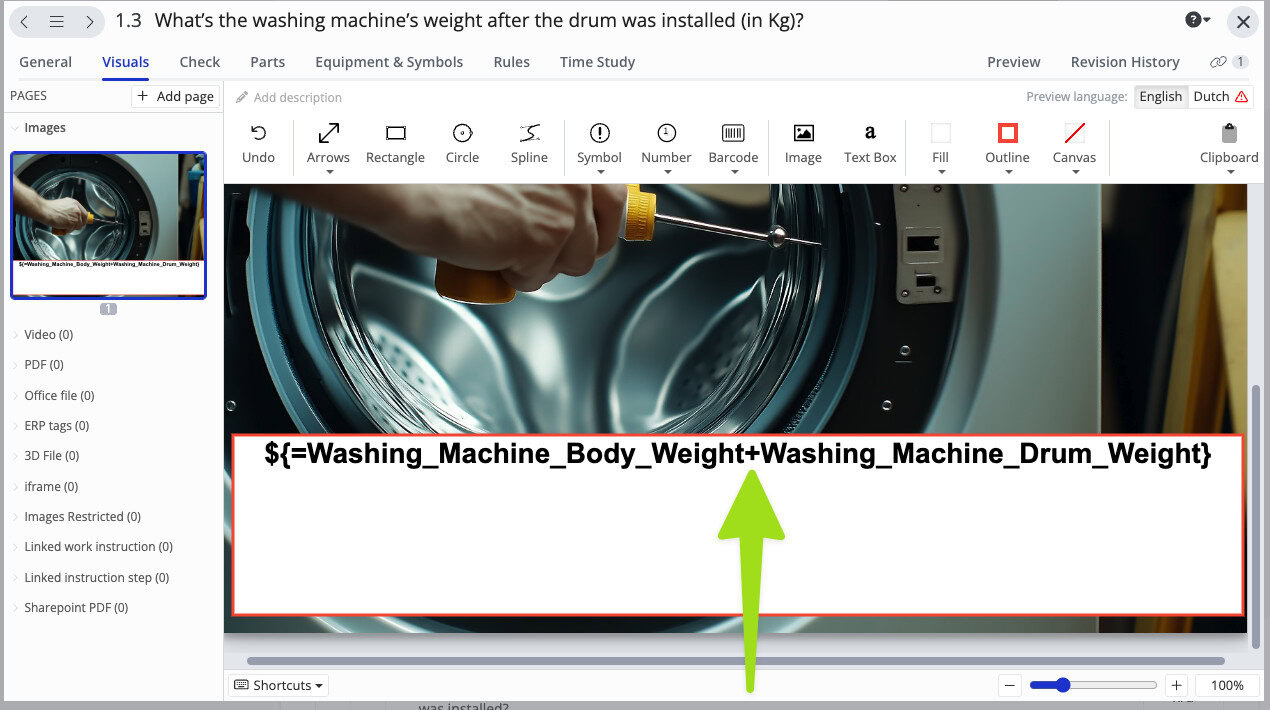
In the example, we’re using AzuWash A8PB, which has a washing machine body weight of 65 Kg and a washing machine drum weight of 10 Kg.
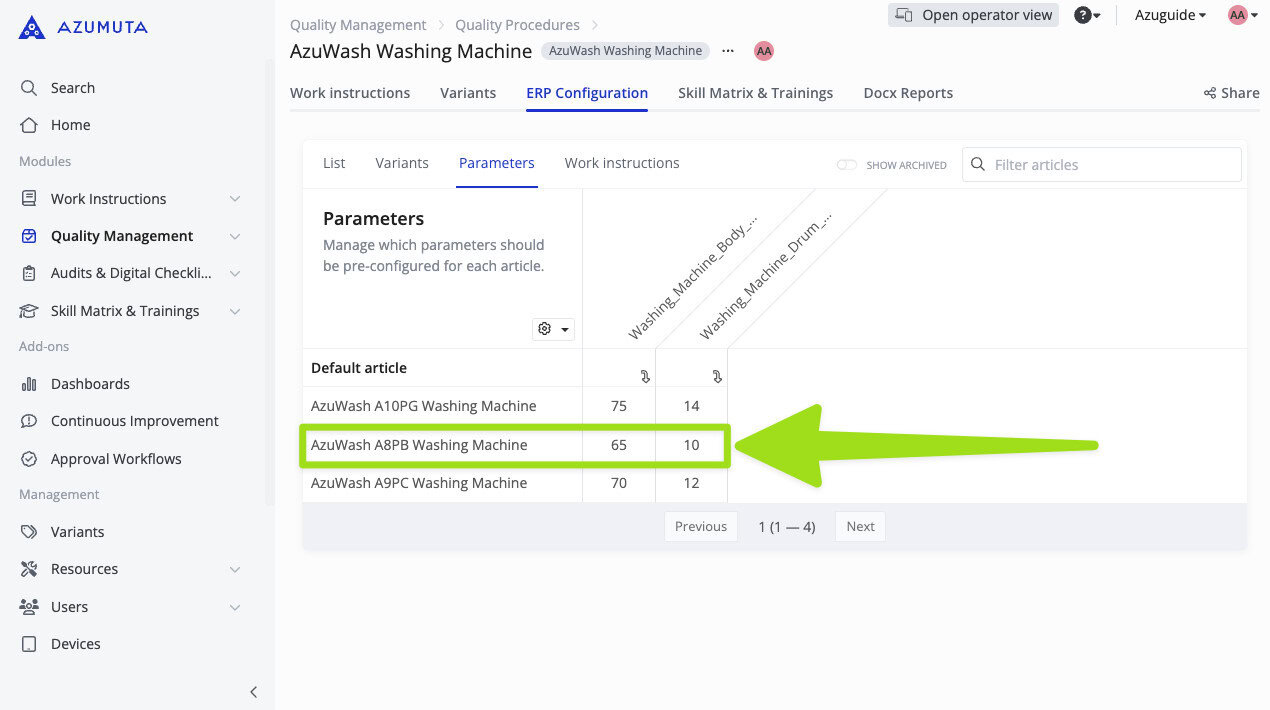
Therefore, the answer to the calculation is “75” (65 +10).

Mathematical Calculation Involving an Operator Input
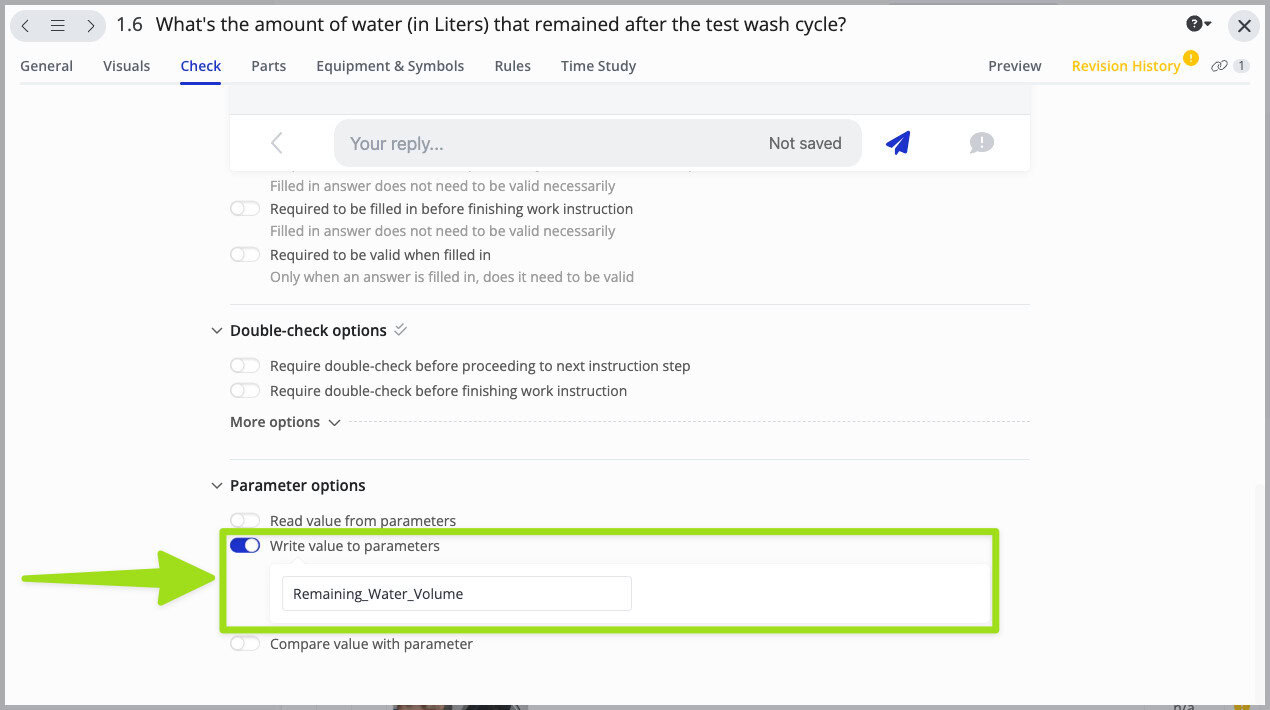
In the previous examples, all of the numbers used in the calculations were provided by the admin. However, you can also use numbers provided by an operator within a calculation, allowing for real-time data entry and dynamic results directly on the shop floor.
Here’s how to set it up:
- Add a number-based check to an instruction step
- Set the “Write value to parameters” toggle to on.
- Type in the parameter key. You can type in a new parameter key, or an existing one. This is the parameter where your operator will input the parameter value of.
- Go to the next instruction step, and write the formula for the calculation. Be sure to include the parameter key that you’ve typed in on step No.3.
- Afterward, inform your operator to input the data on the said instruction step.
- For more details, please check out the example under the video.
Example
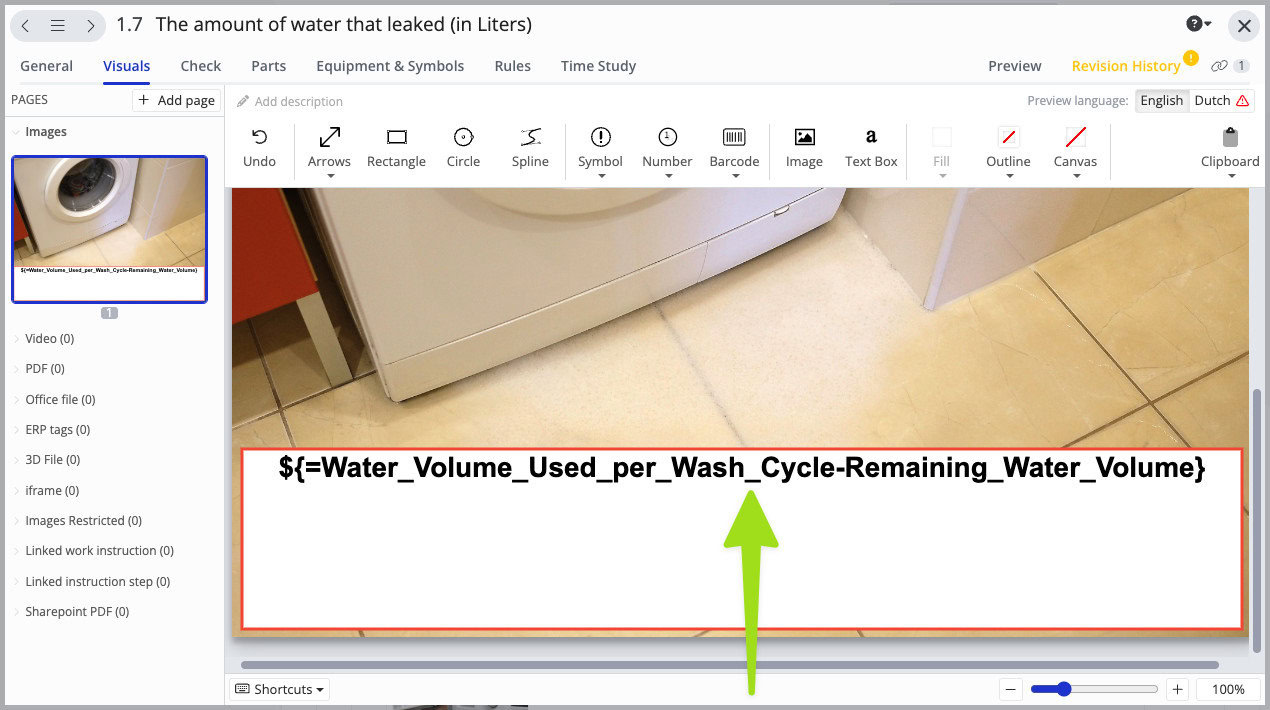
For example, you want to measure the amount of water that leaked from a washing machine during a test wash cycle for an AzuWash A8PB Washing Machine. Thus, you will need to subtract the amount of water that remained after a wash cycle from the total amount of water that was used in a wash cycle.
In this case, the amount of water that a washing machine uses in a wash cycle is already pre-defined as a parameter for the article, as shown below:

Meanwhile, an operator will have to measure the amount of water that remains after the test wash cycle. That’s why we wrote this parameter key on a number-based check (as shown below and demonstrated on step No. 3 in the setup steps above).
And on the next instruction step, we wrote the following formula, which was aimed at subtracting the amount of water that remained after a wash cycle from the total amount of water that was used in a wash cycle (as shown below and demonstrated on step No. 4 in the setup steps above):
- ${=Water_Volume_Used_per_Wash_Cycle-Remaining_Water_Volume}
And let’s say, the operator inputted the parameter value of “38” for the parameter “Remaining_Water_Volume”.
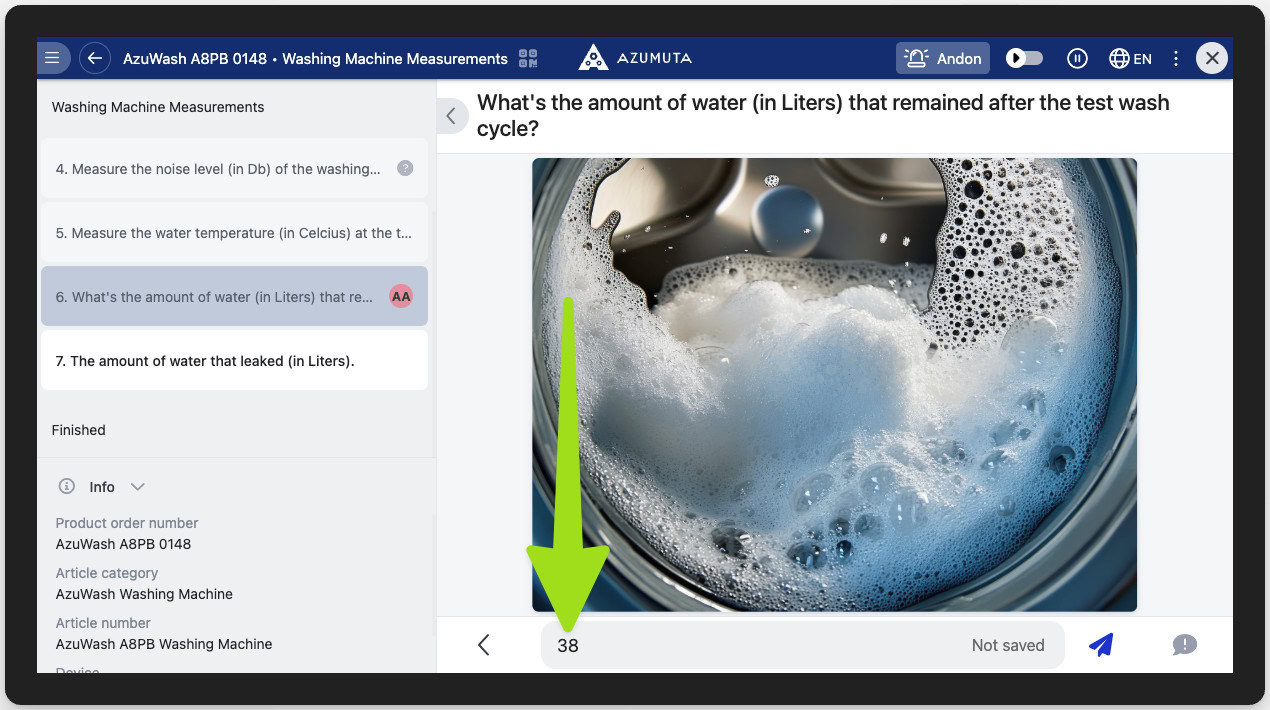
Then our platform will automatically record the value inputted by the operator and calculate the formula that you have set, which led to the final answer of “2” (40-38).
Adding a Unit of Measurement to the Calculation
You can also add a unit of measurement to the calculation formula. To do this, simply type in the unit of measurement after the curly bracket.
Example
In the example below, we’ve added the “Kg” unit of measurement after the curly bracket on the calculation formula:
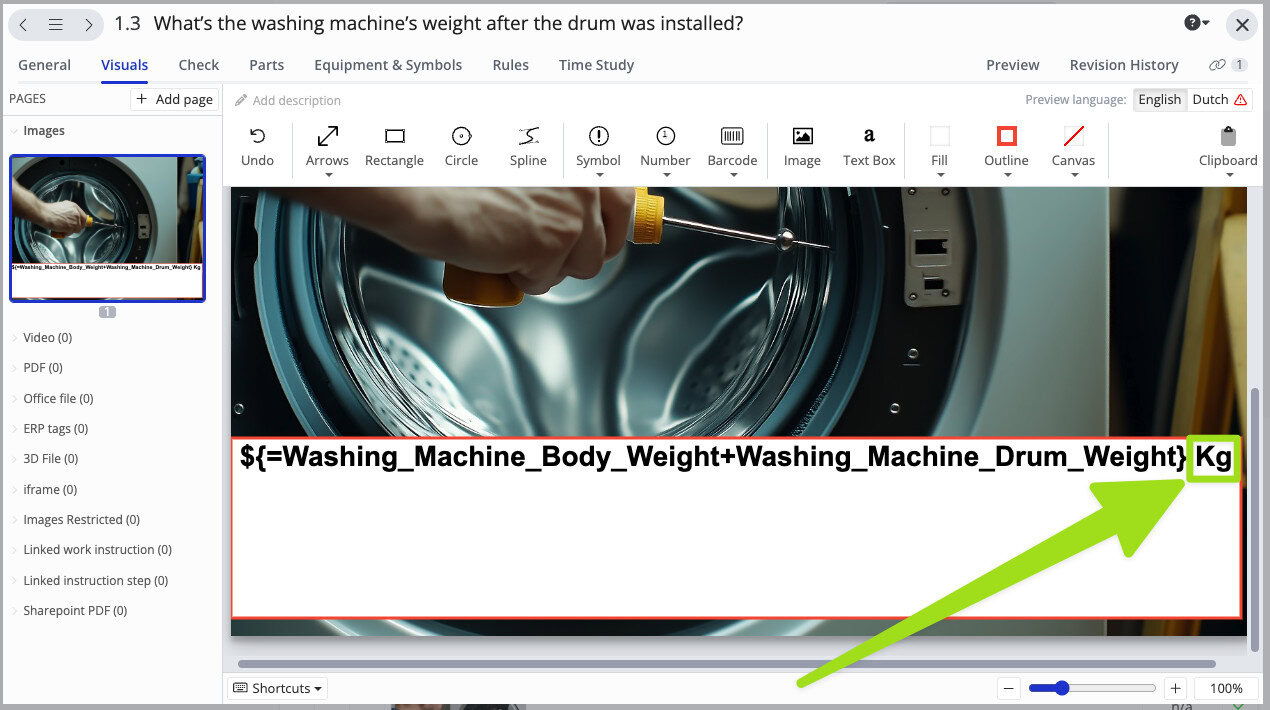
Thus, the “Kg” unit measurement is included in the calculation result, as shown in the image below: