
Visuals in a Work Instruction
Which Visual Elements Exist in Azumuta?
You can add various visual elements to enhance the intuitiveness of your work instructions:

- Arrows (Visual aid)
- Rectangle (Visual aid)
- Circle (Visual aid)
- Spline (Visual aid)
- Symbol (Visual aid)
- Number (Visual aid)
- Barcode (Visual aid)
- Image
- Text Box
- Fill (Modifier)
- Outline (Modifier)
- Canvas (Modifier)
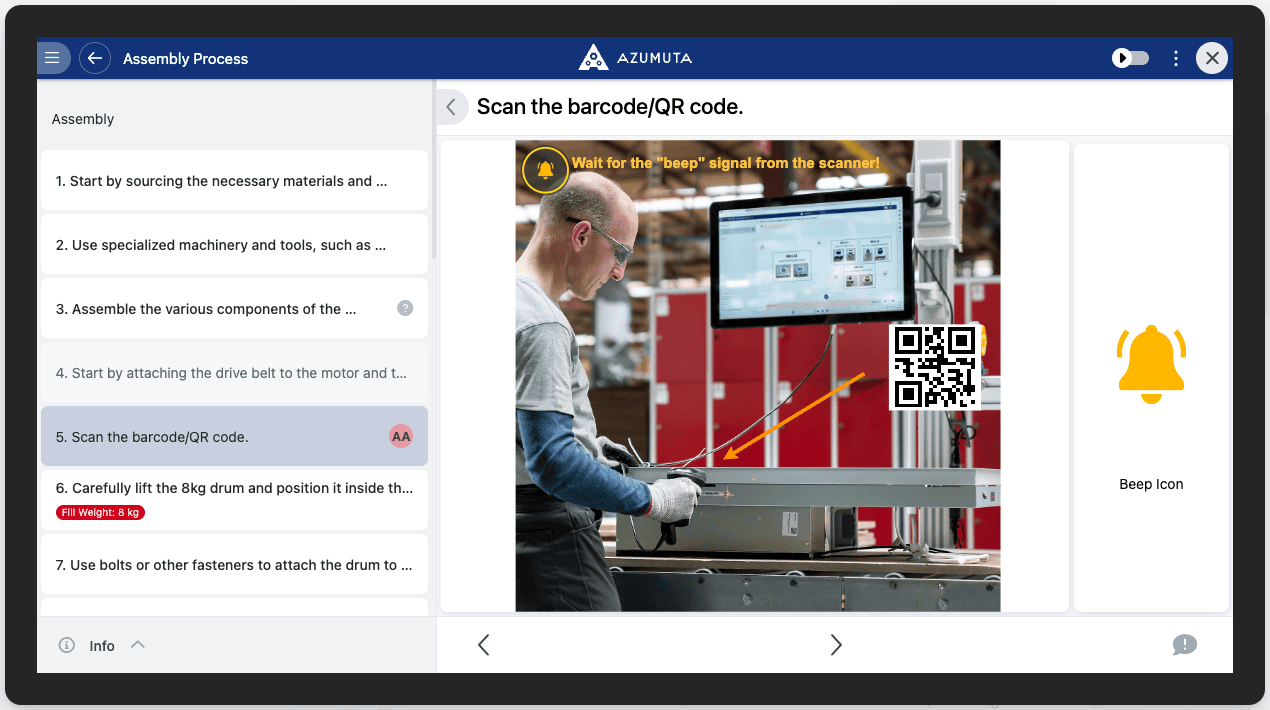
Here’s an example of a work instruction step that uses multiple visual elements, seen from an operator’s screen:
How Do You Get to the Visual Editor?
- Navigate to the work instruction where you would like to open the visual editor.
- Select the work instruction step that you would like to add visual elements to, and click on “Open”.
- Click on the “Visuals” tab.
How to Add a Visual Aid to a Work Instruction
Once you’ve reached the visual editor and have added an image, here’s how you can use the visual elements to enhance your work instruction:
- Click on the desired visual aid.
- Insert it into the work instruction.
- Adjust its size and position as desired.
How to Add a Textbox to a Work Instruction
Here’s how to add text to a work instruction on the visual editor:
- Click on “Text box”.
- Click and drag your mouse where you want to place the text box on the work instruction.
- Double-click on the text box.
- Type in your text. You can also adjust the text size, format, and alignment.
- Adjust the text box’s position and size as desired.
How to Translate Text in a Visual
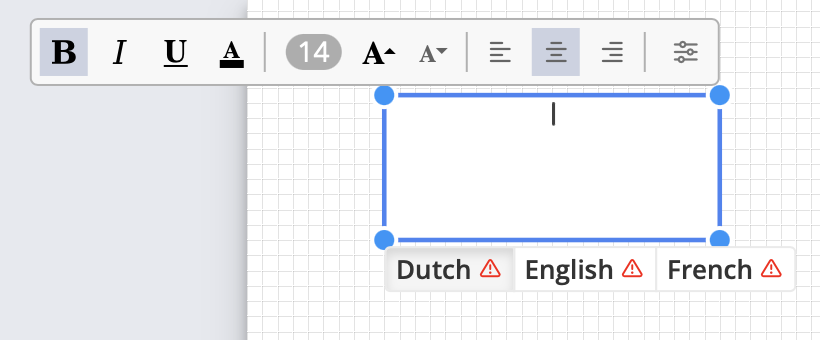
Text boxes on a visual can hold a different version of their content per workspace language, so a single visual stays in sync with multilingual teams. Instead of duplicating the visual for each language, you add the translations to the same text box and Azumuta automatically shows operators the version that matches their interface language.
- Open the Visuals tab of the work instruction step.
- Select the text box you want to translate (or add a new one — see How to Add a Textbox to a Work Instruction above).
- Below the text box, you’ll see a row of language tabs — one tab per language enabled in your workspace (e.g. Dutch, English, French, …).
- Click the language you want to edit and type the translation for that language. A lock icon next to a language indicates that it still uses the original text — once you type a translation, the lock disappears.
- Repeat for each language you need. Click outside the text box (or save the step) when done.
Operators viewing the work instruction will automatically see the text box in their own interface language. Other visual aids — arrows, rectangles, circles, splines, symbols, numbers, barcodes, and images — are shared across all languages and do not require translation.
How to Edit an Image, Visual Aid, or a Textbox
Resizing
- Click on the visual aid, text box, or photo for which you wish to change the format.
- Click on any of the white circle handles on the corners, and drag in or out.
- Click outside of the selected element to finish.
Note: The format of numbers cannot be changed. However, you can choose between a large or small format when inserting a number.
Editing the Shape Fill
- Click on the visual aid or text box for which you wish to change the format.
- Click on “Fill”.
- Select the new color.
Editing the Outline Color
- Click on the visual aid, text box, or photo for which you wish to change the format.
- Click on “Outline”.
- Select the new color.
Note: You can also adjust the width of the shape outline on this menu.
Editing the Background Color of an Image
If the added image is not maximized over the entire white grid, the color of the image background can be selected as follows:
- Click on “Canvas”.
- Select the new color.