
How to Integrate a Digital Torque Wrench to Your Azumuta Workspace
Before we introduce you to the steps of doing so, please ensure that you already have the following items:
- The digital torque wrench that you wish to integrate.
- The digital torque wrench’s controller ( it must be on and remain connected to your computer throughout the integration process).
- A computer (can be a desktop computer/laptop computer) or a Windows tablet that is logged in to your Azumuta workspace. At the moment, you can’t use a non-Windows tablet or a smartphone with a digital torque wrench yet.
If you have all 3 items listed above, then you can start the process of integrating that digital torque wrench into your Azumuta workspace, which consists of 2 phases.
In our guides, we will use the WrenchStar Multi Torque Wrench and the TCI Multi Lineside Controller from Crane Electronics as examples.
Phase 1: Adding the Digital Torque Wrench to Your Azumuta Workspace
The first phase is to add the digital torque wrench to your Azumuta workspace. Here’s how:
- Click on “Peripherals” under “Management”.
- Click on the yellow plus button.
- Type in the new peripheral device’s name.
- Select one of the existing peripheral groups or create a new peripheral group.
- For the Check type, select “Torque”.
- For the Hub plugin, select the one that matches your digital torque wrench type. If you have any doubts, please contact us through our support@azumuta.com email.
- For the fields under “Configuration”, please consult the image under the video.
- If necessary, you can also add additional notes for this digital torque wrench under the “Notes” field. These notes will be displayed on your workspace’s list of peripheral devices.
- Once you’re done, click on “Add”.
Here’s an explanation of the fields under “Configuration”.
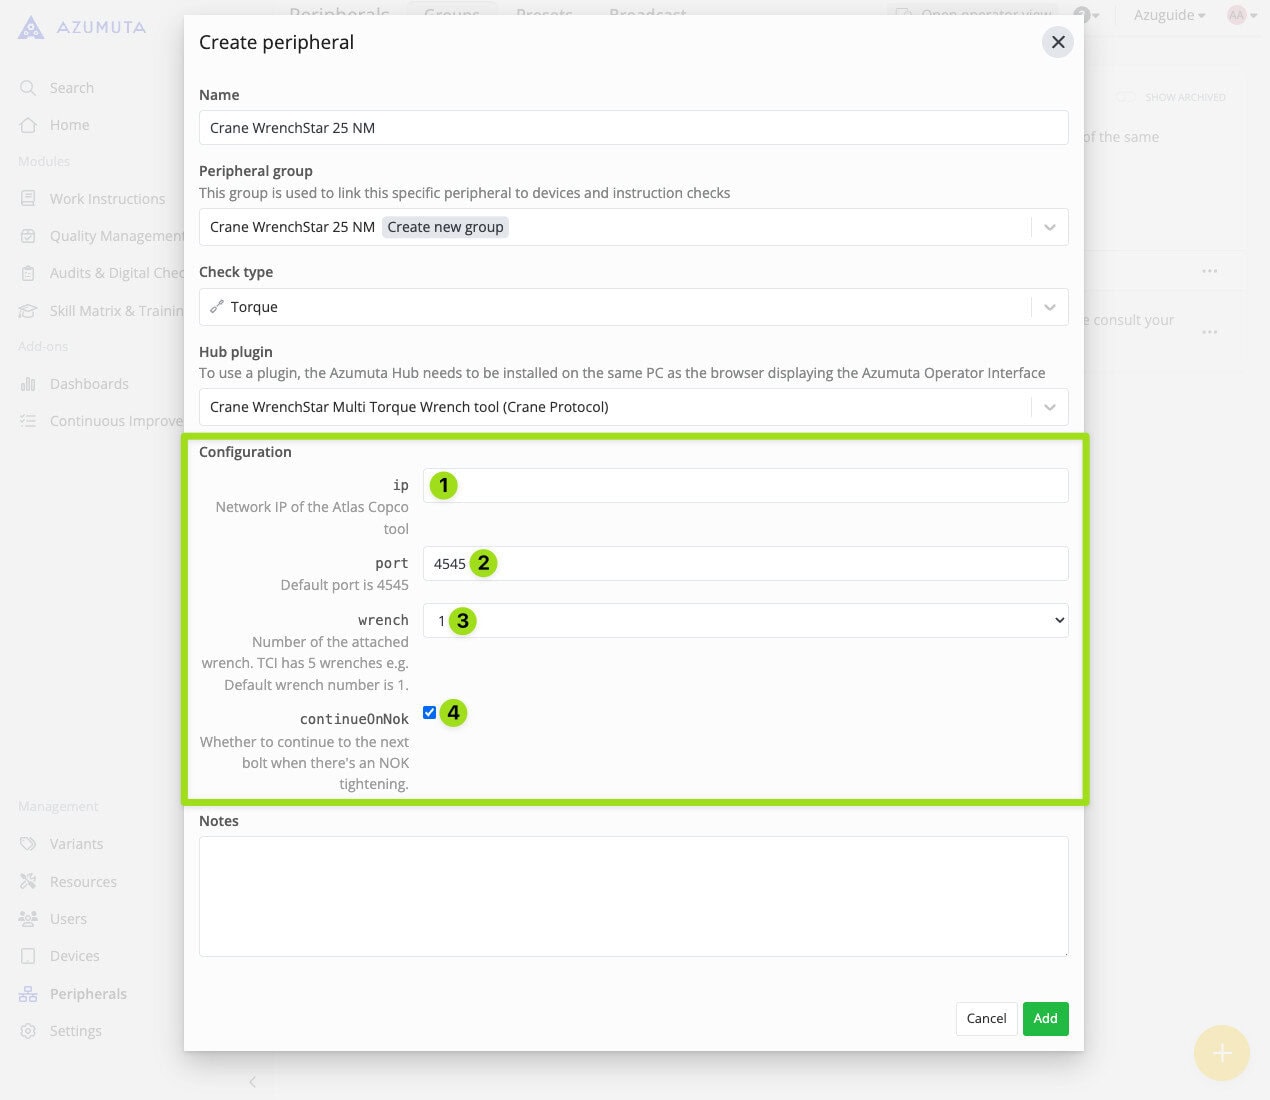
- Type in the IP address of the digital torque wrench controller. Normally, you can find this in the manual book of the digital torque wrench controller. If it’s not listed there, you should ask the manufacturer for this information.
- The port number is automatically generated by the hub plugin. We recommend you to keep it as it is.
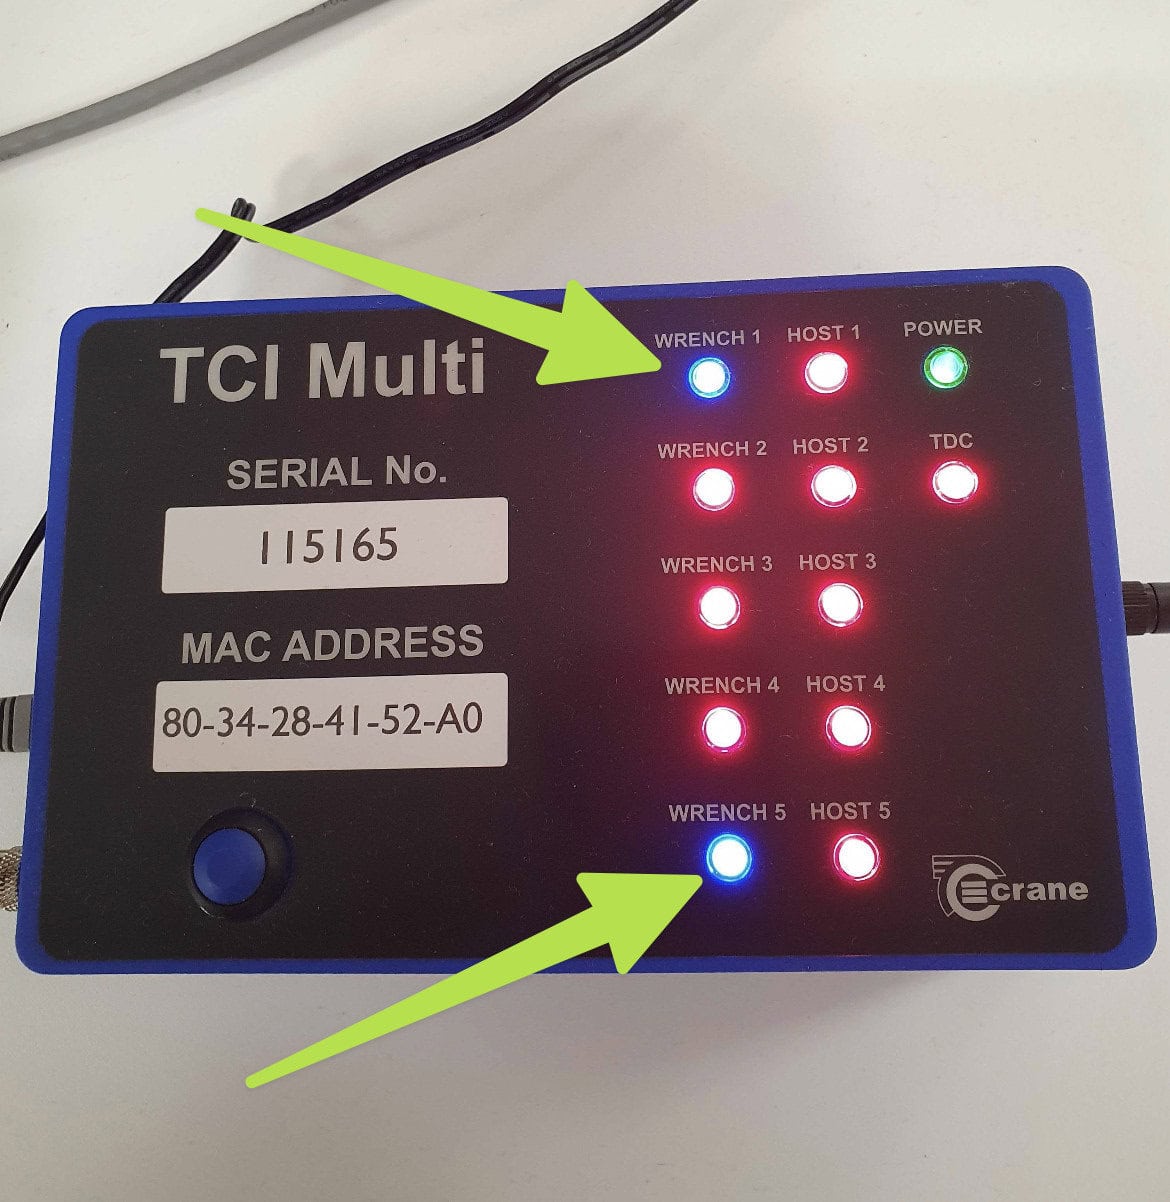
- Select the digital torque wrench that you would like to integrate into your Azumuta workspace. Please ensure that when selecting this option, the digital torque wrench that you would like to integrate is connected to the digital torque wrench controller. For example, in the image of our TCI Multi Lineside Controller below, only digital torque wrenches #1 and #5 are connected to the controller (signified by the blue light). Therefore, we can only choose the numbers “1” or “5” for this option.
- Select whether the operator using this digital torque wrench can proceed to the next instruction step if there’s any torquing task that doesn’t fulfill the pre-set requirements.
Phase 2: Enabling the Digital Torque Wrench on the Selected Device
The second phase is to enable the digital torque wrench on the selected device that will be used by your operators.
- Click on “Devices” under “Management”.
- Click on the three-dot icon next to the device where you would like to enable the digital torque wrench on.
- Click on “Edit device”.
- Click on the “Peripherals” tab.
- Click on the dropdown menu under “Peripherals for instruction checks”.
- Select the digital torque wrench that you would like to enable on this device. You can select multiple digital torque wrenches.
- Once you’re done, click on “Save”.
If you would like to enable this digital torque wrench on multiple devices, then simply repeat this process on each device where you would like to enable this digital torque wrench on.
After you’ve completed both phases, you can start using the integrated digital torque wrench in your workspace. Click on the hyperlinks to learn more about adding a torque check (for admins) and performing a torque check (for operators).
Editing or Deleting a Peripheral Device/Peripheral Group
See how to configure a peripheral group and device to learn how to edit or delete a peripheral device/peripheral group.