
SharePoint PDF
What Is SharePoint PDF in Azumuta?
Microsoft SharePoint is a widely used collaboration platform that enables organizations to manage and share documents. It allows your team members to upload, edit, and access documents at any moment – from any device.
As a versatile software, Azumuta has a wide range of integration possibilities – including with SharePoint.
This integration allows various capabilities – including the ability to display a PDF file from your SharePoint platform into an instruction step.
This feature is highly beneficial because any changes made to the PDF file on SharePoint will be automatically applied to the PDF file on Azumuta. That way, you don’t need to manually update the PDF file on Azumuta every time the original PDF file on SharePoint is amended.
This advantage will save you plenty of time, especially if you have a large number of PDF files on SharePoint and you would like to display them in your instruction steps.
Note: At the moment, an instruction step can only process PDF files. However, we're currently expanding this feature, so that you will be able to display other file types from SharePoint as well in the future.
How to Add a SharePoint PDF to an Instruction Step
After you’ve finished setting-up the SharePoint integration into your workspace, you can then start adding SharePoint PDF pages to your instruction steps. Here’s how to add one:
- Navigate to an instruction step where you would like to add a SharePoint PDF into, and open it.
- Click on the “Visuals” tab.
- Click on “Add page”.
- Select “Sharepoint PDF”.
- Click on “Select file”.
- Click on the file that you would like to add to the instruction step.
- Click on “Select”.
Viewing a SharePoint PDF as an Operator
A SharePoint PDF file is meant to be viewed by an operator. Here’s how an operator can view it:
- Navigate to the instruction step that contains a SharePoint PDF.
- Wait until the SharePoint PDF has finished loading.
- Click on the SharePoint PDF.
- Afterward, a PDF viewer will pop up. You can navigate between pages by scrolling up/down. Additionally, you can also adjust the PDF viewer’s zoom level.
How to Edit a SharePoint PDF on an Instruction Step
- Navigate to an instruction step with a SharePoint PDF, and open it.
- Click on the “Visuals” tab.
- Click on the SharePoint PDF that you would like to edit.
- Perform the desired edits. Under the video below, we provided a visual instruction that displays all of the edits that you can perform to a SharePoint PDF on an instruction step.
Here are the editing possibilities that you can do to a SharePoint PDF on an instruction step:
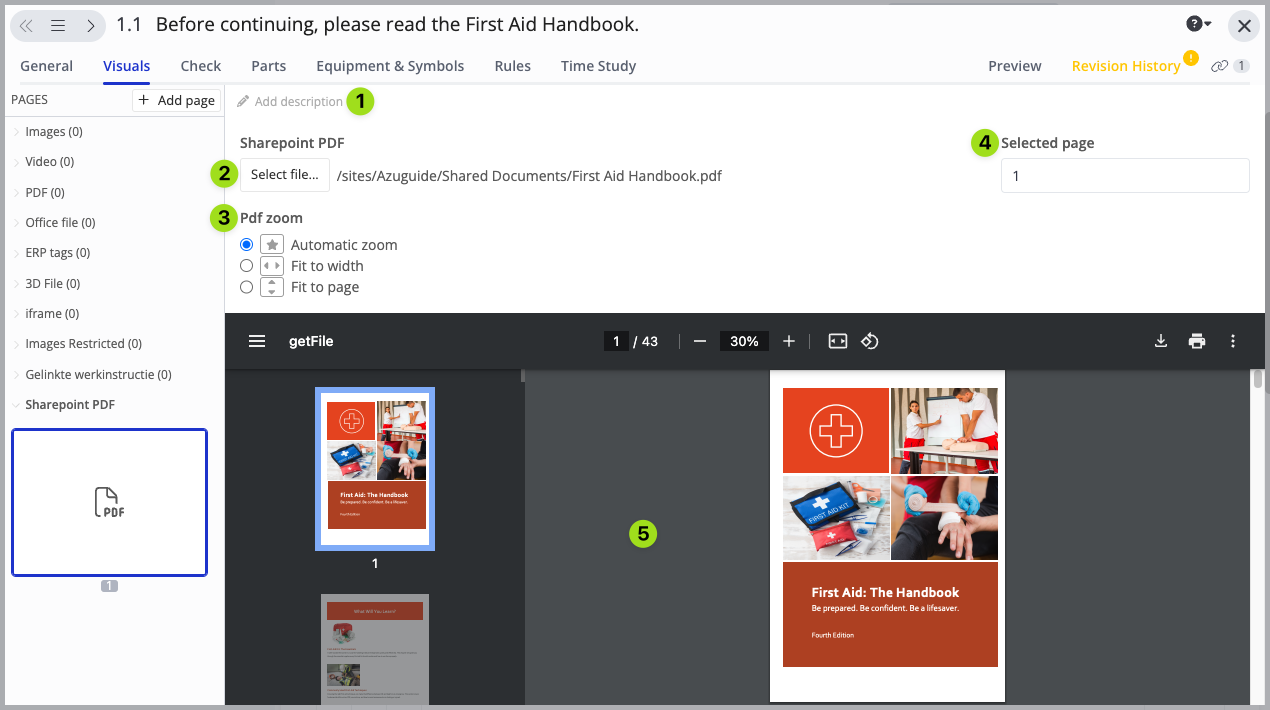
- You can add a description of the PDF file here. This description will appear on the operator’s view.
- Click to change the PDF file that is displayed in this instruction step.
- Select the zoom level of the PDF file. This setting will be applied to the operator’s view as well.
- Select the default opening page for the PDF file. This setting will be applied to the operator’s view as well.
- This is a preview of how the PDF file will be displayed on the operator’s view.
How to Delete a SharePoint PDF from an Instruction Step
- Navigate to an instruction step with a SharePoint PDF, and open it.
- Click on the “Visuals” tab.
- Right-click the SharePoint PDF that you would like to delete.
- Click on “Delete page”.
- Click on “Remove”.
How to Set up the SharePoint Integration to Your Workspace
Before you can add a SharePoint PDF file to an instruction step, you will first need to set up the SharePoint integration in your workspace. You will need to do this set-up once for every SharePoint site that you have.
Should you encounter any issues during the set-up process or if you have any questions, please contact us through our support@azumuta.com email.
The set-up process itself consists of 3 phases. We will explain each phase below:
Phase 1: Create an “App” in Your SharePoint
The first phase is to create an “app” in your SharePoint. Here’s how to do it:
- Go to the following link and register a new “app” there:
https://{tenant}.sharepoint.com/sites/{site}/_layouts/15/appregnew.aspx- Replace “{tenant}” with your organization’s Microsoft tenant name, and replace “{site}” with your organization’s SharePoint site name. If you have any questions, please contact us through our support@azumuta.com email.
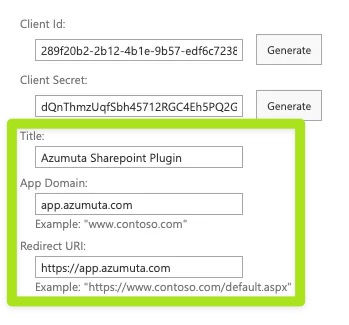
- Generate the
Client Idand theClient Secret - Copy the
Client Idand theClient Secretand paste them into a safe location. You will need to use both credentials again in the next phases. - We also recommend you to fill in the following fields, in the format shown below:
- Title: Azumuta Sharepoint Plugin
- App Domain: {domain}.azumuta.com
- Redirect URI: https://{domain}.azumuta.com
- Replace “{domain}” with your workspace’s domain name. If your workspace has a custom domain name, then replace “{domain}” with your workspace’s domain name. However, if your workspace doesn’t have a custom domain name, then replace “{domain}” with “app”. If you have any doubts, please contact us through our support@azumuta.com email.
- For more details, please refer to the screenshot below:
Phase 2: Grant Permission to the New “App”
In the second phase, you will need to grant permission to the “app” that you’ve created in phase 1. These are the required steps:
- Go to
https://{tenant}.sharepoint.com/sites/{site}/_layouts/15/appinv.aspx- Replace “{tenant}” with your organization’s Microsoft tenant name, and replace “{site}” with your organization’s SharePoint site name. If you have any questions, please contact us through our support@azumuta.com email.
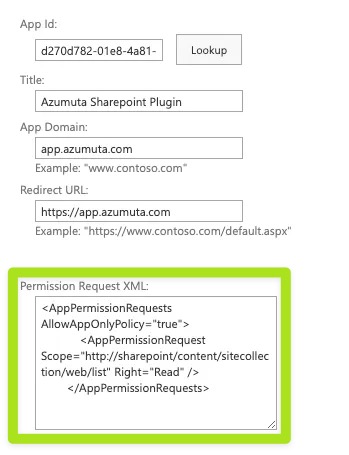
- Fill in the
Client Id - Click on “Lookup”.
- On the “Permission Request XML” field, fill in the following code:
<AppPermissionRequests AllowAppOnlyPolicy="true"> <AppPermissionRequest Scope="http://sharepoint/content/sitecollection/web/list" Right="Read" /> </AppPermissionRequests>
For more details, please refer to the screenshot below:
Phase 3: Contact Azumuta
After you’ve completed both phases above, you will need to contact us through our support@azumuta.com email.
In this email, please mention your Client Id and Client Secret (which you’ve obtained from phase 1).
Afterward, we will enable the SharePoint PDF visual page type on your workspace. We will inform you once it has been done.
Note: Your Client Id and Client Secret are two highly sensitive credentials. Please keep them secure and avoid sharing them with unauthorized individuals.