Previously, we’ve elaborated on how to create an approval flow. Now, we will explain how to edit it or delete it.
Note: Currently, there are 2 templates for approval boards and approval flows: single-wave approval and dual-wave approval. Both templates share the same editing settings. In this guide webpage, we will use the dual-wave approval template in our examples. Click here to learn more about both templates.
How to Get to the Approval Flow Editor #
Here’s how you can access the approval flow editor:
- Click on “Continous Improvement” in the side panel.
- Click on “Settings”.
- Click on the three-dot icon next to the approval flow that you would like to edit.
- Click on “Edit flow”.
There, you will see 5 editor tabs: the General, Flow Template, Advanced, Docx Reports, and Parameters tabs. Simply click on a tab to open it. We will cover each tab further in the guide sections below.

The General Tab #
The General tab is the first tab that will appear whenever you open the approval flow editor. Here’s what you can edit on this tab:

- Click to open the General tab.
- You can edit the approval flow’s name here.
- Select whether the user who submits an approval request is automatically subscribed to that approval request. If that person is subscribed, then that person will receive an email notification whenever that approval request changes columns.
- Insert the maximum number of days granted to approve an approval request that is listed on this approval flow (if needed).
- Insert the problem template (if needed). A problem template is a text that will appear on a work instruction’s approval menu (as shown in the image below). A problem template is generally used to give a certain message to users who create or update work instructions.

- Insert a checklist (if needed). A checklist in an approval request works the same way a checklist in a ticket. Please click here to learn more about checklists.
- When you’re done editing, click on “Save”. However, if you would like to proceed without saving the changes that you’ve made, click on “Cancel”.
The Flow Template Tab #
This is where the word “flow” in “approval flow” is derived from. An approval flow consists of several columns. A column represents an action phase that needs to be taken in order to approve a work instruction.

The existing columns will vary depending on the approvement flow template that you’re using. For example, within the dual-wave approval template there are 4 columns, which are:
- First Wave
- Second Wave
- Approved
- Declined
Click here to see how you can edit each column’s name.

You can add multiple items for each column. We will explain how to add an item and how to edit it in the next guide sections.
How to Add an Item to a Column #
You can add various items to an approval flow column. Here’s how to add one:
- Click on “Add Item” in the targeted column.
- Select the desired item.
- Input the necessary details.
- When you’re done, click on “Save”.
Here are the available item options for each column:
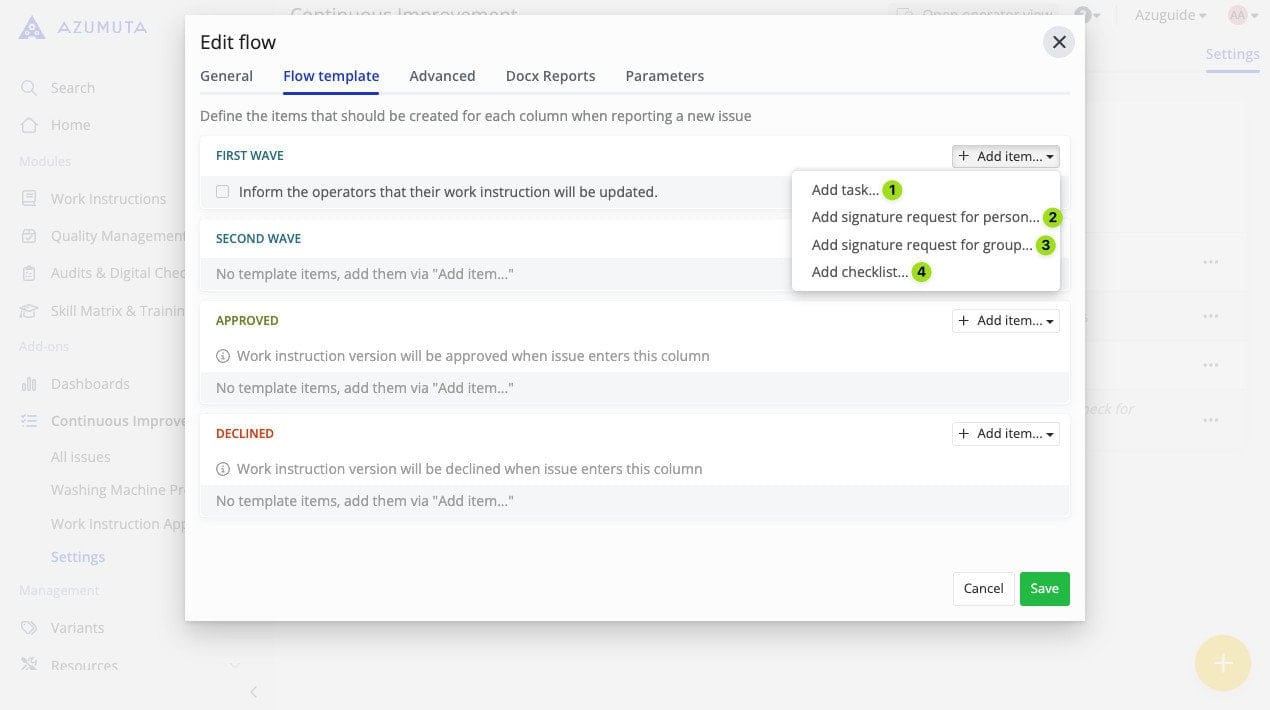
- Click to add a task (you can type the task’s description directly. If the item doesn’t involve asking for a signature or filling a checklist, then we recommend you to choose this item type).
- Click to add a signature request for a specific person. (A signature is given to signify approval that an operator has completed all the required items within a column and is ready to move to the next column. Usually, a signature is asked from a supervisor or a manager).
- Click to add a signature request to a user group.
- Click to add a checklist (a checklist in an approval request works the same way a checklist in a ticket).
How to Edit an Item in a Column #
In order to edit an item in a column, simply do the following:
- Click on the three-dot icon next to the item that you would like to edit.
- Do the desired edits.
- When you’re done, click on “Save”.
The configuration options differ slightly based on the item type. Here are the item configuration items based on each type:
Editing a Task #

- Edit the task’s description here.
- Click to assign the task to yourself.
- Click to assign the task to a specific person.
- Click to assign the task to a specific user group.
- Click to remove the assigned person/user group (this can only be done if there’s already a person/user group that has been assigned).
- Select whether you want the assigned person/user group to receive an automated email from Azumuta that informs them when an approval request eaches this column.
- Select whether the person/user group that completes this task will be subscribed to the linked approval request. If someone is subscribed to an approval request, then that person will receive an automated email notification whenever that approval request changes status.
- Click to add a condition. With this feature, the task will be automatically created if the approval request involves updating instruction step(s) that contains one of the selected symbols.
- Click to remove the task.
- When you’re done editing, click on “Save”. However, if you would like to proceed without saving the changes that you’ve made, click on “Cancel”. (This option will appear once you’ve finished editing).
Editing a Signature Request to a Person/to a User Group #

- If you choose this option, then you’re the only person authorized to sign this signature request.
- Select the person who’s authorized to sign this signature request
- Select the user group that’s authorized to sign this signature request.
- Select whether you want the assigned person/user group to receive an automated email from Azumuta that informs them when an approval request reaches this column.
- Select whether the person/user group that gave a signature to be subscribed to the linked approval request. If someone is subscribed to an approval request, then that person will receive an automated email notification whenever that approval request changes status.
- Click to add a condition. With this feature, the signature request will be automatically created if the approval request involves updating instruction step(s) that contains one of the selected symbols.
- Click to remove the signature request.
- When you’re done editing, click on “Save”. However, if you would like to proceed without saving the changes that you’ve made, click on “Cancel”.
Editing a Checklist #

- Click to view the checklist work instruction. A checklist in an approval request works the same way a checklist in a ticket. Click here to learn more about checklists.
- Click to assign the checklist to yourself.
- Click to assign a specific person to fill out the checklist.
- Click to assign a user group to fill out the checklist.
- Click to remove the assigned person/user group (this can only be done if there’s already a person/user group that has been assigned).
- Select whether you want the assigned person/user group to receive an automated email from Azumuta that informs them when an approval request reaches this column.
- Select whether the person/user group that fills out the checklist will be subscribed to the linked approval request. If someone is subscribed to an approval request, then that person will receive an automated email notification whenever that approval request changes status.
- Click to add a condition. With this feature, the checklist will be automatically added if the approval request involves updating instruction step(s) that contain one of the selected symbols.
- Click to remove the checklist.
- When you’re done editing, click on “Save”. However, if you would like to proceed without saving the changes that you’ve made, click on “Cancel”. (This option will appear once you’ve finished editing).
The Advanced Tab #
Previously, we’ve explained about columns on an approval flow. Now, we will show you how to use these columns in a coordinated way.
The Advanced tab consists of 2 elements: columns and transitions. In the Advanced tab, a column represents an action phase that needs to be taken in order to approve a work instruction (just like in the Flow Template tab).
The column names will vary depending on the approval flow template that you’re using. For example, within the dual-wave approval template, there are 4 columns, which are:
- First Wave
- Second Wave
- Approved
- Declined
Meanwhile, a transition functions as a bridge between columns. A transition leads an item to another column, based on a pre-configured scenario.
The image below shows the distinction between a column and a transition.

- Click to open the Advanced tab.
- This is a column.
- This is the list of transitions for this column.
How to Add an Item to a Column #
You can add various items to an approval flow column. Here’s how to add one:
- Click on “Add Item” in the targeted column.
- Select the desired item.
- Input the necessary details.
- When you’re done, click on “Save”.
Note: If you added an item on the Flow Template tab, then that item will also appear in the same column on the Advanced tab. And conversely, if you added an item on the Advanced tab, then it will also appear on the same column on the Flow Template tab.
Here are the available item options for each column:

- Click to add a task (you can type the task’s description directly. If the item doesn’t involve asking for a signature or filling out a checklist, then we recommend you to choose this item type).
- Click to add a signature request for a specific person (a signature is given to signify approval that an operator has completed all the required items within a column and is ready to move to the next column. Usually, a signature is asked from a supervisor or a manager).
- Click to add a signature request to a user group.
- Click to add a checklist. A checklist in an approval request works the same way a checklist in a ticket. Please click here to learn more about checklists.
How to Edit an Item in a Column #
Editing an item on a column in this tab works the same way as in the Flow Template Tab. Check out the links below to see how you can edit an item on a column based on the item type:
- How to Edit a Task
- How to Edit a Signature Request to a Person/to a User Group
- How to Edit a Checklist
Note: If you edited an item on the Flow Template tab, then that item will also be automatically updated on the Advanced tab. And conversely, if you edited an item on the Advanced tab, then the same item will also be automatically updated on the Flow Template tab.
How to Add a Transition #
- Click on “Add transition” on the targeted column.
- Select one of the available options on the “When” dropdown menu.
- Select one of the available options on the “Then move to” dropdown menu.
- When you’re done, click on “Save”.
The “When” and “Then Move to” dropdown menus have a cause-and-effect relationship.
Whenever the event in the “When” dropdown menu happens, then it will cause the event in the “Then Move to” dropdown menu to occur.
How to Edit a Transition #

- To add an additional transition to this column, click on “Add transition”.
- Click to change the content on the “When” dropdown menu.
- Click to change the content on the “Then move to” dropdown menu.
- In Azumuta, all approval requests will automatically proceed to the next column if there are no outstanding items remaining (be it because all items in this column have been completed or no items were added to this column in the first place). If you want to prevent an approval flow from automatically proceeding to the next column because no items were added to this column, then tick this option.
- When you’re done editing, click on “Save”. However, if you would like to proceed without saving the changes that you’ve made, click on “Cancel”.
The Docx Reports Tab #
You can add Docx reports to an approval flow. Learn more about it here (it works the same way as docx reporting for tickets).
The Parameters Tab #
You can add parameters to an approval flow. These parameters will be listed on all approval requests that fall under this approval flow’s umbrella, as well as on all checklists that are linked to those approval flows.
How to Add a Parameter to an Approval Flow #
- Click on “Add field”.
- Type in the parameter’s “Key” and “Value”.
- When you’re done, click on “Save”
How to Edit a Parameter on an Approval Flow #
- Do the desired edits. You can do it on the parameter’s “Key” and/or “Value”.
- When you’re done, click on “Save”.
How to Delete a Parameter on an Approval Flow #
- Click on the parameter that you would like to delete.
- Click on the trash can icon.
- When you’re done, click on “Save”.
How to Delete an Approval Flow #
- Click on “Continous Improvement” in the side panel.
- Click on “Settings”.
- Click on the three-dot icon next to the approval flow that you would like to delete.
- Click on “Delete flow”.
- Click on “Delete”.